
Profile Perfect Level 247 Answer
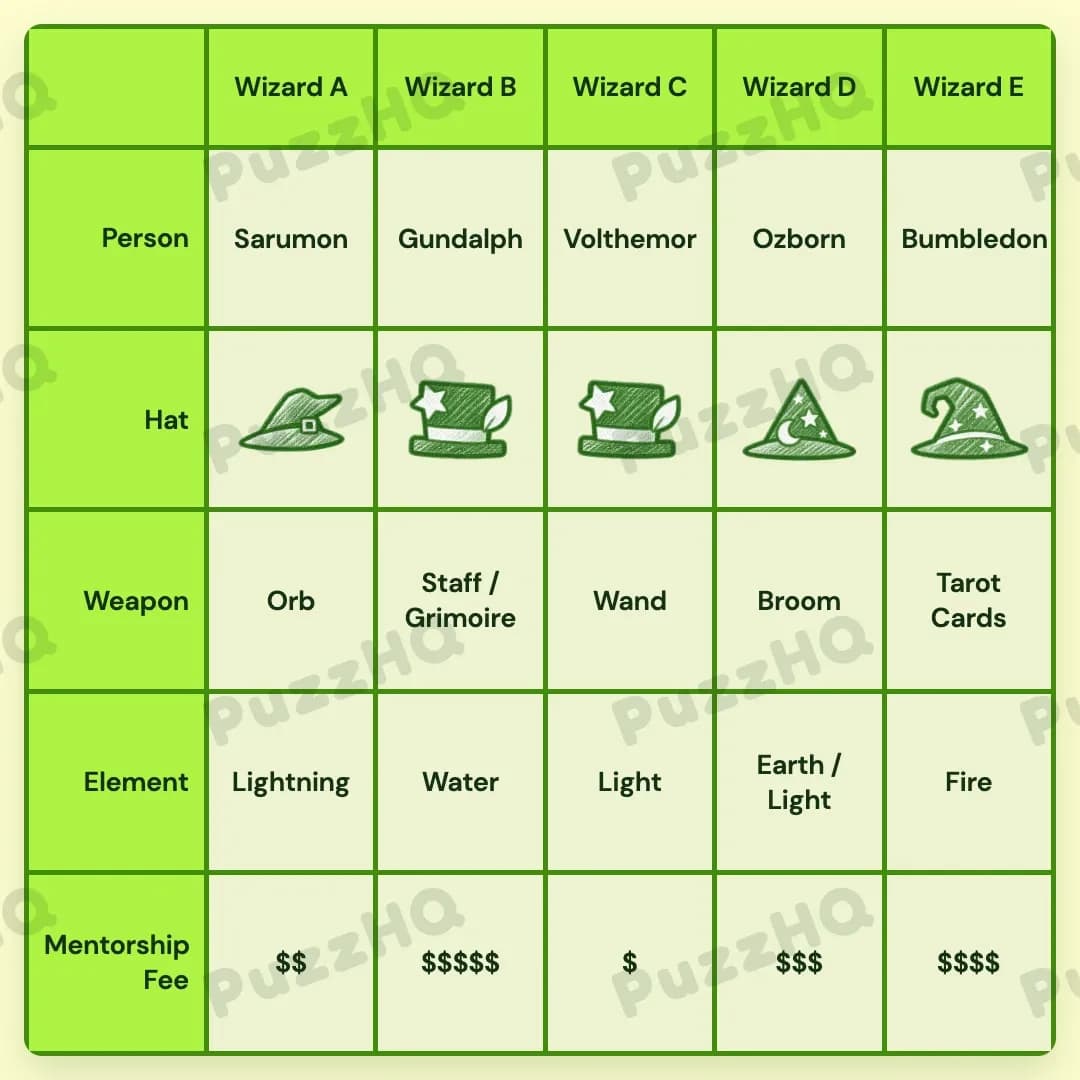
Every wizard across the lineup can be definitively identified by tracking how their mentorship fees, signature weapons, elemental affinities, and visual hat styles link together.
| Trait | Wizard A | Wizard B | Wizard C | Wizard D | Wizard E |
|---|---|---|---|---|---|
| Person | Sarumon | Gundalph | Volthemor | Ozborn | Bumbledon |
| Hat | Row1Col2 | Row1Col4 | Row1Col4 | Row3Col3 | Row3Col4 |
| Weapon | Orb | Staff / Grimoire | Wand | Broom | Tarot Cards |
| Element | Lightning | Water | Light | Earth / Light | Fire |
| Mentorship Fee | $$ | $$$$$ | $ | $$$ | $$$$ |
Building The Grid By Trait
The clearest path through this puzzle starts by pinning down the mentorship fees and wizard identities along the row. Once the positions and fee structure are anchored, the equipment and spellcraft fall neatly into place.
Person And Mentorship Fee Establish The Core Lineup
The fee structure provides strong structural clues about wizard placements from left to right. We learn that a wizard whose fee is the second lowest sits directly to the left of the wizard charging the highest fee. This directly matches the pairing of two dollar signs next to five dollar signs. Placing this pair at Wizard A and Wizard B immediately sets the foundation. Furthermore, we know the biggest price gap occurs between two neighbors. Wizard B charges the maximum of five dollar signs, so placing the lowest fee of one single dollar sign at Wizard C creates the maximum drop of four full tiers between adjacent columns.
With the second highest fee of four dollar signs assigned to the fifth position at Wizard E, the remaining fee of three dollar signs naturally belongs to Wizard D.
Connecting identities to these seats relies on relative neighbor counts and direct names. Ozborn has more neighbors than Sarumon, which means Sarumon must occupy an end seat at Wizard A, while Ozborn occupies the more central seat at Wizard D. Gundalph, known as Gundalph the Blue, takes Wizard B. Volthemor takes the third seat at Wizard C, and Bumbledon completes the roster at Wizard E.
Weapon Assignments Match Wizard Profiles
With the people and fees established, the weapons row provides distinct equipment signatures for each caster. We are told that the wizard wielding multiple weapons holds a staff in one hand. Looking at the equipment possibilities, this identifies Wizard B as the dual wielder possessing both the Staff and the Grimoire.
Volthemor is described as carrying a thin and small weapon that is easy to bring around, which accurately describes the classic Wand at Wizard C. Meanwhile, a pointy hat wizard defeated a witch and took her vehicle, identifying the Broom as the stolen mount belonging to Wizard D.
The user of Tarot Cards is noted for wearing a hat with a swirly tip, placing the cards with Wizard E. This leaves the crystal Orb as the sole remaining focus for Sarumon at Wizard A.
Element And Hat Details Complete The Magical Roster
The elemental row fills out rapidly by cross referencing the established identities and weapon choices. Gundalph the Blue is named specifically after his mastered element, giving Wizard B the Water affinity. We also know that either Sarumon or Ozborn can summon a storm. Because storm magic is tied to Lightning and Sarumon is an elemental specialist, Sarumon at Wizard A claims Lightning.
Two wizards possess the power to cast the lumière spell, which corresponds to the Light element. Wizard C masters pure Light, while Ozborn at Wizard D commands a combination of Earth and Light. Wizard E takes the Fire element.
The visual hat designs complete the remaining details. Wizard B and Wizard C share matching headwear from Row1Col4. Wizard A wears the style from Row1Col2. Wizard D wears the pointed hat from Row3Col3 that matched the stolen broom lore, and Wizard E sports the swirly tipped hat from Row3Col4 that pairs with the Tarot Cards.
Where The Trait Rows Intersect
Storm Callers And Boundary Placements
The clue stating that either Sarumon or Ozborn summons a storm directly links identity, position, and element. Because Ozborn holds more neighbors than Sarumon, Sarumon must sit on the outer edge at Wizard A. Once Sarumon is fixed at the boundary, his affinity for storm summoning locks in the Lightning element for Wizard A, freeing Ozborn at Wizard D to focus on the dual Earth and Light forces.
Witch Vehicles And Pointed Headwear
A strong multi trait link occurs when connecting the stolen witch vehicle to headwear. The wizard who took the witch's vehicle wields the Broom. This clue also tells us that this specific individual wears a pointy hat. By tracking the Broom to Ozborn at Wizard D, we instantly resolve his hat style as Row3Col3, satisfying both his physical accessory trait and his signature tool at the same moment.
Matching Hats And Elemental Restrictions
Another crucial intersection occurs between the Hat and Element rows. We learn that wizards wearing matching hats do not control the Fire element, and that the Orb user avoids matching hats as well. Because Wizard B and Wizard C both wear the Row1Col4 style, neither can wield Fire or the Orb. This rule neatly pushes the Orb to Sarumon at Wizard A and pushes the Fire element all the way over to Bumbledon at Wizard E.
Final Grid Check
Reviewing the solved board confirms that all trait rows align harmoniously. Every wizard occupies a distinct fee tier with valid neighboring gaps, while their equipment, magical affinities, and hat styles fully satisfy every cross category condition without any contradiction.
Comments