
Profile Perfect Level 34 Answer
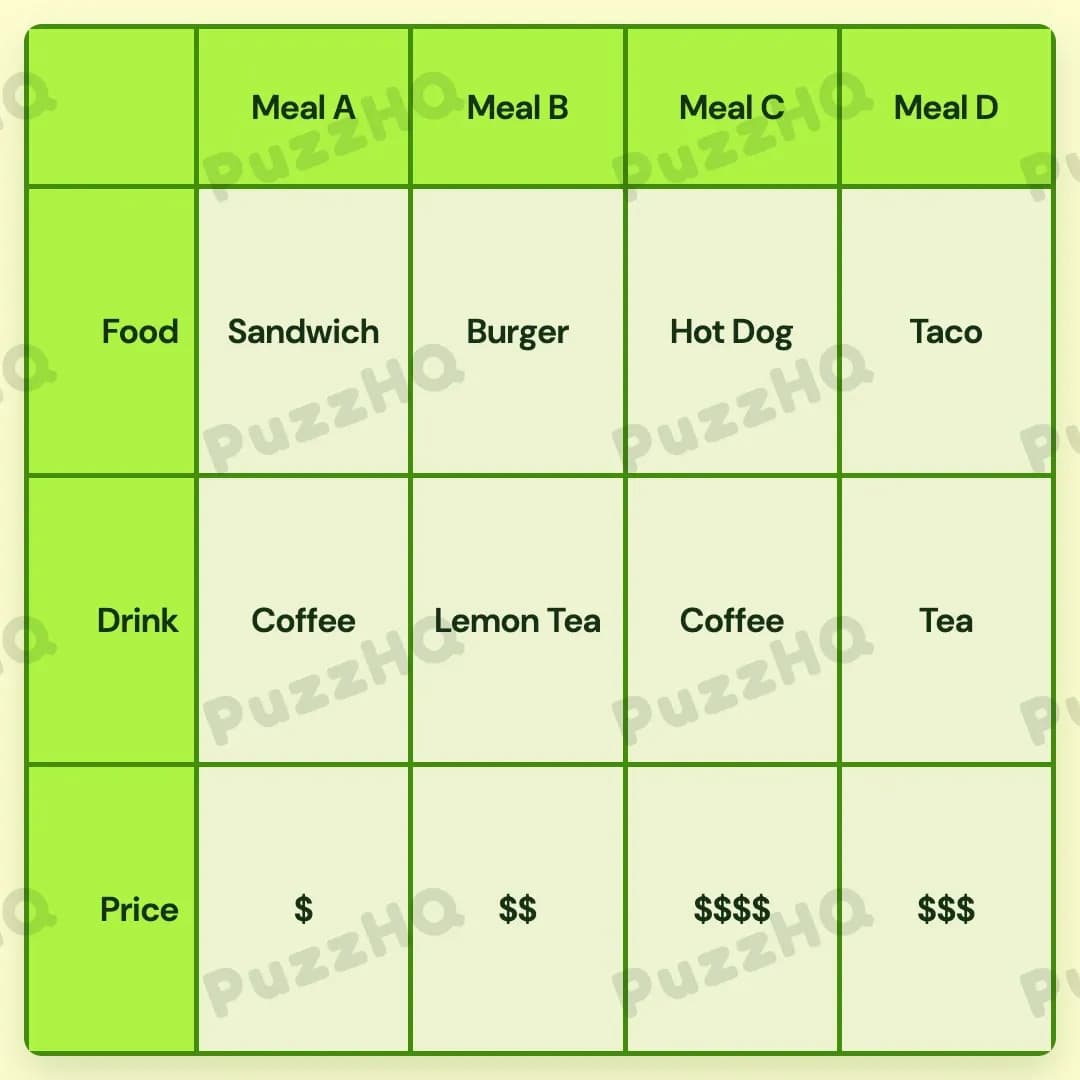
Here is the complete solution for each meal's food, drink, and price tier in this puzzle.
| Trait | Meal A | Meal B | Meal C | Meal D |
|---|---|---|---|---|
| Food | Sandwich | Burger | Hot Dog | Taco |
| Drink | Coffee | Lemon Tea | Coffee | Tea |
| Price | $ | $$ | $$$$ | $$$ |
How I Solved Profile Perfect Level 34
When looking at the clues across the four meals, the pricing structure and the drink pairings immediately stood out as the cleanest entry points. With prices ranging across four distinct tiers from single dollar sign to four dollar signs, several clues placed tight restrictions on which meals could take specific drinks and price values. Tracking down how Coffee connected to the extreme price tiers while anchoring adjacent foods allowed the board to unravel smoothly from left to right.
Pinning Down Meal B's Price and the Coffee Rule
The first thing I noticed was clue 2, which states that Meal B is cheap but not the cheapest. Looking at our four price values of $, $$, $$$, and $$$$, the cheapest possible tier is $. Being cheap without being the absolute cheapest placed Meal B squarely at $$.
Right after locking in Meal B's price, clue 5 became much more interesting. It mentions that both the cheapest meal ($) and the priciest meal ($$$$) are paired with Coffee. Because Meal B has a price of $$, it cannot be either the cheapest or the priciest meal, meaning Meal B cannot have Coffee.
This immediately narrowed where Coffee could go. Coffee had to belong to exactly two meals among Meal A, Meal C, and Meal D, and those two specific meals had to hold the $ and $$$$ price tags.
Placing the Burger and Fixing Meal A
From there, I turned to clue 4, which notes that a meal with Coffee has Burger on its right.
In a linear four column setup from Meal A through Meal D, having a food item on the right requires an adjacent pair. Since Meal B was already ruled out from having Coffee, Meal B could not be the left side of such a pair. That left Meal A or Meal C as candidates to hold Coffee with a Burger to their right.
If Meal A had Coffee, then the meal directly on its right, Meal B, would have to be Burger. If Meal C had Coffee, Meal D would have to be Burger.
Looking at Meal B holding the second price tier ($$), setting Meal A as Coffee cleanly established Meal A as the cheapest option ($). With Meal A paired with Coffee, Meal B immediately took Burger as its food. This made total sense because Meal A was now the cheapest meal ($) with Coffee, satisfying the first half of clue 5.
Resolving the Remaining Prices and Drinks
Once Meal A was established with Coffee and a price of $, the priciest meal ($$$$) had to be the other meal with Coffee.
Meal D could not be the four dollar sign meal if it had to balance out the remaining food and drink rules. Meal C paired naturally with Coffee, which immediately assigned Meal C the highest price tier of $$$$.
With $, $$, and $$$$ assigned to Meal A, Meal B, and Meal C respectively, only one price tier remained unaccounted for. Meal D had to take the three dollar sign tier ($$$).
That changed the picture for the drinks. We already had Coffee placed in Meal A and Meal C. Clue 3 points out that only 1 meal has Lemon Tea as its drink. Between Meal B and Meal D, Meal B took Lemon Tea, leaving standard Tea as the drink for Meal D.
At this stage, the entire drink row and the entire price row were completely solved:
- Meal A: Coffee, $
- Meal B: Lemon Tea, $$
- Meal C: Coffee, $$$$
- Meal D: Tea, $$$
Sorting Out the Foods Across the Menu
All that remained was filling in the food slots for Meal A, Meal C, and Meal D, with Burger already secured in Meal B. The available foods left to assign were Sandwich, Hot Dog, and Taco.
Clue 7 explains that the meal with Hot Dog is not the most affordable one. The most affordable meal on the board is Meal A at the single dollar sign tier. Therefore, Meal A could not be Hot Dog, leaving Hot Dog to go into either Meal C or Meal D.
Next, clue 6 links the meal with Taco to its price tier, placing Taco directly into Meal D at $$$.
With Taco placed in Meal D and Burger already in Meal B, only Meal A and Meal C were open. Hot Dog could not go to Meal A due to the affordability rule, which meant Hot Dog belonged in Meal C. Clue 1 also mentions that the food in Meal C does not contain vegetables, which aligns nicely with placing Hot Dog there.
This left Sandwich as the final remaining food option, perfectly fitting into Meal A. The last few cells then fell into place without any conflict across the grid.
The Point Where I Nearly Went Wrong
The most deceptive moment came when interpreting clue 4 alongside clue 5. Clue 4 simply states that a meal with Coffee has Burger on its right, but because two separate meals serve Coffee, it is easy to assume either Coffee could be the one next to Burger.
If you prematurely assign Coffee to Meal C and place Burger into Meal D, the price distribution becomes awkward when trying to ensure the cheapest and priciest meals both hold Coffee. Recognizing that Meal B's price of $$ prevented it from taking Coffee kept me from making an incorrect pairing early on. Confirming Meal B's exact price tier first made it obvious that Meal A had to be the Coffee meal that placed Burger into Meal B.
Looking Back At The Solution
The breakthrough in this puzzle came from combining the relative price position of Meal B with the rule tying Coffee to both price extremes. Once Meal B was set to $$ and excluded from Coffee, the positional Burger clue snapped Meal A and Meal B into place, creating a chain reaction that sorted out the drinks, the remaining prices, and the final food items effortlessly.
Comments