
Profile Perfect Level 699 Answer
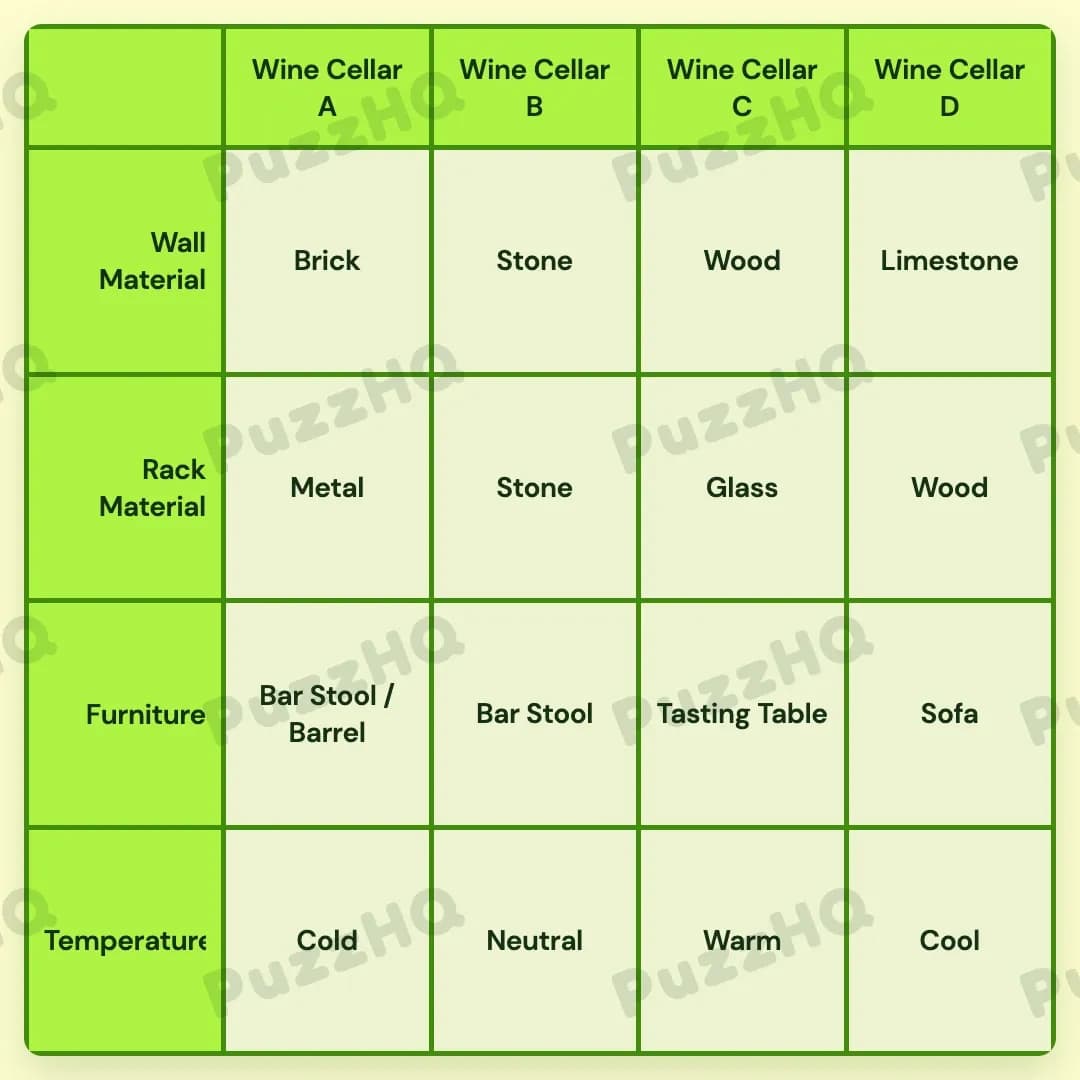
Every cellar finds its distinctive balance of climate, masonry, shelving, and furnishings once spatial clues and material overlaps anchor the layout.
| Trait | Wine Cellar A | Wine Cellar B | Wine Cellar C | Wine Cellar D |
|---|---|---|---|---|
| Wall Material | Brick | Stone | Wood | Limestone |
| Rack Material | Metal | Stone | Glass | Wood |
| Furniture | Bar Stool / Barrel | Bar Stool | Tasting Table | Sofa |
| Temperature | Cold | Neutral | Warm | Cool |
Building The Grid By Trait
Starting with wall materials and rack materials provides the clearest path forward because positional anchors and shared material traits immediately narrow down where each cellar sits in the line.
Wall Material Establishes The Spatial Framework
The physical order of the cellars runs from left to right across four positions, labeled Wine Cellar A through Wine Cellar D. We learn right away that the leftmost cellar is built with Brick walls, which immediately assigns Brick to Wine Cellar A.
From there, we examine the remaining wall materials, which consist of Stone, Wood, and Limestone. A spatial restriction tells us that the cellars walled in Stone and Limestone cannot be adjacent to one another. Since Wine Cellar A is already occupied by Brick, the remaining three rooms must arrange Stone and Limestone so they never touch. This requires Stone and Limestone to occupy Wine Cellar B and Wine Cellar D in some combination, leaving the middle opening at Wine Cellar C for Wood.
Deciding whether Wine Cellar B holds Stone or Limestone depends directly on how the racks interact with the walls. A key condition specifies that Wine Cellar B uses identical material for both its walls and its racks. Because Limestone is strictly a wall material, Stone is the only candidate capable of matching both categories in Wine Cellar B. With Wine Cellar B fixed as Stone, Wine Cellar D takes Limestone to complete the separation constraint. The wall row is therefore completely resolved as Brick, Stone, Wood, and Limestone.
Rack Material Locks In Across The Four Rooms
With the wall row fully established, the rack materials fall into place with minimal resistance. We already know that Wine Cellar B matches its walls and racks, which gives Wine Cellar B a Stone rack.
Next, we look at Wine Cellar C. We are told that Wine Cellar C utilizes a rack material that is not among the wall material options. Comparing the list of rack options against the wall materials reveals Glass as the unique material present only on the racks. Consequently, Wine Cellar C must feature a Glass rack.
Only two rack materials remain unassigned: Metal and Wood. The clue concerning rust in the Brick cellar indicates that Metal belongs to Wine Cellar A. Furthermore, an environmental rule states that the hottest cellar uses Wood as its material. Since Wine Cellar C already has Wood walls and Glass racks, and Wine Cellar D is walled in Limestone, Wood racks naturally slot into Wine Cellar D. This completes the rack material row with Metal in Wine Cellar A, Stone in Wine Cellar B, Glass in Wine Cellar C, and Wood in Wine Cellar D.
Temperature Calibrates Around The Shelving Layout
Temperature readings span Cold, Cool, Neutral, and Warm, corresponding logically to a progression from lowest to highest thermal levels. We know that the cellar positioned directly to the right of the Glass rack is the second coldest room. Because Wine Cellar C houses the Glass rack, the room immediately to its right is Wine Cellar D. Holding the second coldest position means Wine Cellar D is Cool, keeping Cold as the only lower value for the absolute coldest cellar.
Next, we look at the hottest room condition. The warmest environment uses Wood as its material. Wine Cellar C features Wood walls, making it the designated Warm cellar.
With Cool in Wine Cellar D and Warm in Wine Cellar C, only Cold and Neutral remain to be distributed between Wine Cellar A and Wine Cellar B. A clue regarding seating specifies that the rightmost cellar containing a Bar Stool has a Neutral temperature. When looking at the furniture rules, Wine Cellar B is situated to the right of Wine Cellar A and hosts a Bar Stool, satisfying the Neutral temperature assignment for Wine Cellar B. By elimination, Wine Cellar A must be Cold, which perfectly fits the rust prevention and low temperature conditions.
Furniture Distributes Based On Climate And Seating Limits
The furnishings across the four rooms include Bar Stool, Barrel, Tasting Table, and Sofa. Wine Cellar C immediately claims the Tasting Table based on its specific presentation layout.
Next, we address the distribution of Bar Stools. We know that Bar Stools appear in more than one cellar, and that the rightmost room with a Bar Stool has a Neutral climate. Because Wine Cellar B has a Neutral temperature, it takes a Bar Stool. Wine Cellar A also features a Bar Stool along with a Barrel.
The final room, Wine Cellar D, cannot take a Bar Stool because Wine Cellar B is already the rightmost cellar permitted to have one. Additionally, the guidelines dictate that a Sofa and a Bar Stool cannot share the same cellar. This makes Wine Cellar D the only available and appropriate location for the Sofa.
Where The Trait Rows Intersect
Matching Wall And Rack Materials Pinpoints Cellar B
The relationship between wall materials and rack materials forms the essential breakthrough of the puzzle. Wine Cellar B requires identical substances for both structural walls and storage racks. Because the puzzle restricts Limestone to walls, and Glass to racks, Stone emerges as the singular valid material capable of satisfying both categories simultaneously. This single deduction cements both rows for Wine Cellar B and prevents Limestone from touching Stone.
Glass Racks Identify The Cool Room
The interaction between the rack row and the temperature row hinges entirely on Wine Cellar C's Glass rack. Because the room to the right of the Glass rack must be the second coldest in the building, knowing that Wine Cellar C holds Glass instantly establishes Wine Cellar D as the Cool room. This positional handshake anchors half of the climate spectrum and isolates Cold to the left side of the floor plan.
Seating Boundaries Fix The Remaining Climates
The rule governing the rightmost Bar Stool bridges the furniture category with temperature. Knowing that Bar Stools are used in multiple cellars, but cannot be placed in Wine Cellar D alongside the Sofa, forces Wine Cellar B to be the easternmost Bar Stool location. Tying that boundary to a Neutral temperature cleanly separates Wine Cellar B from Wine Cellar A's Cold climate without any ambiguity.
Final Grid Check
Every row neatly confirms the validity of the others when viewed as a whole. Wine Cellar A combines Brick, Metal racks, and a Cold environment with Bar Stool and Barrel seating. Wine Cellar B balances matched Stone construction with a Neutral climate and a Bar Stool. Wine Cellar C blends Wood walls, a Glass rack, a Warm climate, and the Tasting Table. Finally, Wine Cellar D rests on the far right with Limestone, Wood racks, a Cool setting, and a comfortable Sofa. Every neighboring restriction and trait link holds true across the board.
Comments