
Profile Perfect Level 244 Answer
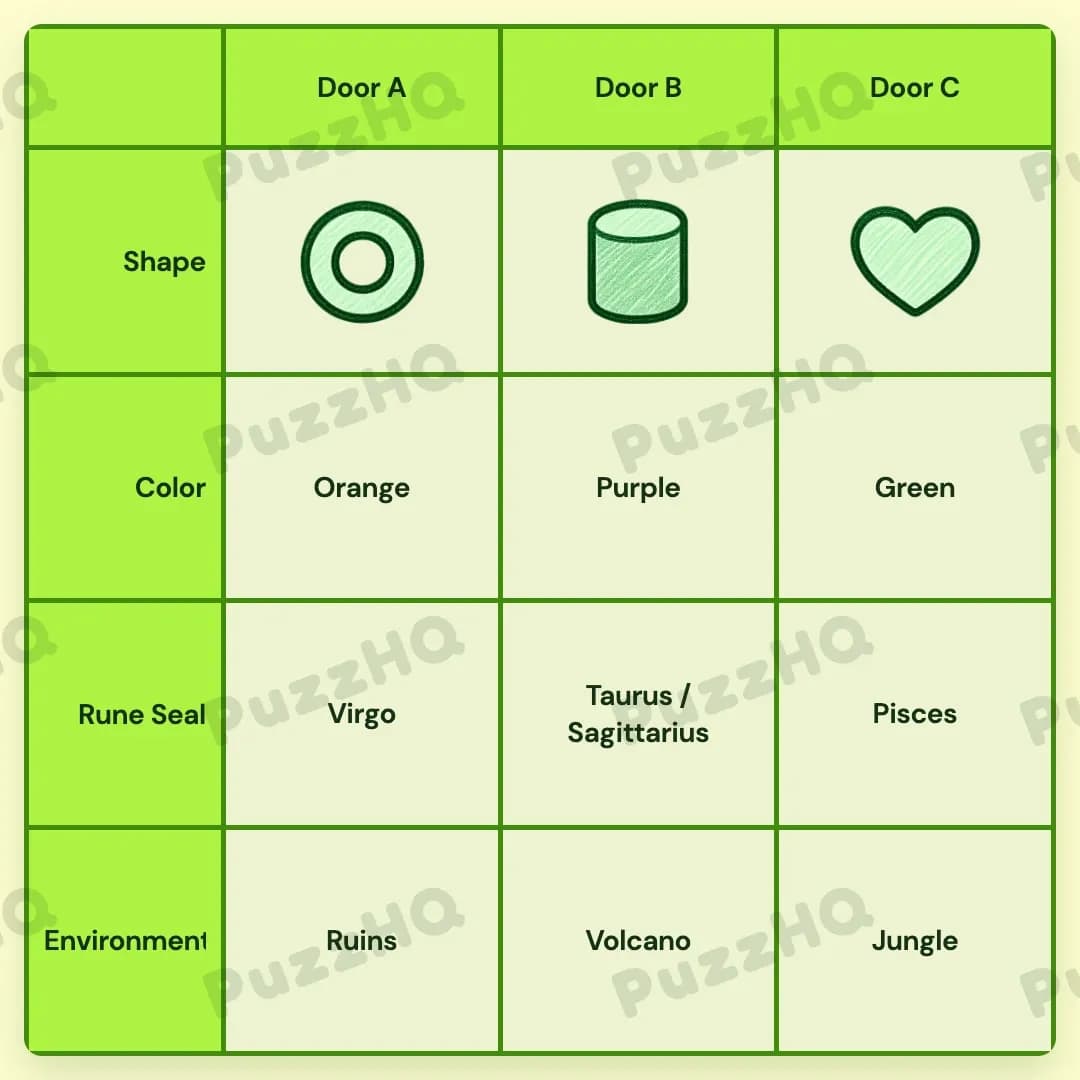
Here is the complete solution for the three mysterious doors, their shapes, colors, rune seals, and corresponding environments.
| Trait | Door A | Door B | Door C |
|---|---|---|---|
| Shape | Pic1Row1Col3 | Pic1Row1Col1 | Pic2Col2 |
| Color | Orange | Purple | Green |
| Rune Seal | Virgo | Taurus / Sagittarius | Pisces |
| Environment | Ruins | Volcano | Jungle |
How I Solved Profile Perfect Level 244
Looking over the initial board, the setup consisted of three distinct doors arranged across three columns. With only three positions to manage, direct spatial clues offered the quickest route to locking down the entire structure of the grid.
Establishing The Horizontal Order With The Color Clue
The first thing I noticed was the clue stating that the Orange door is 2 columns left of the Green one. Because the puzzle contains exactly three doors (Door A, Door B, and Door C from left to right), there was only one possible layout that could satisfy a two-column gap.
The Orange door had to belong in the first column under Door A, while the Green door had to occupy the third column under Door C. That left only one remaining color, Purple, which naturally went straight into the middle slot for Door B.
This single placement also aligned directly with the clue noting that Door B sits between the other doors, giving me full confidence in the color row right at the start.
Locking In The Environments And Rune Placement
Once the colors were pinned down, I looked for clues linking specific doors or colors to environments and seals.
A clue pointed out that the Green color blends well with the place it leads to, which paired Door C with the lush Jungle environment.
Next, I examined the clue stating that on top of the door is the Virgo sign, which placed the Virgo seal onto Door A. That immediately narrowed down the remaining seal possibilities across the board.
We also had the rule that no Sagittarius seal is found near the Ruins. Since Door A is set in the Ruins, Sagittarius could not be placed there. Furthermore, Pisces and Taurus seals could not be placed within the same door.
With Virgo assigned to Door A, the remaining seals had to be distributed between Door B and Door C. Because Door B carries a combined seal of Taurus / Sagittarius, Pisces was left to take its spot under Door C.
With the Jungle assigned to Door C and the Ruins assigned to Door A, the Volcano environment slid naturally into the middle slot for Door B.
Assigning The Final Shapes
With the colors, environments, and rune seals fully mapped out, the remaining task was matching the specific door shapes to each column.
The physical appearance of the doors corresponds directly to their architectural traits:
- Door A received the shape Pic1Row1Col3.
- Door B took Pic1Row1Col1.
- Door C took Pic2Col2.
Each piece clicked into place without any contradictions across the clues, neatly completing the puzzle.
The Point Where I Nearly Went Wrong
The easiest place to stumble in this level involves the rune seals, particularly the combination on the middle door.
Clue 6 mentions that Pisces and Taurus are not placed within the same door, while Clue 9 restricts Sagittarius from being near the Ruins. Because Door B holds a dual seal (Taurus / Sagittarius), it is tempting at first glance to assume each door only receives a single zodiac name.
If you try to split Taurus and Sagittarius across different doors, you end up violating either the Ruins placement on Door A or forcing Pisces into a conflicting spot. Remembering to treat the combined Taurus / Sagittarius marking as a single compound entry for Door B clears up the entire right side of the board.
Looking Back At The Solution
The turning point was definitely the spacing clue between the Orange and Green doors. Locking the outer columns down immediately provided the framework needed to separate the environments and resolve the zodiac seals without guesswork.
Comments