
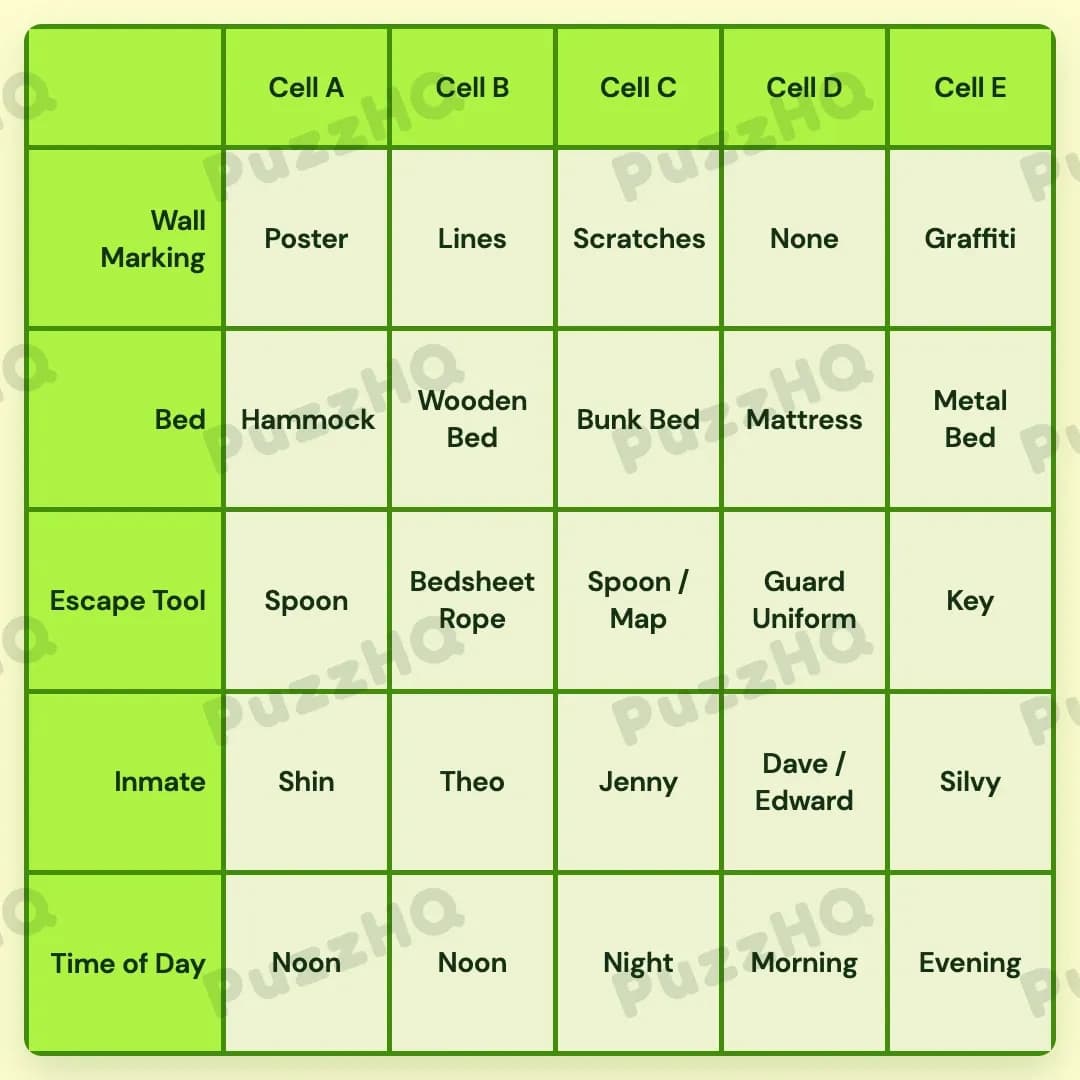
Profile Perfect Level 202 Answer
Here is the complete solution for the prison block layout:
| Trait | Cell A | Cell B | Cell C | Cell D | Cell E |
|---|---|---|---|---|---|
| Wall Marking | Poster | Lines | Scratches | None | Graffiti |
| Bed | Hammock | Wooden Bed | Bunk Bed | Mattress | Metal Bed |
| Escape Tool | Spoon | Bedsheet Rope | Spoon / Map | Guard Uniform | Key |
| Inmate | Shin | Theo | Jenny | Dave / Edward | Silvy |
| Time of Day | Noon | Noon | Night | Morning | Evening |
How I Solved Profile Perfect Level 202
Looking over the clue list, the layout spacing clues immediately jumped out at me. A five-cell grid means that any mention of four columns or items between two traits forces them directly onto opposite ends of the board.
Pinning Down Both Ends Of The Cell Block
The first major breakthrough came from the clue stating there are four tools between the Hammock and Silvy. Because the grid spans five cells in total from Cell A to Cell E, having four tools between two targets means one must be in Cell A and the other in Cell E.
Right alongside that, I looked at the clue saying the Metal Bed is four columns away from the room at Noon. That four-column distance is another full board span. Then, another clue mentions that it is getting dark outside of the Metal Bed cell. If the Metal Bed were in Cell A with Noon in Cell E, it would contradict the darkness clue. Placing the Hammock in Cell A and Silvy in Cell E allowed the Metal Bed to settle cleanly into Cell E, while Cell A took the Noon time slot. Because it is getting dark outside the Metal Bed cell, Cell E became Evening.
Mapping Out The Inmates And Wall Markings
With the edges established, I turned to the wall decorations and character placements. One clue noted that Shin hangs prints to cover up his escape plan, giving him Poster. Another clue placed the Guard Uniform exactly three columns away from Shin. With only five cells, Shin had to be in Cell A, placing the Guard Uniform squarely in Cell D.
From there, I checked the remaining wall markings. Someone is counting their days inside Cell B, which corresponds to tally Lines on the wall. Meanwhile, Edward likes his room clean and cleans his wall, meaning Edward belongs in a room with None for wall markings.
I also knew that Silvy is not in the cells next to Theo. Since Silvy is in Cell E, Theo could not be in Cell D. That left Theo for Cell B. The clue about the person with the goatee being used to the hardness of the Wooden Bed immediately matched Theo in Cell B with the Wooden Bed.
Sorting Out Times And Sunlight
Next, I focused on the lighting conditions across the remaining cells. One clue stated that the only room with no sunlight is Jenny's cell. That meant Jenny had to be the occupant of the Night room.
Another clue stated that rooms to the left of the Night room are not in the Morning right now. If Jenny's Night room were in Cell B, Cell A would be the only room to its left, but Cell A was already set to Noon. If Jenny were placed further right, it created room for the earlier cells to share Noon. Placing Jenny in Cell C with Night meant both Cell A and Cell B were at Noon, which fit the rule that none of the rooms to the left of Night were in the Morning. That naturally left Cell D as Morning.
With Jenny locked into Cell C, the only unassigned inmate slot in Cell D belonged to Dave and Edward. The clue mentioning two guys not having enough beds matched them sharing the Mattress in Cell D. Jenny in Cell C received the Bunk Bed, leaving Scratches as her wall marking. Cell E then took Graffiti, matching the note that no graffiti can be seen from the brown-haired woman's cell.
Finalizing The Escape Tools
The final pieces to assemble were the escape tools. We already had the Guard Uniform in Cell D.
One clue described the Japanese inmate meticulously digging his way out. With Shin in Cell A, that meant Shin used the Spoon to carve his way through. Another clue explained that after the escape hole is carved, the Map will be used. That placed the Spoon and Map combination with Jenny in Cell C.
Theo in Cell B was left with the Bedsheet Rope, and Silvy in Cell E received the Key. The entire grid snapped into place with every spatial constraint, inmate, and timeline fully verified.
The Point Where I Nearly Went Wrong
The spacing clues were easy to confuse if read too quickly, particularly the clue stating there are four tools between the Hammock and Silvy. It is tempting to treat that as a distance of four cells rather than counting the items strictly sitting between the endpoints. In a five-cell row, having four items between two endpoints means the endpoints occupy the very first and very last positions. Recognizing that this required an exact Cell A and Cell E placement saved me from trying to bunch the tools into the middle of the grid.
Looking Back At The Solution
The entire puzzle opened up once the four-step span between the Hammock and Silvy anchored both outer edges. Connecting that immediately to the four-column gap for the Metal Bed and the lighting clues provided a solid framework, allowing the rest of the inmates and tools to slot in systematically.
Comments