
Profile Perfect Level 394 Answer
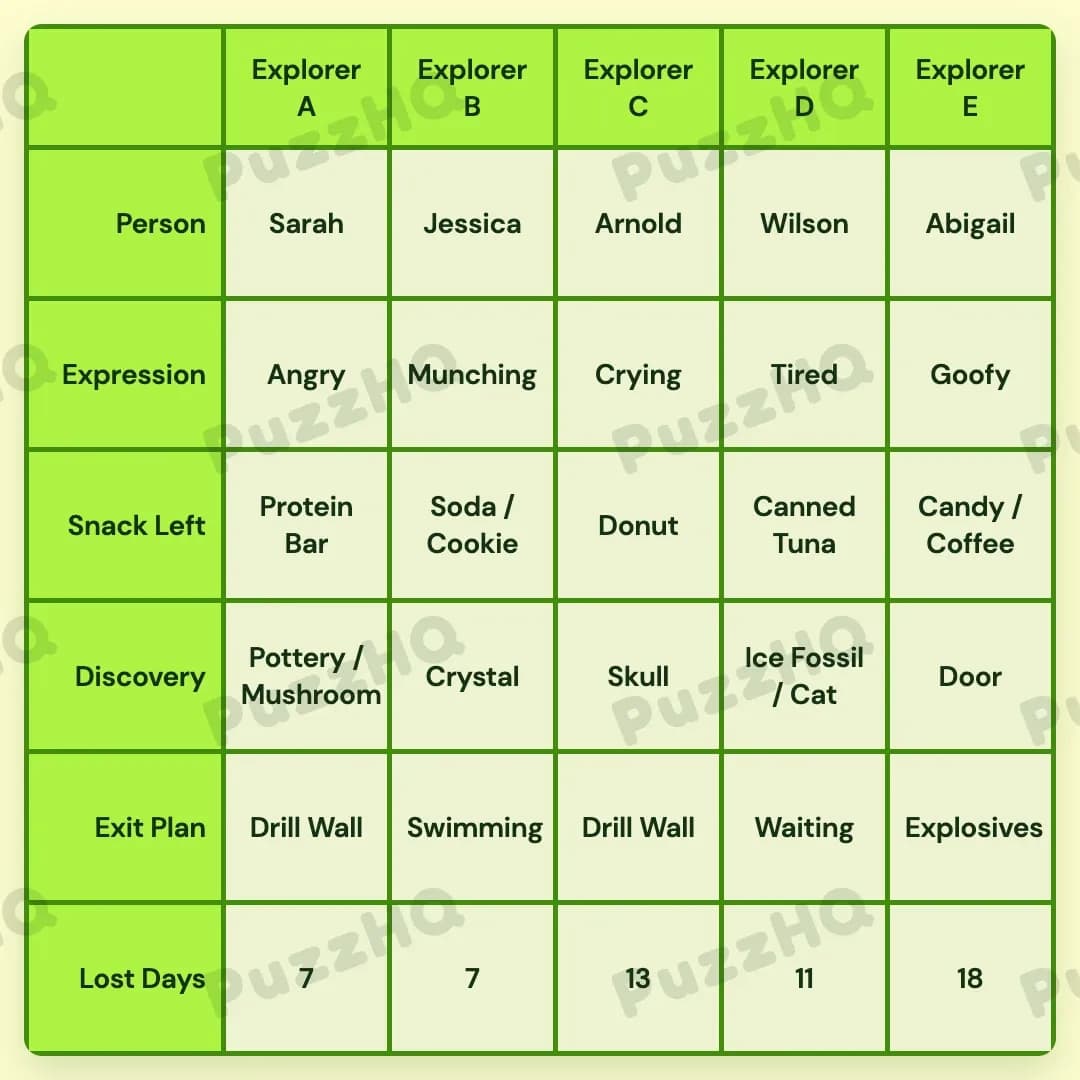
Here is the complete configuration for all five lost explorers in the cave.
| Trait | Explorer A | Explorer B | Explorer C | Explorer D | Explorer E |
|---|---|---|---|---|---|
| Person | Sarah | Jessica | Arnold | Wilson | Abigail |
| Expression | Angry | Munching | Crying | Tired | Goofy |
| Snack Left | Protein Bar | Soda / Cookie | Donut | Canned Tuna | Candy / Coffee |
| Discovery | Pottery / Mushroom | Crystal | Skull | Ice Fossil / Cat | Door |
| Exit Plan | Drill Wall | Swimming | Drill Wall | Waiting | Explosives |
| Lost Days | 7 | 7 | 13 | 11 | 18 |
How I Solved Profile Perfect Level 394
The layout of the explorers became clear once I tied together the clues about positioning, neighbor requirements, and physical locations. The puzzle offered several direct anchors right at the start, especially regarding the leftmost explorer and specific item combinations.
Nailing Down The Edges And Direct Matches
The first thing I noticed was a straightforward positional rule: the leftmost explorer was irritated that rescue had not arrived yet. That immediately gave Explorer A the Angry expression. Pairing that with the clue stating her anger prevented her from opening the Protein Bar wrapper, I was able to lock Protein Bar as Explorer A's snack left.
Next, a few item and person combinations clustered naturally:
- The clue about Jessica discovering a glowing mineral after swimming far linked Jessica, the Crystal discovery, and the Swimming exit plan together.
- Another clue stated that the cookie eater was choking and grabbed a soda while devising a swim escape plan, which united Soda / Cookie with Swimming, and therefore with Jessica.
- The clue about Arnold showed he held the last Donut, and that in two more days he would be missing for half a month, fixing his lost time at 13 days.
- Abigail found a mysterious entrance deep inside the cave, matching her to the Door. Connecting that with the note about someone being tempted to detonate the locked Door gave Abigail the Explosives exit plan.
Fixing Positions Across The Board
With those bundles established, the spacing clues helped place the explorers into their exact columns.
One clue mentioned there were two people between Crystal and Explosives. Since Jessica held the Crystal and Abigail held the Explosives, they had to be at slots separated by exactly two spots. This meant they occupied either positions B and E or A and D.
Because Explorer A was already confirmed to hold the Protein Bar, Jessica could not be at Explorer A. That meant Jessica had to be Explorer B, placing the Crystal at Explorer B, and putting Abigail with the Door and Explosives over at Explorer E.
That left columns A, C, and D for Sarah, Arnold, and Wilson. A helpful clue noted that neither Sarah nor Jessica was a neighbor of Wilson. Since Wilson could not sit next to Jessica at Explorer B, Wilson could not be in Explorer A or Explorer C. That forced Wilson into Explorer D.
With Explorer D assigned to Wilson, Sarah naturally took Explorer A, and Arnold took Explorer C.
Resolving Wilson's Neighbors And Discoveries
Once the five names were set in order from left to right as Sarah, Jessica, Arnold, Wilson, and Abigail, the rest of the board opened up rapidly.
I looked at the clue stating both of Wilson's neighbors preferred confectionery sweets. Wilson's neighbors were Arnold at Explorer C and Abigail at Explorer E. Arnold already had the Donut. That left Candy / Coffee for Abigail, and by process of elimination, Wilson was left with Canned Tuna.
Next, I looked at the discoveries. The clue about the Pleistocene era object being to the right of the Skull meant the Skull was directly left of an ancient fossil. Since Wilson discovered an organism and Abigail found the Door, Explorer D had the Ice Fossil / Cat. That placed the Skull at Explorer C with Arnold.
Sarah and Wilson both discovered organisms, and the clue mentioning organisms inside the Pottery could not make a sound confirmed Sarah at Explorer A had the Pottery / Mushroom.
Expressions, Exit Plans, And Lost Days
Now I had to resolve the remaining expressions, exit plans, and lost days.
A clue stated that a Tired man heard someone Crying to his left. That placed Crying at Explorer C and Tired at Explorer D. With Angry already at Explorer A, that left Munching and Goofy. The clue about the explorer with the second shortest lost time not munching helped separate the final expressions, giving Munching to Jessica at Explorer B and Goofy to Explorer E.
For the exit plans, the explorer without a real plan was not next to the Crystal. That meant the Waiting plan could not be at Explorer A or Explorer C. Explorer D took Waiting, leaving Drill Wall for both Sarah and Arnold.
Finally, the lost days fell into line:
- Sarah had been missing for a whole week, giving Explorer A 7 days.
- Jessica shared the shortest time with 7 days.
- Arnold was already calculated at 13 days.
- Abigail had been missing 18 days, as stated in the clue about losing one's mind after 18 days.
- Wilson took the remaining count of 11 days.
The entire grid was completely filled and verified.
The Point Where I Nearly Went Wrong
The clue mentioning that both of Wilson's neighbors preferred confectionery sweets was easy to overthink at first. Because Jessica was eating a cookie and was adjacent to Arnold, it was tempting to think Jessica was one of Wilson's sweet loving neighbors.
However, cross checking the neighbor restriction clue cleared this up: neither Sarah nor Jessica could be adjacent to Wilson. Remembering that restriction prevented me from mistakenly placing Wilson in Explorer C.
Looking Back At The Solution
The spacing rule placing two people between the Crystal and the Explosives was the true turning point of the solve. Once Jessica and Abigail anchored the board at Explorer B and Explorer E, Wilson's neighbor restrictions easily sorted the remaining explorers into their correct positions.
Comments