
Profile Perfect Level 405 Answer
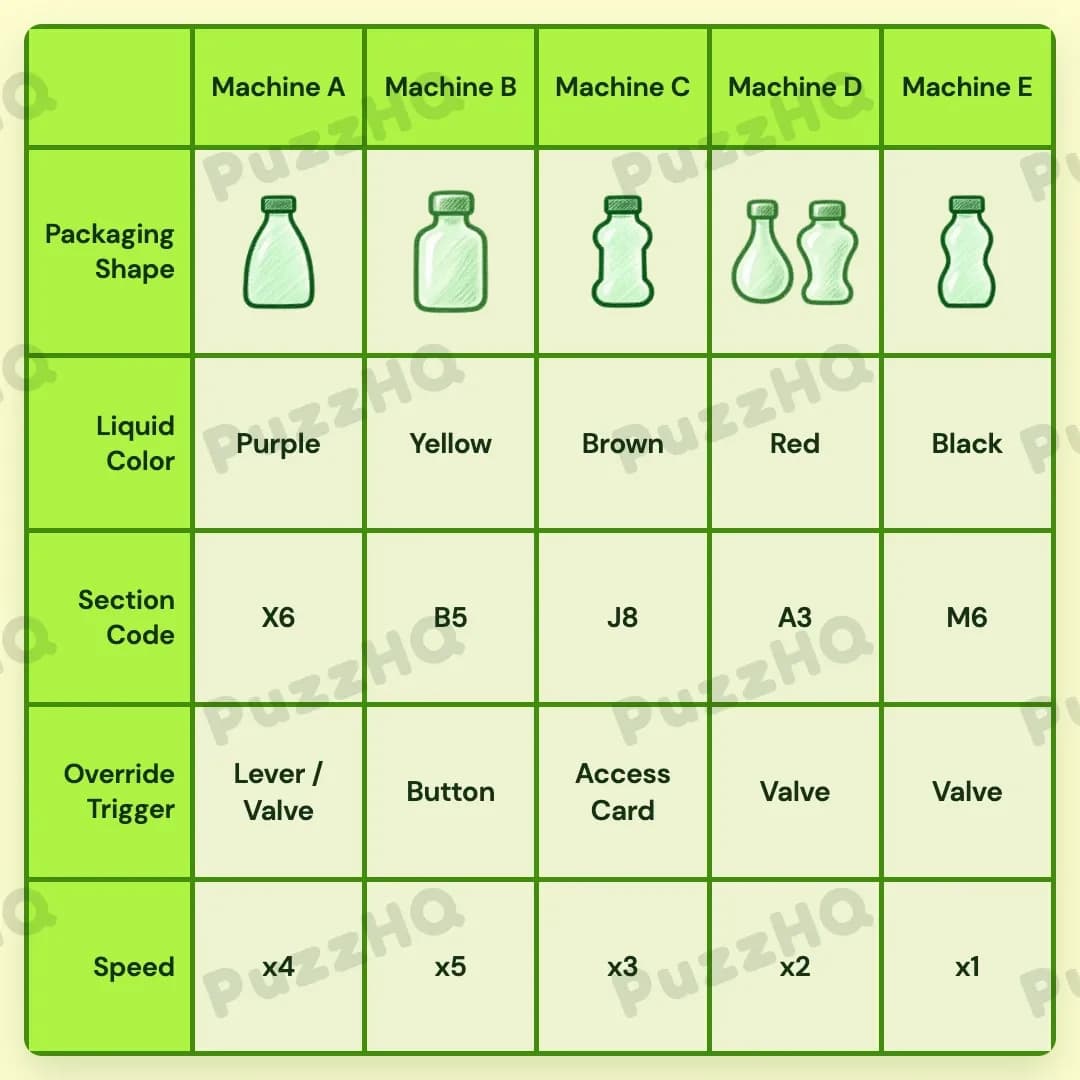
Here is the complete solution grid for this puzzle, followed by the step-by-step logic to help you work through each deduction.
| Trait | Machine A | Machine B | Machine C | Machine D | Machine E |
|---|---|---|---|---|---|
| Packaging Shape | Ref2Row2Col4 | Ref1Row2Col4 | Ref2Row2Col7 | Ref2Row1Col6 / Ref1Row3Col2 | Ref2Row1Col2 |
| Liquid Color | Purple | Yellow | Brown | Red | Black |
| Section Code | X6 | B5 | J8 | A3 | M6 |
| Override Trigger | Lever / Valve | Button | Access Card | Valve | Valve |
| Speed | x4 | x5 | x3 | x2 | x1 |
Clues of Profile Perfect Level 405
- Machine at section B5 fills the most bottles per day
- Chocolate drink is 2 columns away from the soy sauce
- One of the triggers at leftmost machine can be pulled
- Machine with Lever is slightly slower than the one in B5
- Trigger that uses RFID is next to the Yellow liquid
- Purple liquid is 2 columns away from the Brown one
- Sections M6 and A3 are not beside B5
- is the farthest bottle from the second fastest machine
- The 2 machines to the right of J8's machine are the slowest
- Tomato sauce is not next to X6's machine
- Neither nor is to the left of the mustard
- bottle is left of the machine with average speed
- ''s section is the nearest to the entrance
- ''s machine is faster than ''s
- Access Card is needed for machine that fills
- There is no Button on the machine that fills
- Machines in odd-numbered sections need no special access
How To Solve Profile Perfect Level 405
This factory puzzle requires you to map out operating speeds, section codes, override mechanisms, and liquid colors across five distinct workstations named Machine A through Machine E. Solving the layout depends heavily on establishing relative machine speeds and using positional constraints across the factory floor.
Step 1: Establish the speed ratings and place Section J8
Clue 1 states that the machine at section B5 fills the most bottles per day, which means section B5 operates at the maximum speed rating of x5.
Clue 9 explains that the two machines to the right of section J8 are the slowest machines on the line. Because there are five machines total, the two slowest machines (speeds x2 and x1) must occupy the fourth and fifth positions, which are Machine D and Machine E. That directly establishes Machine C as section J8 with the middle speed rating of x3.
Clue 4 notes that the machine with a Lever is slightly slower than the machine in B5. Since B5 operates at speed x5, the Lever machine must run at speed x4. That places speed x4 at Machine A and speed x5 at Machine B, leaving Machine D at speed x2 and Machine E at speed x1.
Step 2: Assign Section Code B5, X6, A3, and M6
Now that the speed order is fixed, we know Machine B is the fastest machine running at speed x5, so Machine B belongs to section B5.
Clue 7 states that sections M6 and A3 are not beside section B5. Machine A is directly adjacent to Machine B, meaning Machine A cannot be section M6 or section A3. Machine C is already confirmed as section J8. That leaves section X6 as the only available section code for Machine A.
With sections X6, B5, and J8 assigned to Machines A, B, and C, sections A3 and M6 must go to the remaining two slots, giving section A3 to Machine D and section M6 to Machine E.
Step 3: Match the Override Triggers across the line
Clue 3 tells you that one of the triggers at the leftmost machine can be pulled. Machine A is the leftmost column, confirming it holds the pullable Lever override trigger alongside its secondary Valve trigger (Lever / Valve).
Clue 5 states that the trigger using RFID is next to the Yellow liquid. An RFID-based override corresponds to the Access Card, which belongs to Machine C. Since Machine C is next to Machine B, Machine B must process the Yellow liquid.
Clue 17 notes that machines in odd-numbered sections need no special access. Section B5 uses a Button override, while sections A3 and M6 both utilize standard Valve triggers. Machine D and Machine E are therefore confirmed with Valve override triggers.
Step 4: Position the Purple and Brown liquids
Clue 6 indicates that the Purple liquid is two columns away from the Brown liquid.
Looking at our columns, Machine A (column 1) and Machine C (column 3) are spaced exactly two columns apart. Placing Purple at Machine A and Brown at Machine C perfectly matches this two-column separation while keeping Yellow firmly placed at Machine B.
Solution: Finish the remaining matches
With Purple, Yellow, and Brown assigned to Machines A, B, and C, only two liquid colors remain: Red and Black. Machine D takes the Red liquid, while Machine E receives the Black liquid.
Finally, place the corresponding packaging shapes onto their respective columns based on their assigned machine profiles:
- Machine A takes packaging shape Ref2Row2Col4.
- Machine B takes packaging shape Ref1Row2Col4.
- Machine C takes packaging shape Ref2Row2Col7.
- Machine D takes the dual packaging shape Ref2Row1Col6 / Ref1Row3Col2.
- Machine E takes packaging shape Ref2Row1Col2.
This completes all traits across every machine profile.
Key Clues Explained In Profile Perfect Level 405
Clue 9: The 2 machines to the right of J8's machine are the slowest
This positional clue anchors the middle of the grid. Because the two slowest operating speeds (x2 and x1) are located to the right of section J8, section J8 cannot be in columns 4 or 5. Placing J8 at Machine C with speed x3 neatly divides the faster units (x4 and x5) on the left from the slower units (x2 and x1) on the right.
Clue 7: Sections M6 and A3 are not beside B5
Because Machine B is section B5, any machine immediately adjacent to column B cannot be M6 or A3. Machine A is directly to the left of B5, which eliminates both codes from the first column and immediately forces Machine A to take section X6.
Clue 5: Trigger that uses RFID is next to the Yellow liquid
This clue connects the override mechanism with liquid colors. Recognizing that an RFID trigger refers to the Access Card placed on Machine C allows you to pinpoint Machine B as the station running the Yellow liquid.
Final Thoughts
The key to solving Level 405 lies in locking down the speed hierarchy early using clues 1, 4, and 9. Once you determine the positions of sections B5 and J8, the remaining section codes and override triggers fall neatly into place through process of elimination.
Comments