
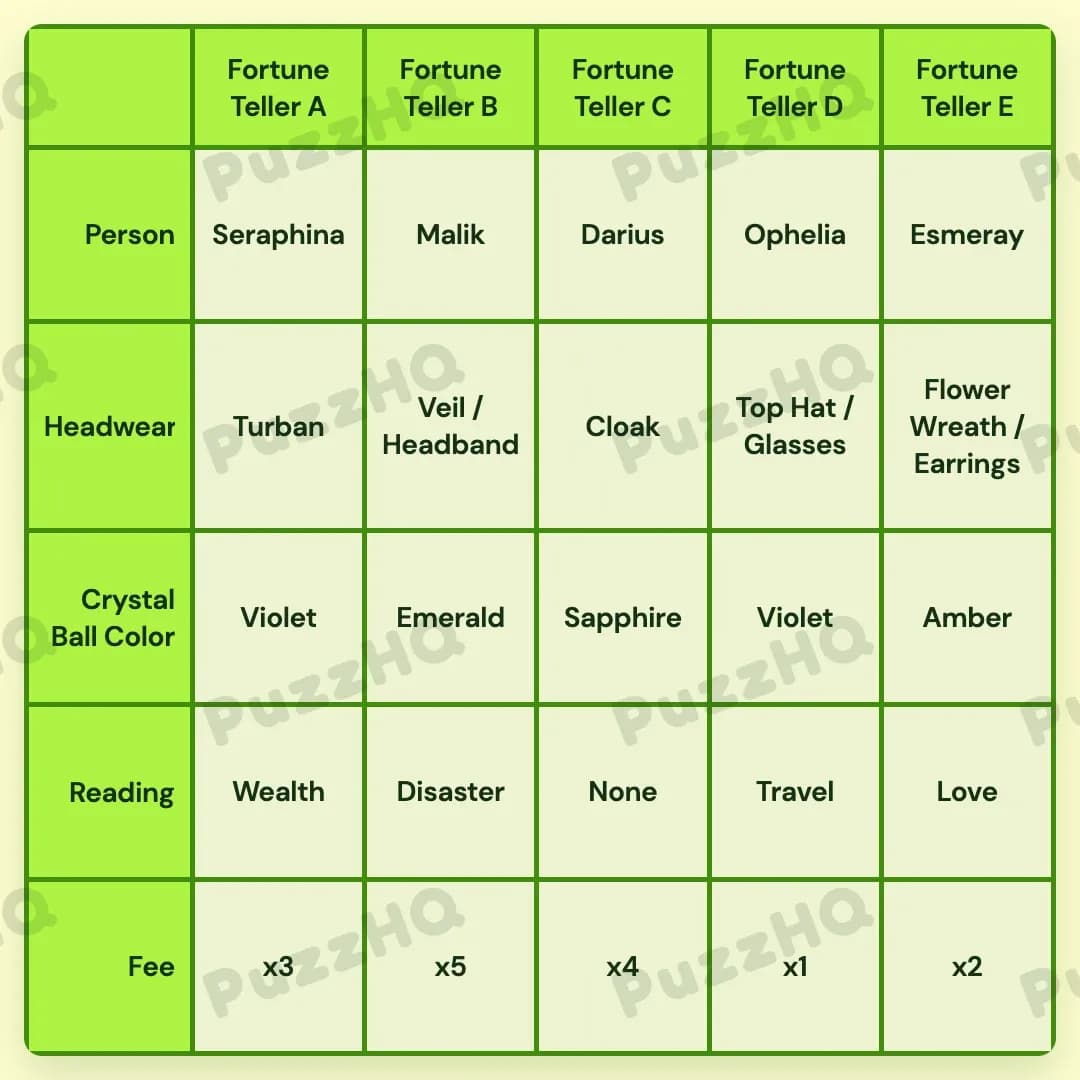
Profile Perfect Level 441 Answer
By anchoring fixed middle and outer positions first, you can resolve the fees and align each fortune teller without guessing.
| Trait | Fortune Teller A | Fortune Teller B | Fortune Teller C | Fortune Teller D | Fortune Teller E |
|---|---|---|---|---|---|
| Person | Seraphina | Malik | Darius | Ophelia | Esmeray |
| Headwear | Turban | Veil / Headband | Cloak | Top Hat / Glasses | Flower Wreath / Earrings |
| Crystal Ball Color | Violet | Emerald | Sapphire | Violet | Amber |
| Reading | Wealth | Disaster | None | Travel | Love |
| Fee | x3 | x5 | x4 | x1 | x2 |
How To Think Through Profile Perfect Level 441
The most useful solving habit for this puzzle is locking down definitive positional anchors before trying to assign floating names or traits. When clues give you specific slots like the leftmost spot or the middle spot, filling those immediately gives every other relationship a stable reference point.
Anchor Absolute Positions: The Center And Left Edge
Positional anchors are the best starting point because they never depend on other variables. They immediately convert abstract clues into locked cells on the board.
Clue 2 states that the middle fortune teller scams all customers. Looking at the five positions from left to right, the middle position is Fortune Teller C. Clue 5 tells you that the scammer uses only a Cloak to imitate the others. You can immediately assign the Cloak to Fortune Teller C. Because this person is a fake who offers no genuine fortune, their reading is None.
Next, Clue 6 reveals that the leftmost ball shows the customer becoming an ultra high net worth individual. That description directly corresponds to Wealth. Because Fortune Teller A is the leftmost person in the lineup, you can immediately lock the Wealth reading into Fortune Teller A.
With both Fortune Teller A and Fortune Teller C anchored, you have fixed poles on the board. Every neighboring or distance clue that follows becomes much easier to measure.
Evaluate Value Rankings: Anchoring The Price Scale
Fee structures often appear complicated until you list the available tiers. When a puzzle uses numerical ratings or relative costs, finding the extremes and the midpoint will quickly place the fees.
The fees in this level run on a five step scale from x1 to x5.
Clue 7 specifies that popularity allows Fortune Teller B to charge the most. The highest value on the scale is x5, so Fortune Teller B receives the x5 fee right away.
Clue 16 states that Seraphina charges the average price. On a scale of 1, 2, 3, 4, and 5, the mathematical average is 3. That means Seraphina charges x3.
Now check Clue 15, which notes that the nearsighted fortune teller charges the least. The lowest possible fee is x1. That leaves fees x2 and x4 to distribute between Darius, Esmeray, and the remaining slots.
Clue 9 states that the Sapphire ball user, Darius, does not charge a low fee. Between the two remaining unassigned amounts of x2 and x4, x4 is distinctly higher. Therefore, Darius charges x4, leaving x2 for the remaining fee.
Because you already know Seraphina takes the x3 fee, look at which subjects can accept both a person and a fee of x3. Fortune Teller A is completely open in both categories, so Seraphina belongs in column A with fee x3.
Trace Distance Clues From Fixed Points: Finding Malik And Esmeray
Relative distance clues become powerful once you have at least one anchor placed on the board.
Clue 13 tells you that the floral crown is the farthest from Malik. In a five person row, the maximum possible distance between any two spots is three intermediate spaces, which only happens between the first and last slots, or two intermediate spaces if an actor sits at position B and another at position E.
We already know Fortune Teller B charges the maximum fee of x5. If Malik is at Fortune Teller B, the farthest possible spot on the board from position B is position E.
Clue 8 notes that Esmeray wears earrings given by her grandmother, and Clue 4 connects Fortune Teller E to small accessories. This confirms that Esmeray, the floral crown, and earrings are at the far right under Fortune Teller E. This places Malik securely in column B.
Clue 12 reinforces this assignment by stating that Malik warned people to stock up on food in advance. That matches the Disaster reading, which now locks into Fortune Teller B.
With Seraphina at A, Malik at B, and Esmeray at E, only columns C and D need people. We already know Darius uses a Sapphire ball and charges x4. Fortune Teller C has room for both Darius and the x4 fee. That leaves Fortune Teller D as the only spot left for Ophelia.
Use Multi Trait Bundles: Resolving Headwear And Readings
Once identities and fees are locked into place, the remaining headwear, readings, and crystal balls snap into position through simple process of elimination.
Clue 15 established that the nearsighted fortune teller charges the least. Fortune Teller D has the x1 fee. Nearsightedness requires Glasses, which pairs with the Top Hat headwear in column D.
With Fortune Teller C wearing the Cloak, Fortune Teller D wearing the Top Hat and Glasses, and Fortune Teller E wearing the Flower Wreath and Earrings, look at what remains for columns A and B. Clue 18 warns that the Top Hat and Veil are not next to each other. Because the Top Hat is in column D, the Veil cannot be in column C or column E. Column B is safely away from D and needs headwear, placing the Veil and Headband with Malik. This leaves the Turban as the final remaining headwear for Seraphina in column A.
For readings, Wealth, Disaster, and None are already placed in columns A, B, and C. Ophelia in column D takes Travel, while Esmeray in column E takes Love.
Apply Exclusion Rules: The Crystal Balls
The final step is distributing crystal ball colors across the lineup.
Clue 9 directly assigned the Sapphire ball to Darius at Fortune Teller C.
Clue 4 notes that Fortune Teller E has accessories that share a color with her ball. Clue 10 links Amber to a known viewer, placing the Amber ball with Esmeray at Fortune Teller E.
Now review Clue 1: there is no Amber ball between the two Violet balls. Since Amber sits at the far right in position E, the two Violet balls must both be situated to the left of position E so that Amber never sits between them. The open columns that take the two Violet balls are Fortune Teller A and Fortune Teller D.
The only remaining ball color is Emerald, which slots naturally into the final open cell under Malik at Fortune Teller B. The grid is completely solved.
What This Level Teaches You
Math Concepts Create Immediate Direct Matches
Clues that reference averages or extremes are not decorative descriptions. In a sequence of values like 1 through 5, average means exactly 3, and most means exactly 5. Treating those clues as exact mathematical constants lets you bypass guesswork.
Distance Clues Narrow Down Extreme Positions
When a clue mentions that an item is the farthest from a specific character, test the edge spaces first. An item can only be farthest from someone if the character is located near one side of the board and the target item is at the opposite end.
Final Thoughts
The key to solving this puzzle was recognizing that numerical clues like average and most give hard mathematical values. When you translate those values into definite grid entries early, relative placement clues like distances and adjacencies quickly fall into place.
Comments