
Profile Perfect Level 475 Answer
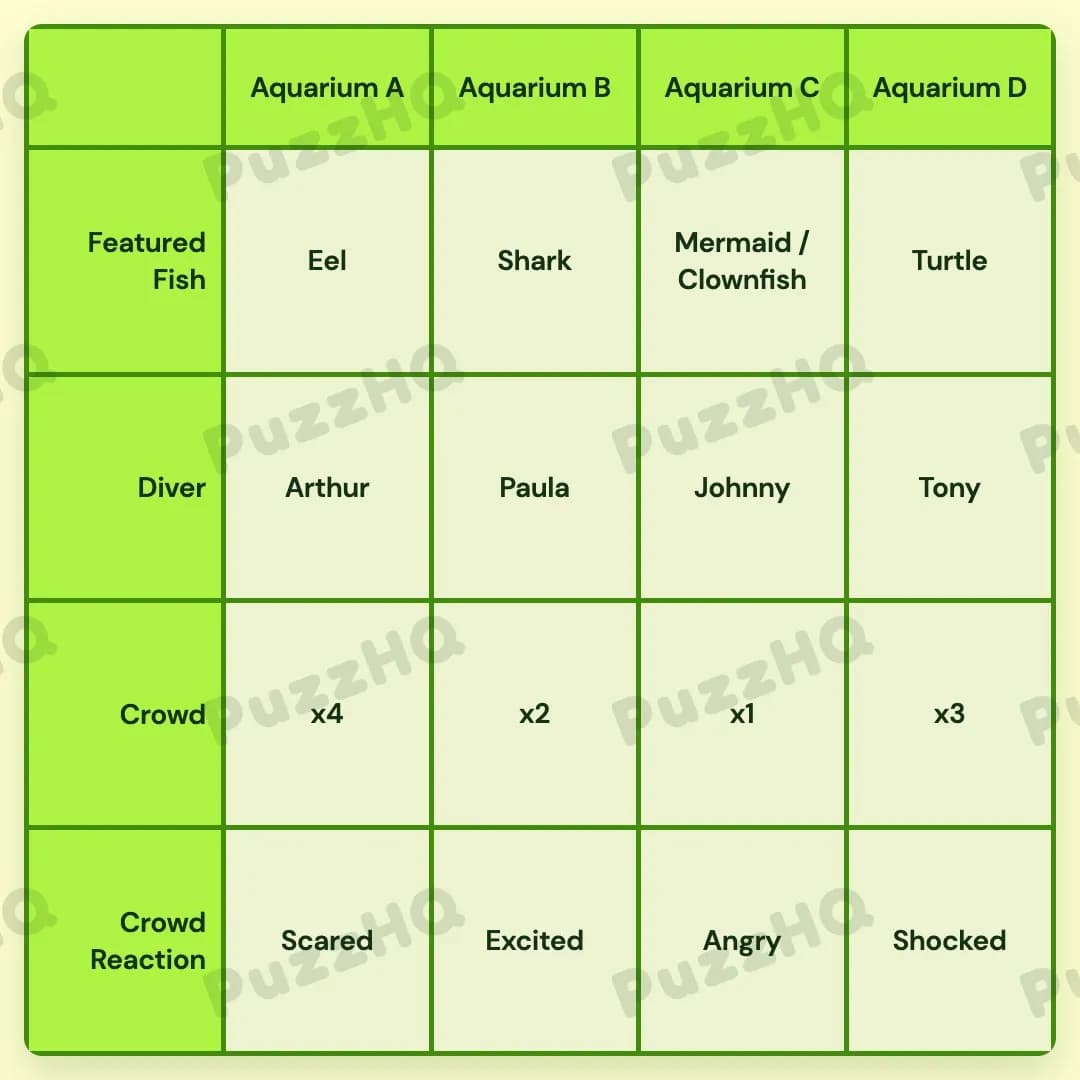
By matching the distinct performances to the emotional reactions of each audience, the featured marine life and their caretakers fall naturally into place across all four exhibits.
| Trait | Aquarium A | Aquarium B | Aquarium C | Aquarium D |
|---|---|---|---|---|
| Featured Fish | Eel | Shark | Mermaid / Clownfish | Turtle |
| Diver | Arthur | Paula | Johnny | Tony |
| Crowd | x4 | x2 | x1 | x3 |
| Crowd Reaction | Scared | Excited | Angry | Shocked |
Building The Grid By Trait
Starting with the connection between the featured marine animals and the reactions of their audiences provides the cleanest route into the puzzle. Several clues pair specific creatures directly with emotional outcomes, while physical positioning clues quickly lock those pairings into individual tanks.
Featured Fish And Crowd Reaction Establish The Scene
The crowd reaction row immediately anchors itself to the aquarium tanks through direct observation. Aquarium D is explicitly identified as having an audience that is instantly Shocked. Working alongside that fact, the acrobatic Turtle is known to perform a backflip that leaves its audience Shocked. Because Aquarium D already claims the Shocked reaction, the Turtle must be the featured creature in Aquarium D.
Aquarium C is distinguished by having a siren as one of its featured attractions. Because this siren represents a fantasy creature, it ties directly to the observation that visitors viewing the fantasy creature leave feeling scammed, translating to an Angry crowd reaction. Furthermore, this tank is known to display multiple highlights, confirming that Aquarium C features both the Mermaid and the Clownfish while eliciting an Angry reaction.
The two remaining creatures and reactions link together cleanly through their behavioral traits. The Eel deploys a defense mechanism that leaves onlookers Scared, whereas the Shark feeding display keeps visitors thoroughly Excited. With Aquarium C and Aquarium D already housing the Mermaid / Clownfish and Turtle, the Eel and Shark must occupy Aquarium A and Aquarium B. Deciding their exact order requires looking at how the staff members are distributed.
Diver Positions Emerge Across The Exhibits
The divers can be located by observing who stands next to the multifaceted display. Tony is situated to the right of the aquarium that contains multiple highlights. Since Aquarium C has the double attraction of the Mermaid and Clownfish, the tank directly to its right is Aquarium D. This securely places Tony as the diver for Aquarium D.
With Tony occupying the fourth position, the remaining three divers can be resolved as a single continuous line. Paula is positioned directly between Arthur and Johnny. Because only the first three aquariums remain open for diver assignments, Paula must take the middle spot at Aquarium B. That leaves Aquarium A and Aquarium C to frame her. Knowing that Tony is already stationed at Aquarium D, Johnny must take Aquarium C, while Arthur takes Aquarium A.
With the diver row fully solved, the positions of the remaining fish and reactions fall into place. Aquarium A is managed by Arthur, and Aquarium B is managed by Paula. The attendance details reveal which creature belongs in which tank.
Crowd Sizes Settle The Attendance Numbers
The crowd trait introduces four distinct attendance levels: x1, x2, x3, and x4. The photogenic Eel is known to draw the largest crowd of all, which fixes the Eel at a crowd value of x4. Paired with the clue that Tony attracts almost as many visitors as Arthur, Arthur must command the maximum crowd of x4, leaving Tony just behind him with a crowd of x3 in Aquarium D.
Because Arthur commands the maximum crowd of x4, Arthur's tank at Aquarium A must house the Eel. Following the earlier behavioral link, the Eel causes the audience to become Scared, cementing both the Eel and the Scared crowd reaction into Aquarium A.
This leaves Aquarium B as the sole remaining home for the Shark and its Excited crowd. With Aquarium A at x4 and Aquarium D at x3, only crowd sizes x1 and x2 remain unassigned. The frustrated visitors feeling scammed by the mythical creature at Aquarium C naturally result in the lowest turnout of x1. Meanwhile, Paula's popular Shark feeding show at Aquarium B draws the remaining attendance level of x2.
Where The Trait Rows Intersect
Linking The Multiple Highlights Clue To The Diver Row
The clue describing an aquarium with multiple highlights creates a bridge between the animal roster and diver placement. Aquarium C is identified as featuring a siren, which accounts for the dual entry of Mermaid / Clownfish. Recognizing that Aquarium C is the tank with multiple highlights immediately unlocks the spatial clue about Tony being stationed to its right. This single deduction pins Tony to Aquarium D and prevents any confusion about where the three-person sequence of Arthur, Paula, and Johnny should be placed.
Merging The Eel Reaction With Attendance Volume
The Eel serves as the critical junction point between animal behavior, crowd reactions, and numerical attendance. One clue links the Eel to a Scared crowd reaction, while another establishes that the Eel pulls in the largest audience. When paired with the clue showing that Arthur holds a higher crowd level than Tony, the Eel and Arthur become inseparable at Aquarium A. This cross connection resolves three rows simultaneously: it assigns the x4 crowd value to Arthur, places the Eel in tank A, and locks the Scared reaction into the very first column.
Final Grid Check
Each category verifies the logic of the others across all four columns. The divers align seamlessly in their sequence, placing Paula squarely between Arthur and Johnny while leaving Tony on the far right. The crowd numbers scale downward logically from the massive turnout for Arthur's electric Eel display to the modest, disgruntled group viewing the mythical exhibit in Aquarium C. Every creature, caretaker, attendance level, and reaction forms a harmonious and completely consistent layout.
Comments