
Profile Perfect Level 570 Answer
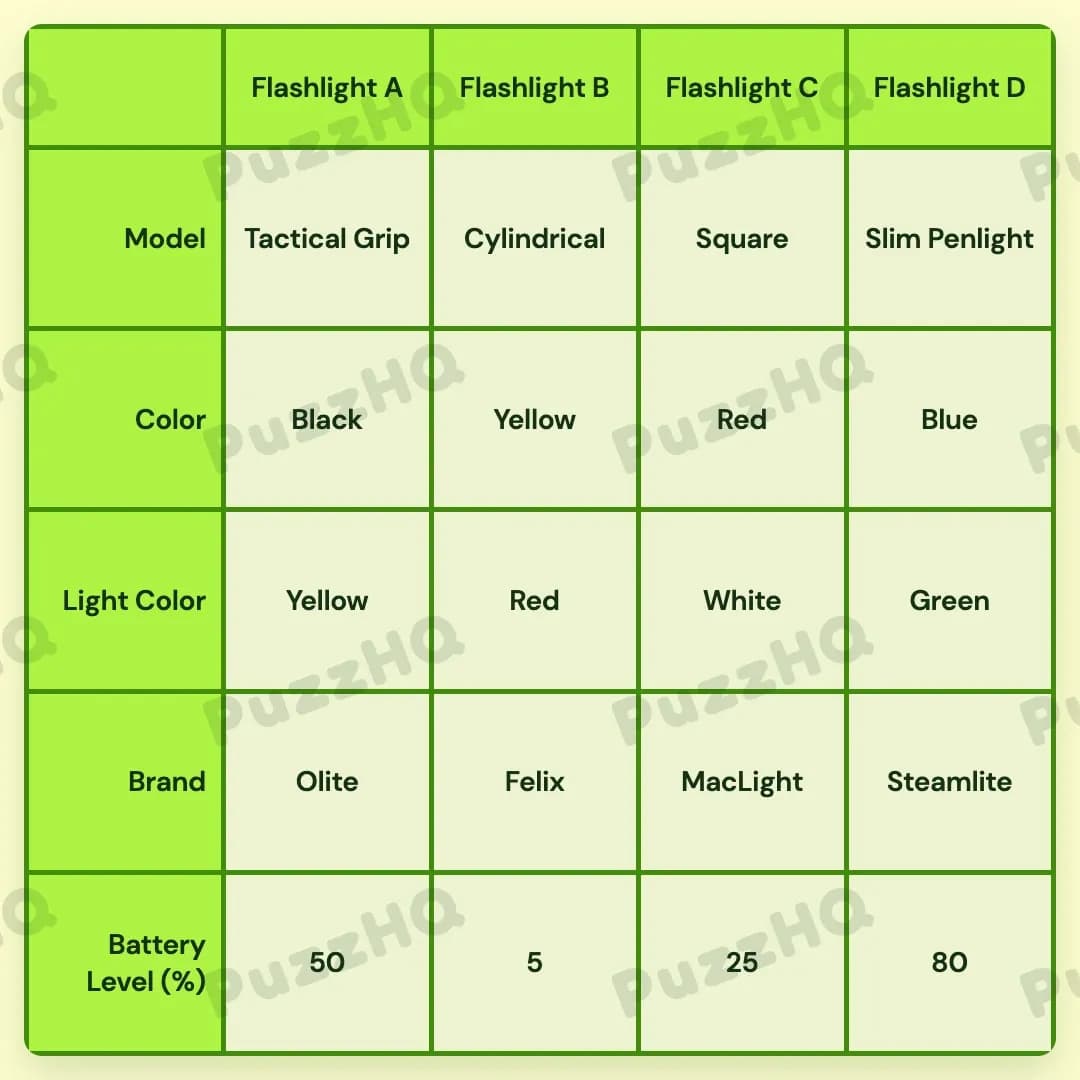
Before you unpack the rest of the workbench, here is the verified setup for all four flashlights across the line.
| Trait | Flashlight A | Flashlight B | Flashlight C | Flashlight D |
|---|---|---|---|---|
| Model | Tactical Grip | Cylindrical | Square | Slim Penlight |
| Color | Black | Yellow | Red | Blue |
| Light Color | Yellow | Red | White | Green |
| Brand | Olite | Felix | MacLight | Steamlite |
| Battery Level (%) | 50 | 5 | 25 | 80 |
The Logic Behind Profile Perfect Level 570
Every good logic puzzle has a hidden hinge, and in this setup, that hinge is purely spatial. While there are battery percentages to calculate and brand names to balance, the entire lineup finds its footing through the physical positions of the four casings resting side by side. Once you recognize how the colored bodies and form factors sandwich Flashlight B into the center, the rest of the specifications fall in line with reassuring order.
Spatial Clues Lock the Hardware into Position
The opening move is straightforward. Flashlight C gives us a firm starting coordinate by shining a bright white beam, giving the middle of the board an immediate point of orientation. From there, physical positioning takes over.
We learn that the largest model type sits squarely between the red and black models. Flashlight C provides the red anchor on the right, which forces the black casing onto the far left at Flashlight A. That positioning leaves Flashlight B trapped directly between them, occupying the slot reserved for the widest profile. Between the square, tactical, penlight, and cylindrical shapes, the cylindrical build is the natural fit for the largest body type.
With Flashlight C established as red, the relationship between neighbors continues to bear fruit. The light color sitting immediately beside Flashlight C mirrors Flashlight C's own casing, which gives Flashlight B a vibrant red beam. Just a few deductions into the board, the middle two slots already possess unmistakable physical identities, and the left end of the row is committed to a black finish.
Battery Math Divides the Power Cells
Once the physical frames are set, the battery levels provide the next major surge of momentum. Four distinct charge percentages exist across the devices, and mathematical relationships quickly separate them.
One flashlight holds exactly half the charge of another when rounded. Looking at the values in play, fifty percent and twenty-five percent form that clean ratio, immediately connecting Flashlight A and Flashlight C. Flashlight A carries the fifty percent charge, while Flashlight C settles at twenty-five percent.
That twenty-five percent base at Flashlight C unlocks the next calculation. We are told another unit holds slightly more battery than three times a specific model. Three times twenty-five yields seventy-five, and an eighty percent reading fits the description of being slightly higher. That high capacity belongs to Flashlight D on the far right.
By elimination, the depleted five percent reading drops directly into Flashlight B. This matches the idea of a nearly dead cell, giving the cylindrical torch a faint, fading reserve to match its low power status.
Distinctive Builds Settle the Remaining Specs
With power figures and positions settled, the physical models snap into place. The tactical grip model is explicitly paired with a yellow beam, perfectly matching Flashlight A, which was waiting for its model name and light specification.
At the far end of the bench, Flashlight D takes on the slim penlight profile. A stationery-inspired design belongs at the extreme end of the row, safely separated from the central cluster. That leaves the square model to finish the form factor trait for Flashlight C.
Color assignments wrap up quickly from here. Flashlight D accepts the blue shell, while Flashlight B takes yellow, completing the four body colors across the board. The light beams follow a similar trajectory. With yellow at Flashlight A, red at Flashlight B, and white at Flashlight C, Flashlight D takes the remaining green beam.
The brands bring the puzzle home. Olite is linked to a dark casing that differs from its own logo color, which belongs at Flashlight A in black. Furthermore, the model carrying Olite's signature logo hue sits farthest away on the opposite side of the lineup, leading across the row to Flashlight D. Steamlite claims that final right-hand position, Felix pairs with the low-battery yellow body at Flashlight B, and MacLight rounds out the red square profile at Flashlight C.
The Clue I Would Read Twice
The instruction stating that the model with Olite's logo color sits farthest from it is the easiest clue to misinterpret if you skim it too quickly. At first glance, it feels like an abstract branding trivia note that belongs late in the solve. In practice, it works as a rigorous boundary condition.
To use the clue properly, you must realize that being farthest from a target demands an extreme endpoint on the board. Because Olite is placed on the far left at Flashlight A, the model wearing its logo shade must sit at the absolute opposite boundary at Flashlight D. This simple rule confirms both the identity of Flashlight A and the final body color of Flashlight D without relying on guesswork.
Final Thoughts
What makes this particular grid enjoyable is how grounded the flashlights feel as tangible objects. You can visualize the bulky cylindrical casing resting between the black tactical grip and the red square body, its tiny red beam struggling on a nearly exhausted five percent cell while the penlight hums comfortably at eighty percent on the far end. It is a satisfying exercise in translating physical descriptions into an orderly row of tools.
Comments