
Profile Perfect Level 22 Answer
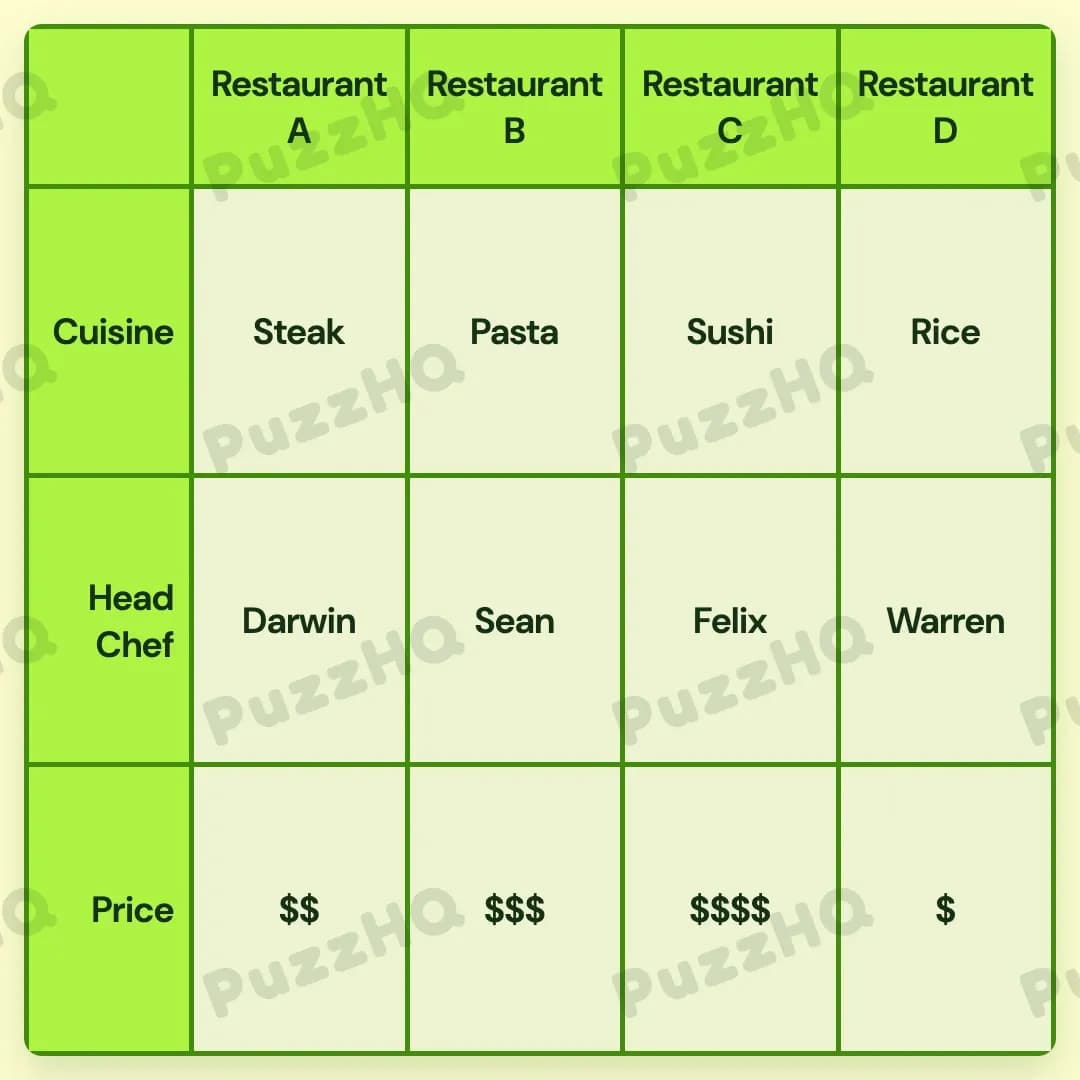
Here is the complete solution for all four restaurants, matching their cuisine, head chef, and price point.
| Trait | Restaurant A | Restaurant B | Restaurant C | Restaurant D |
|---|---|---|---|---|
| Cuisine | Steak | Pasta | Sushi | Rice |
| Head Chef | Darwin | Sean | Felix | Warren |
| Price | $$ | $$$ | $$$$ | $ |
How I Solved Profile Perfect Level 22
Looking at the clues at the start, the clear starting point was finding an exact placement for a cuisine, which immediately unlocked a reliable chain of pricing clues across the four restaurants.
Starting With Restaurant D And Pricing
The first thing I noticed was the direct statement that Restaurant D serves special kinds of Rice. That gave me an immediate cuisine match right on the far right column.
Pairing that with the clue stating that the restaurant serving Rice is the most affordable gave Restaurant D the lowest price tier, $.
From there, another clue stated that next to the cheapest restaurant is the most expensive restaurant. Because Restaurant D is in the fourth position on the board, the only restaurant directly next to it is Restaurant C. That meant Restaurant C had to be the most expensive option, receiving the highest price tier of $$$$.
Ordering The Remaining Menu Prices And Cuisines
With two price tiers locked in ($ at Restaurant D and $$$$ at Restaurant C), I only had two price points left to assign: $$ and $$$.
A subsequent clue noted that the Steak house is cheaper than the Pasta restaurant. Because only Restaurant A and Restaurant B were unassigned in price, Restaurant A had to take the cheaper tier ($$), leaving Restaurant B with the higher tier ($$$).
This relative price comparison also clarified the cuisines:
- The Steak house is cheaper than the Pasta restaurant, meaning Restaurant A is Steak and Restaurant B is Pasta.
- The only remaining cuisine on the board was Sushi, which naturally belonged to Restaurant C.
At this stage, the cuisine and price rows across all four restaurants were completely mapped out:
- Restaurant A: Steak (
$$) - Restaurant B: Pasta (
$$$) - Restaurant C: Sushi (
$$$$) - Restaurant D: Rice (
$)
Working Through The Chef Profiles
With the cuisines and prices settled, I shifted attention to the clues describing the head chefs and their physical traits.
I already knew which cuisine belonged to each location:
- The clue mentioning that the Sushi chef takes good care of his Long Hair attached the long hair trait directly to Restaurant C.
- Another clue stated that the chef with a Scar makes the best Pasta, linking the scar trait directly to Restaurant B.
- The clue stating Restaurant A's chef is famous for his Big Mustache linked the big mustache trait directly to Restaurant A.
Next, I looked at the clue stating that the restaurant next to the Long Haired chef has a Bald chef, combined with the fact that the Bald chef is not next to the Pasta restaurant.
- The Long Haired chef is at Restaurant C.
- The restaurants next to Restaurant C are Restaurant B and Restaurant D.
- Since the Bald chef cannot be adjacent to the Pasta restaurant (Restaurant B), the Bald chef could not be at Restaurant A or Restaurant C, leaving Restaurant D as the only valid location for the bald chef.
Matching The Head Chefs
Once every trait, cuisine, and price was locked to its correct restaurant column, matching the names of the head chefs followed naturally. Darwin is the head chef at Restaurant A, Sean leads Restaurant B, Felix manages Restaurant C, and Warren heads Restaurant D.
Everything aligned neatly with every condition laid out in the puzzle.
The Point Where I Nearly Went Wrong
The clue that could easily trip someone up is the adjacency requirement for the Bald chef. The clue states that the restaurant next to the Long Haired chef has a Bald chef, but Restaurant C sits between Restaurant B and Restaurant D. It is tempting to jump to conclusions before checking the negative clue that follows.
If you do not immediately cross-check the restriction that the Bald chef is not next to the Pasta restaurant, you might accidentally place the Bald chef at Restaurant B instead of Restaurant D. Remembering that Restaurant B is the Pasta restaurant eliminates Restaurant B as an option and guarantees that Restaurant D holds the Bald chef.
Looking Back At The Solution
The pivotal breakthrough in this grid was anchoring the Rice cuisine at Restaurant D and tying it to the lowest price point. That single link forced the most expensive tier into Restaurant C, which untangled the remaining price comparisons and opened up the rest of the board.
Comments