
Profile Perfect Level 349 Answer
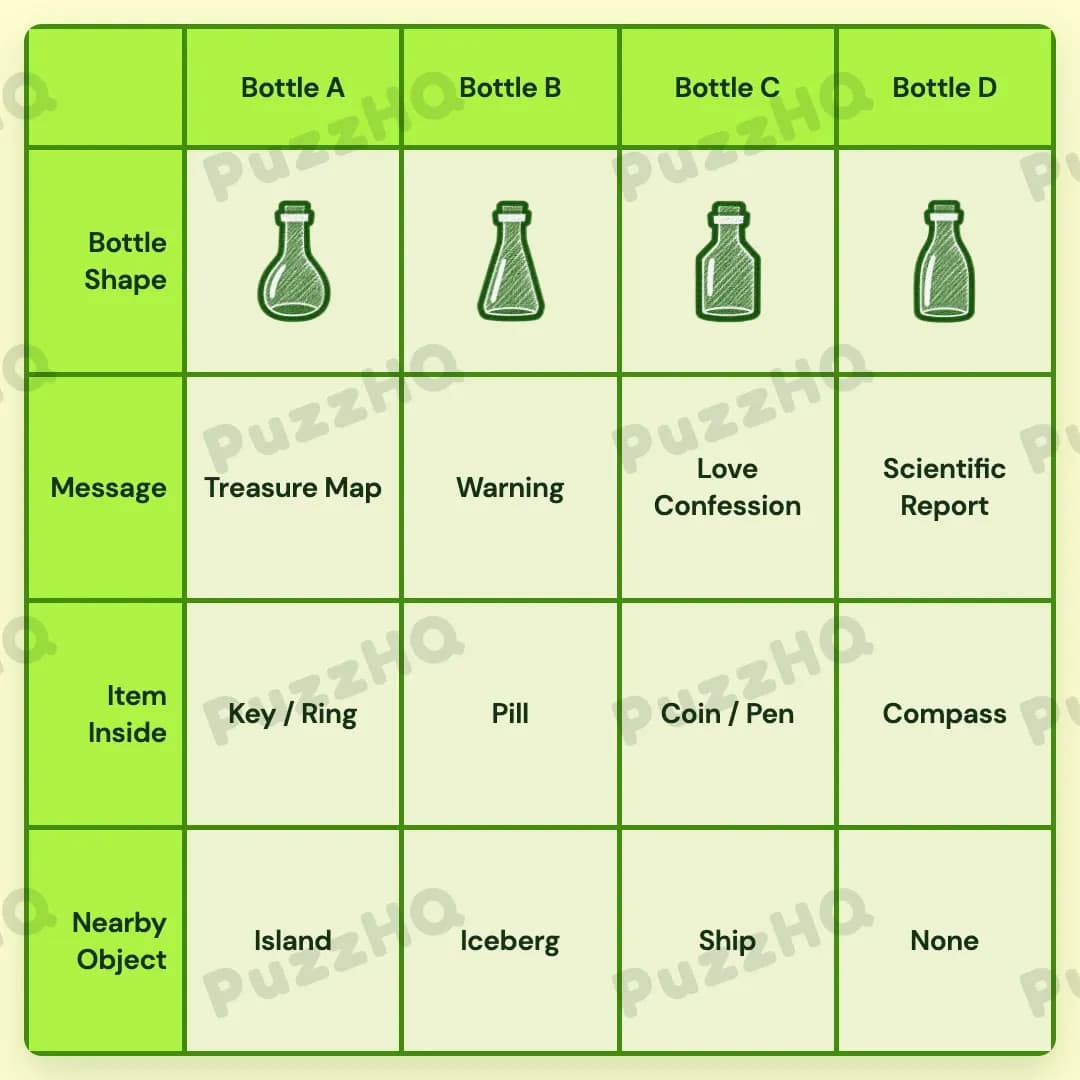
Every bottle across the shoreline can be fully identified by matching the scientist's mission, the lovestruck confession, and the physical positions of each nearby landmark.
| Trait | Bottle A | Bottle B | Bottle C | Bottle D |
|---|---|---|---|---|
| Bottle Shape | Row3Col2 | Row2Col2 | Row1Col1 | Row3Col5 |
| Message | Treasure Map | Warning | Love Confession | Scientific Report |
| Item Inside | Key / Ring | Pill | Coin / Pen | Compass |
| Nearby Object | Island | Iceberg | Ship | None |
Building The Grid By Trait
Starting with the Message category provides the cleanest entry point because several clues directly tie written notes to specific column positions and contents. Once these messages fix the outer boundaries of the board, tracking the Items Inside and Nearby Objects creates a clear chain of deduction that resolves the entire layout.
Message And Item Inside Anchor The Extremes
The rightmost position on the board, Bottle D, is immediately solved by the statement that the rightmost bottle contains a classified Scientific Report. Connecting this note to the scientist reveals that Sir Newt included a Compass to guide the mission. This places the Compass directly into Bottle D alongside the Scientific Report.
With the Compass established in the fourth column, the spacing rule for the Pill comes into play. The Pill is located exactly two columns away from the Compass, which directly locks the Pill into Bottle B.
Next, examining the romantic note links two other categories. The lovestruck girl dropped her tool into the bottle containing the heartfelt message. A pen is a writing tool, pointing to the Coin / Pen combination belonging to the Love Confession. Because the clue specifies that the heartfelt message is not located near the Island or the Iceberg, the Love Confession cannot be placed in Bottle A or Bottle B. Since Bottle D already holds the Scientific Report, the Love Confession must belong to Bottle C, carrying the Coin / Pen inside it.
This leaves only two message types and two item sets to place. The note mentioning the treasure chest pairs naturally with the Key / Ring combination, since a key opens a chest. Placing the Treasure Map and Key / Ring into Bottle A leaves the Warning message to fill Bottle B, which already contains the Pill.
Nearby Object Aligns With The Clue Geography
With the messages and contents firmly distributed across the four columns, the environmental surroundings quickly fall into place. We know from the heartfelt message clue that Bottle C cannot be near the Island or the Iceberg, and Bottle D already has no landmark assigned to it. This leaves the Ship as the only valid environment for Bottle C.
Furthermore, we learn that the bottle located to the right of the Iceberg contains multiple items. Bottle C holds multiple items (the Coin / Pen pair) and sits immediately to the right of Bottle B. This establishes that Bottle B is floating near the Iceberg.
With the Iceberg in Bottle B, the Ship in Bottle C, and no landmark associated with Bottle D, the Island must belong to Bottle A. This perfectly matches our earlier observation that Bottle A holds the Treasure Map, as islands and treasure maps are classic companions.
Bottle Shape Completes The Physical Descriptions
With all messages, items, and nearby objects resolved across the four subjects, the remaining task is assigning the bottle shapes to their respective columns.
Each column receives its designated physical profile based on the established grid mapping. Bottle A takes the Row3Col2 shape, Bottle B receives Row2Col2, Bottle C matches Row1Col1, and Bottle D is fixed with Row3Col5. Every category row is now completely occupied without any internal contradictions.
Where The Trait Rows Intersect
The Scientist's Report Connects Column Position And Item Selection
The deduction for the fourth column demonstrates how location and trait identity work together. The clue establishes that the rightmost bottle carries the Scientific Report, while another clue notes that the scientist packed a Compass. By synthesizing these two separate statements, Bottle D instantly receives both its message and its item in one move. This fixed anchor then acts as the measuring post for the spacing rule that places the Pill into Bottle B.
The Heartfelt Message Filters Geographic Landmarks
Rather than attempting to place landmarks by guessing, the negative condition on the heartfelt note eliminates the Island and the Iceberg from Bottle C. Because Bottle D is already occupied by the scientist's items and has no landmark, Bottle C must take the Ship. This single deduction prevents ambiguity across the entire Nearby Object row and immediately forces the Iceberg into Bottle B.
Multiple Items Validate Column Adjacency
The clue noting that the bottle to the right of the Iceberg contains multiple items serves as a crucial cross check. Bottle C contains two items, the Coin and the Pen, and rests directly to the right of Bottle B. Confirming that Bottle B is near the Iceberg validates both the item assignment in Bottle C and the landmark assignment in Bottle B simultaneously.
Final Grid Check
Reviewing the solved board confirms that every constraint is satisfied in harmony. Bottle A holds the Treasure Map and Key / Ring near the Island with the Row3Col2 shape. Bottle B contains the Warning note and Pill near the Iceberg with the Row2Col2 shape. Bottle C contains the Love Confession and Coin / Pen near the Ship with the Row1Col1 shape. Finally, Bottle D holds the Scientific Report and Compass with the Row3Col5 shape, standing two columns away from the Pill. Every clue aligns seamlessly across all four columns.
Comments