
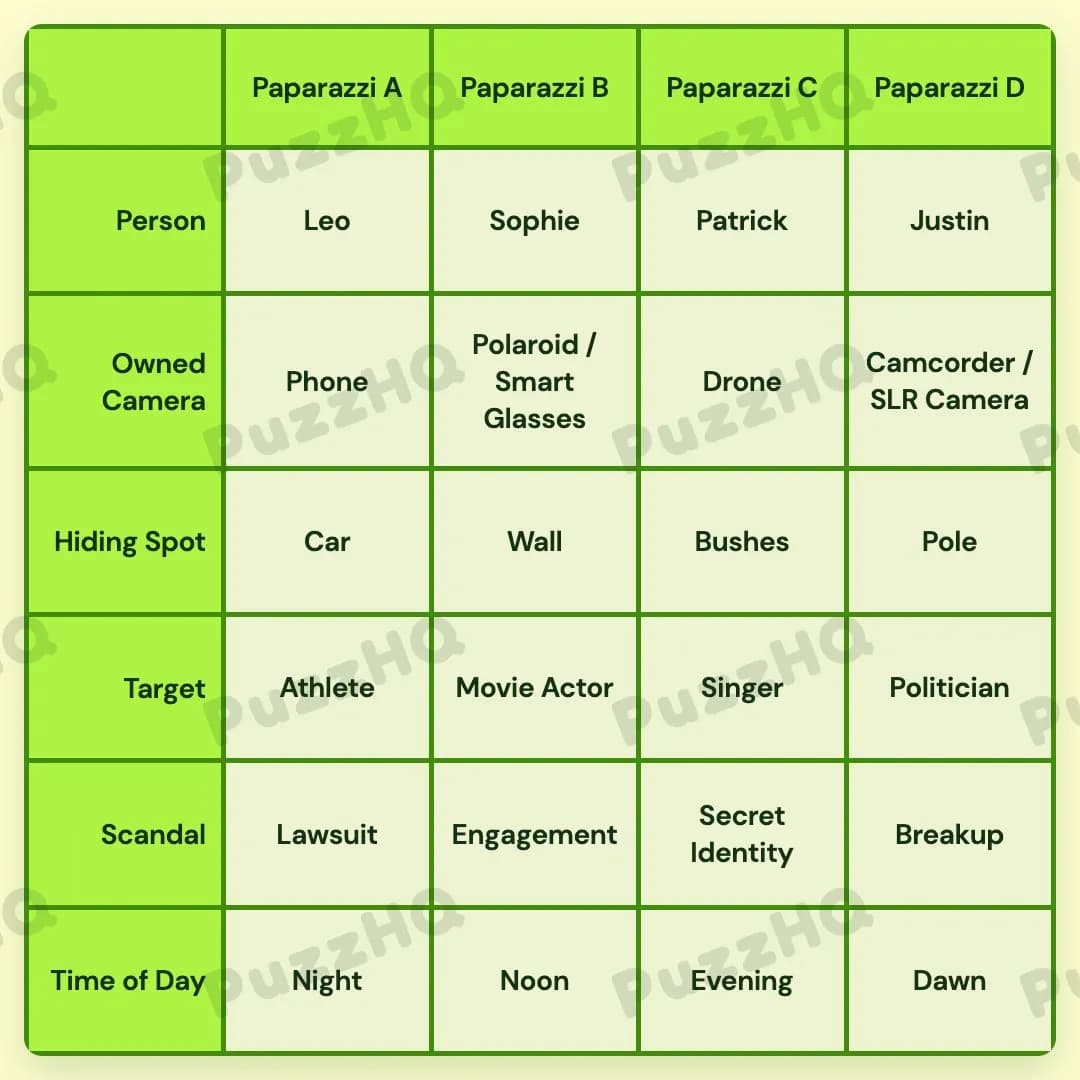
Profile Perfect Level 385 Answer
By linking the physical hiding spots to specific investigators and following the scandal assignments, every paparazzi finds their exact target and equipment.
| Trait | Paparazzi A | Paparazzi B | Paparazzi C | Paparazzi D |
|---|---|---|---|---|
| Person | Leo | Sophie | Patrick | Justin |
| Owned Camera | Phone | Polaroid / Smart Glasses | Drone | Camcorder / SLR Camera |
| Hiding Spot | Car | Wall | Bushes | Pole |
| Target | Athlete | Movie Actor | Singer | Politician |
| Scandal | Lawsuit | Engagement | Secret Identity | Breakup |
| Time of Day | Night | Noon | Evening | Dawn |
Building The Grid By Trait
Starting with the physical locations and the people occupying them provides the clearest foundation for resolving the entire puzzle.
Hiding Spot And Person Establish The Physical Framework
The hiding spots immediately anchor several investigators to their columns. Sophie stakes out behind the Wall to track down a fiancee, which directly pairs Sophie with the Wall. Patrick makes a distinct rustling sound entering his position, meaning Patrick must be concealed in the Bushes. Meanwhile, the car spot is tied to a stakeout at 10 PM on an athletic target who could outrun Paparazzi A, confirming that Paparazzi A is hiding behind the Car.
With three hiding spots accounted for across the columns, the remaining spot is the Pole, which naturally falls to Paparazzi D. Since Sophie is behind the Wall at Paparazzi B and Patrick is in the Bushes at Paparazzi C, the remaining people to distribute are Leo and Justin. A stakeout next to Justin chases a diva, which positions Justin at Paparazzi D behind the Pole. This leaves Leo to take the first slot at Paparazzi A behind the Car.
Target And Scandal Group The Assignments
The investigative targets and their scandals fit neatly into the established investigator columns. The car stakeout at Paparazzi A targets an Athlete who might easily outrun the photographer. The middle positions, Paparazzi B and Paparazzi C, focus on figures from the entertainment industry. Sophie at Paparazzi B observes a fiancee connected to an engagement scandal, identifying her target as the Movie Actor.
Next to Sophie, the diva is chased by the investigator to the left of Justin, placing the Singer at Paparazzi C. That leaves the Politician as the target for Justin at Paparazzi D. Connecting scandals to these figures resolves the rest of the scandal row. The SLR user monitors a breakup scandal, placing the Breakup scandal under Justin at Paparazzi D. Targets with lawsuit and engagement scandals sit as neighbors, meaning Paparazzi A investigates the Lawsuit alongside Paparazzi B's Engagement. The remaining scandal, the Secret Identity, belongs to Patrick's Singer assignment at Paparazzi C.
Owned Camera Distributes The Gear
With the subjects, spots, and targets locked in place, the cameras follow clear structural rules. The two investigators who carry multiple cameras are situated earlier in the lineup than those with single setups, placing dual-camera kits in the first half of the sequence. Paparazzi B holds a Polaroid with a hidden backup camera in plain sight, giving Sophie the Polaroid and Smart Glasses pair. Justin at Paparazzi D is already identified as the SLR user investigating the breakup, so Justin takes the Camcorder and SLR Camera combination.
The single camera users fall into the remaining positions without conflict. The Drone cannot sit next to the Bushes, which prevents it from being in adjacent positions, placing the Drone squarely with Patrick at Paparazzi C. This leaves the standard Phone as the sole piece of gear for Leo at Paparazzi A.
Time Of Day Completes The Schedule
The temporal traits finalize the daily routine for each investigator. Paparazzi A's stakeout by the Car takes place at 10 PM, defining Night for Leo. The investigator next to Leo experiences opposite ambient conditions, shifting noon heat to Paparazzi B. The remaining time slots distribute Dawn to Justin at Paparazzi D and Evening to Patrick at Paparazzi C, completing the full timetable across all four profiles.
Where The Trait Rows Intersect
Hiding Spots Unlock Person And Target Identifications
The hiding locations act as a bridge between the investigators and their specific assignments. Identifying that the Bushes produce rustling noises immediately links Patrick to Paparazzi C, which then isolates the Wall for Sophie at Paparazzi B and the Car for Paparazzi A. Because the Car stakeout specifically monitors a fast-moving Athlete, the hiding spot row simultaneously fixes both the Person and Target rows for Paparazzi A without requiring separate trial and error.
Scandal Assignments Pinpoint The Camera Setup
Connecting the Breakup scandal to Justin at Paparazzi D directly impacts the equipment category. Because the photographer tracking the Breakup relies on an SLR camera, Justin must hold the Camcorder and SLR Camera pair. This single cross-trait link prevents the multi-camera setups from being placed incorrectly and ensures Sophie receives the Polaroid and Smart Glasses combination at Paparazzi B.
Target Types Define Neighboring Column Positions
The entertainment industry requirement for the central columns creates a tight boundary for the Target and Person rows. Placing the Singer and Movie Actor at Paparazzi B and Paparazzi C satisfies the diva and fiancee clues simultaneously. This structural rule keeps the Politician at the far right with Justin and the Athlete at the far left with Leo, creating a clean symmetry that supports every surrounding trait row.
Final Grid Check
Every row now stands fully verified against its neighboring traits. The hiding spots match each investigator's physical movements, the cameras align with their specific investigative needs, the targets correlate with their respective scandals, and the time slots account for all environmental conditions. Each category locks seamlessly into the next, confirming a completely cohesive solution across the entire board.
Comments