
Profile Perfect Level 390 Answer
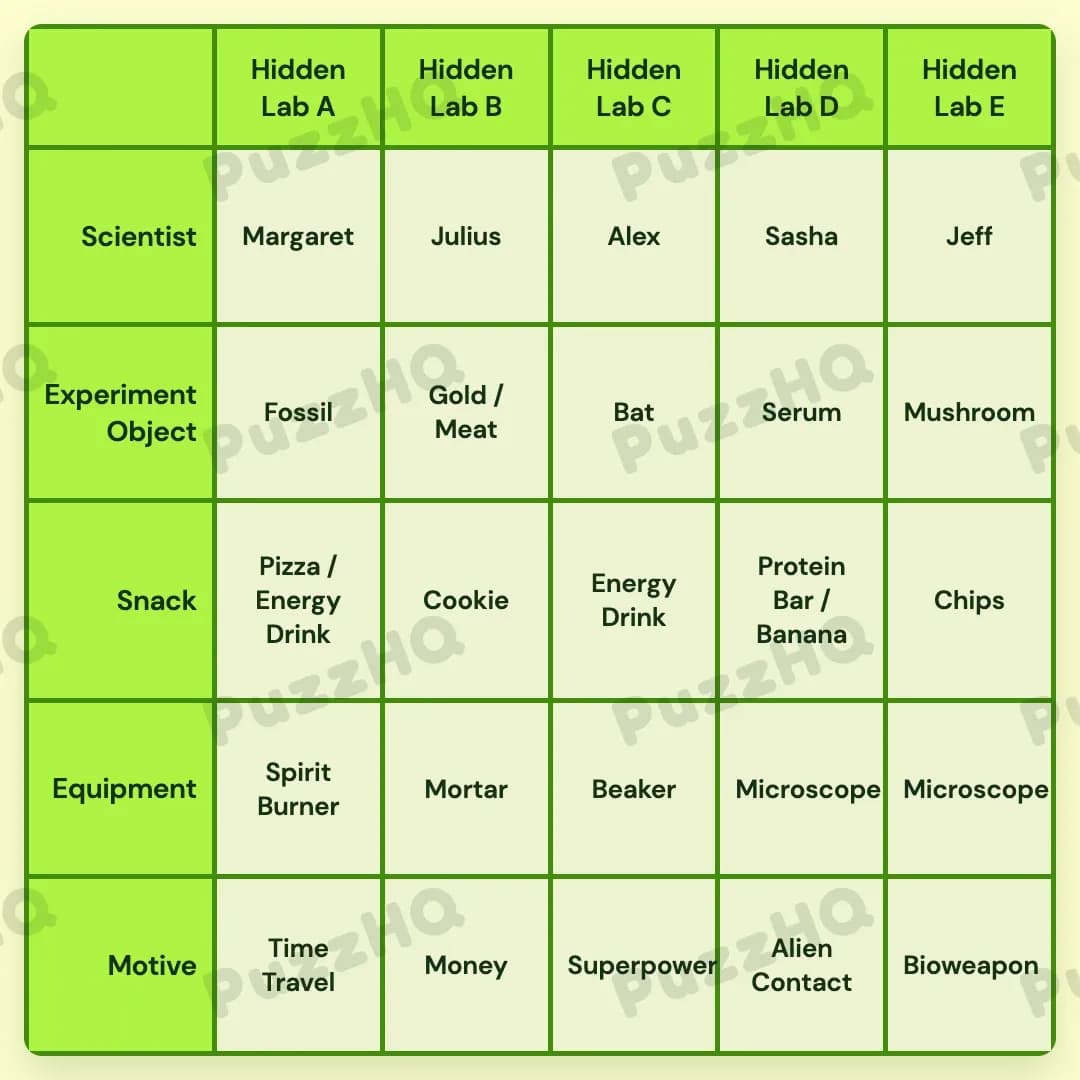
Beneath the classified research facility lies an eccentric lineup of researchers, whose secret experiments and midday snacks reveal exactly who is working in each laboratory bay.
| Trait | Hidden Lab A | Hidden Lab B | Hidden Lab C | Hidden Lab D | Hidden Lab E |
|---|---|---|---|---|---|
| Scientist | Margaret | Julius | Alex | Sasha | Jeff |
| Experiment Object | Fossil | Gold / Meat | Bat | Serum | Mushroom |
| Snack | Pizza / Energy Drink | Cookie | Energy Drink | Protein Bar / Banana | Chips |
| Equipment | Spirit Burner | Mortar | Beaker | Microscope | Microscope |
| Motive | Time Travel | Money | Superpower | Alien Contact | Bioweapon |
The Logic Behind Profile Perfect Level 390
Everything in this puzzle flows outward from a spatial backbone. Rather than handing us direct assignments immediately, the puzzle uses horizontal spacing across the laboratory columns to anchor the scientists in place. Once the five researchers are pinned to their specific benches from Hidden Lab A through Hidden Lab E, their strange motives, laboratory equipment, and dietary habits slot neatly into the grid through direct association.
Positional Clues Lock Down The Roster
The solve begins with the layout of the lab benches. We are told directly that Scientist E only gets five minutes to eat chips for lunch, placing chips firmly in Hidden Lab E at the far right. From there, another clue states that there are three unique snacks between Julius and chips. Because chips occupy the fifth column, Julius must sit four positions away in Hidden Lab B, leaving the three intermediate snack slots between them.
The remaining scientists quickly fall into place using two relative position clues. Alex is described as being two columns to the right of someone trying to fix the past. If the person who wants to alter the past were in Hidden Lab B, Alex would be in Hidden Lab D, but we know another clue places a jealous scientist immediately to the right of Sasha who builds a bioweapon to kill aliens. Placing Sasha in Hidden Lab D puts her neighbor in Hidden Lab E, leaving Hidden Lab A for Margaret and Hidden Lab C for Alex. That naturally places the time travel motive in Hidden Lab A, two columns left of Alex, while Jeff claims the remaining scientist spot at Hidden Lab E.
Lab Work And Equipment Establish The Core Science
With the scientists established across the row, their research assignments link up without much resistance. Sasha takes the initiative to contact a pretty alien, which establishes her motive in Hidden Lab D as alien contact. That immediately clarifies the neighboring scientist in Hidden Lab E, who makes a bioweapon to wipe out aliens.
Julius receives instructions from the head scientist to coat meat with gold leaf, assigning both gold and meat as his experimental subject in Hidden Lab B. His motive aligns with money. Meanwhile, Margaret is attempting to burn a fossil into charcoal, which pairs the fossil with Hidden Lab A and equips her station with a spirit burner. Because equipment beside the burner can turn things into dust, the adjacent Hidden Lab B receives the mortar.
Over in Hidden Lab C, Alex is connected to the study of bat extract to become The Human Bat, setting his motive to gaining a superpower and his experimental subject as the bat. The tissue sample from the bat belongs inside a beaker, which assigns the beaker to Hidden Lab C. Lab D melted its floor with a spilled sample of serum, while the remaining equipment slots in Hidden Lab D and Hidden Lab E fill out with microscopes. Hidden Lab E takes mushroom as its experiment object.
Motives And Snacks Complete The Dossier
The final layer involves sorting out who eats what while conducting these dubious experiments. Alex craves pizza but cannot order it without giving away his location, while Margaret eats the dream food that Alex can only imagine. That delivers pizza to Margaret in Hidden Lab A, alongside an energy drink.
Sasha pays close attention to nutrition, specifically looking for protein and antioxidants, which matches the protein bar and banana in Hidden Lab D. With chips already sitting in Hidden Lab E and the dessert pairing resolved by giving Julius his cookie in Hidden Lab B, Alex takes an energy drink in Hidden Lab C to finish off the board. Every laboratory bay now holds a complete, cohesive record of its researcher, their tools, and their questionable life goals.
The Clue I Would Read Twice
The clue stating that the one two columns to the left of Alex tries to fix the past is the pivot point of the entire layout. It does not mention a lab letter or a scientist by name, yet it simultaneously establishes Margaret in Hidden Lab A, gives her the time travel motive, and sets Alex in Hidden Lab C. If you miscalculate the column offset or try to place Alex before locating Julius and Sasha, the middle of the board becomes impossible to untangle. Reading that clue in tandem with the spatial gap between Julius and the chips is what makes the entire roster fall into place.
Final Thoughts
There is a charming absurdity to this facility. Watching a researcher burn ancient fossils next door to someone gold leafing steaks makes the grid memorable, and the crisp positional geometry gives the deduction process a very clean rhythm.
Comments