
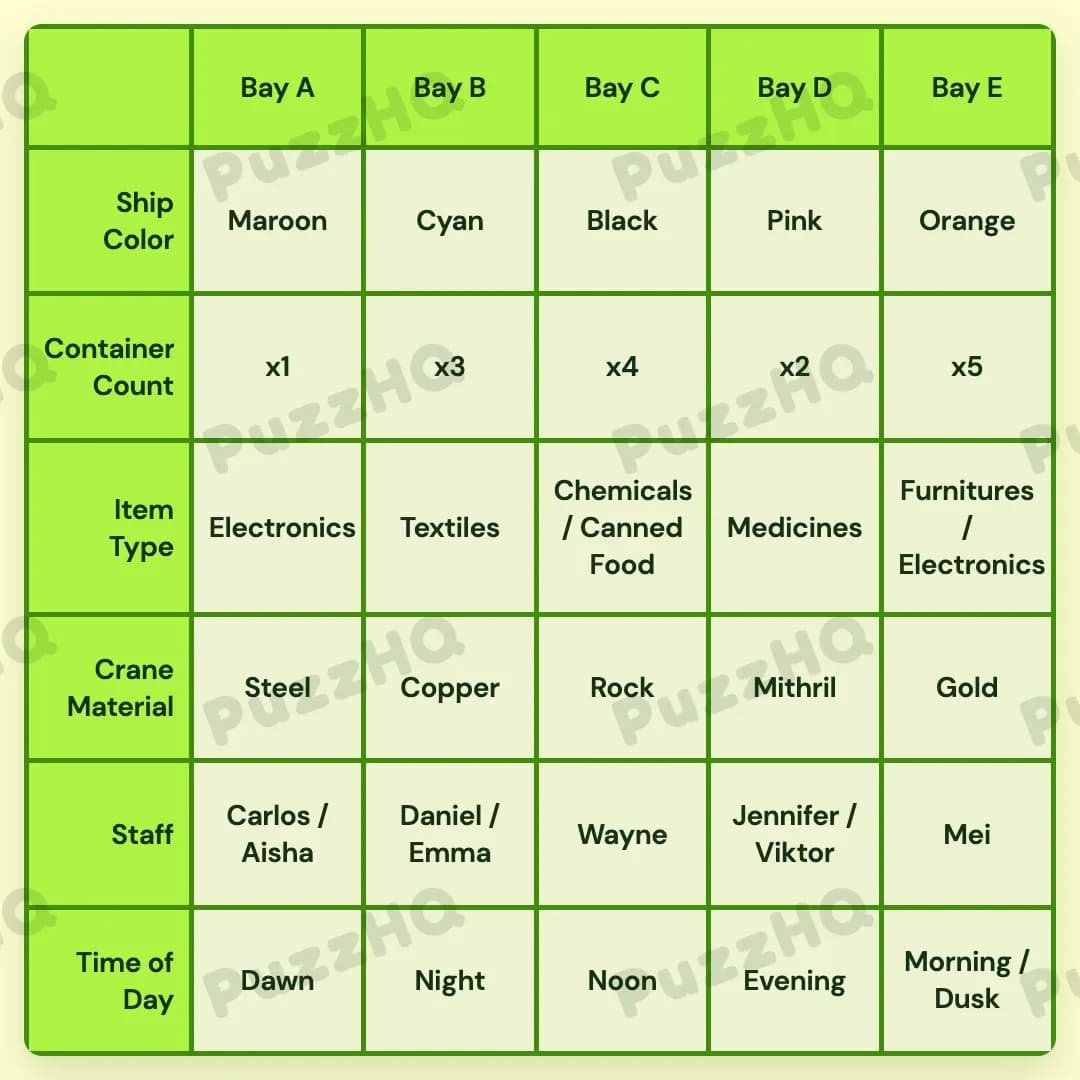
Profile Perfect Level 409 Answer
By aligning the outer crane materials and ship colors first, the entire port layout locks neatly into place bay by bay.
| Trait | Bay A | Bay B | Bay C | Bay D | Bay E |
|---|---|---|---|---|---|
| Ship Color | Maroon | Cyan | Black | Pink | Orange |
| Container Count | x1 | x3 | x4 | x2 | x5 |
| Item Type | Electronics | Textiles | Chemicals / Canned Food | Medicines | Furnitures / Electronics |
| Crane Material | Steel | Copper | Rock | Mithril | Gold |
| Staff | Carlos / Aisha | Daniel / Emma | Wayne | Jennifer / Viktor | Mei |
| Time of Day | Dawn | Night | Noon | Evening | Morning / Dusk |
Building The Grid By Trait
Starting with the structural traits provides the cleanest path forward because crane placements and ship colors define the physical limits of the harbor. Once the outer edges are pinned down, cargo distributions and work schedules resolve rapidly across each category.
Crane Material And Ship Color Establish The Outer Spatial Layout
The crane placements give immediate spatial certainty across the bays. Clue 2 directly states that Bay E operates the Gold crane, which means its immediate neighbor at Bay D holds the Mithril crane.
Meanwhile, Clue 1 establishes that the Orange ship sits at the opposite extreme from the Maroon ship. Combining this with Clue 5, which notes that the Copper crane and both of its neighbors avoid any feminine ship color, allows the harbor colors to settle. The Copper crane must occupy Bay B so that its neighbors at Bay A and Bay C can be Maroon and Black respectively, leaving Pink safely placed at Bay D.
Because Orange is furthest from Maroon, Maroon takes Bay A, and Orange takes Bay E. With Bay A receiving the Steel crane to satisfy Clue 7 and Bay E taking Gold, the remaining Rock crane falls into Bay C. Once the Cyan ship is placed at Bay B to clear the remaining color slot, the physical backdrop of the port is completely fixed.
Item Types And Container Counts Map The Cargo Flow
With the bays identified by crane and ship hull, cargo types fit into logical positions based on operational clues. Clue 8 mentions that the bay with the Steel crane shares an item type with another bay, while Clue 19 highlights that the Maroon ship carries items prone to planned obsolescence. This identifies Electronics at Bay A, which also repeats at Bay E alongside Furnitures.
Clue 3 points out a spill scenario involving reagent and food, grouping Chemicals and Canned Food together at Bay C. Clue 16 specifies that Textiles sits between distinct cargo items, placing Textiles at Bay B. Clue 21 links a life saving cargo to Medicines at Bay D, reinforced by Clue 22 which confirms Furnitures cannot be located to the left of Medicines, placing Furnitures firmly at Bay E.
Container counts follow the spatial distribution clues. Clue 15 states that the ship with the most containers is closer to Viktor than to Emma, placing the maximum count of five containers at Bay E. Bay A holds one container, Bay D holds two containers, Bay B holds three containers to remain greater than its neighbor as noted in Clue 11, and Bay C holds four containers.
Staff Assignments And Time Of Day Complete The Roster
Once the bays and their cargo are known, the crew schedules click into place. Clue 20 states that the staff member working at Noon is situated to the right of the Cyan ship at Bay B, placing the Noon shift directly at Bay C. Clue 13 mentions that Wayne works adjacent to the Pink ship, locking Wayne into Bay C during that Noon shift.
Clue 17 notes that Ursa Major is clearly visible during Daniel's shift, indicating night work at Bay B alongside Emma. Clue 18 shows Mei preparing to go home as the sun sets, tying Mei to the Morning and Dusk shift at Bay E.
Clue 10 places Viktor next to the bay holding different kinds of items, settling Viktor and Jennifer at Bay D during the Evening shift. Finally, Aisha and Carlos take the Dawn shift at Bay A, satisfying Clue 7 where work continues near 4 AM at the Steel crane, as well as Clue 9 regarding staff wearing glasses during Dawn or Evening hours.
Where The Trait Rows Intersect
Cargo Properties Connect With Crane Materials
The link between the Steel crane at Bay A and the cargo categories serves as a critical bridge early in the puzzle. Clue 7 points to early morning operations at the Steel crane, while Clue 8 and Clue 19 connect that same crane to planned obsolescence items. Knowing that Electronics belong at Bay A instantly fixes the shared item category between the first and last bays, bypassing several steps of trial and error.
Crew Proximity Determines Harbor Geometry
Clue 15 provides a powerful cross trait deduction by linking container volumes to staff positions. The clue notes that the ship with five containers is closer to Viktor than to Emma. Because Emma works at Bay B beside the middle bay and Viktor works at Bay D beside the mixed chemical cargo, the highest container volume must sit at Bay E rather than on the western side of the dock. This single connection locks both the container tier and the personnel layout simultaneously.
Final Grid Check
Every row in the finished grid harmonizes with the overall port structure. The progression of ship colors from Maroon to Orange matches the crane distribution from Steel to Gold, while the cargo classifications align directly with the shift times of the harbor workers. Checking each condition confirms that all twenty two clues hold true across all five bays without conflict.
Comments