
Profile Perfect Level 440 Answer
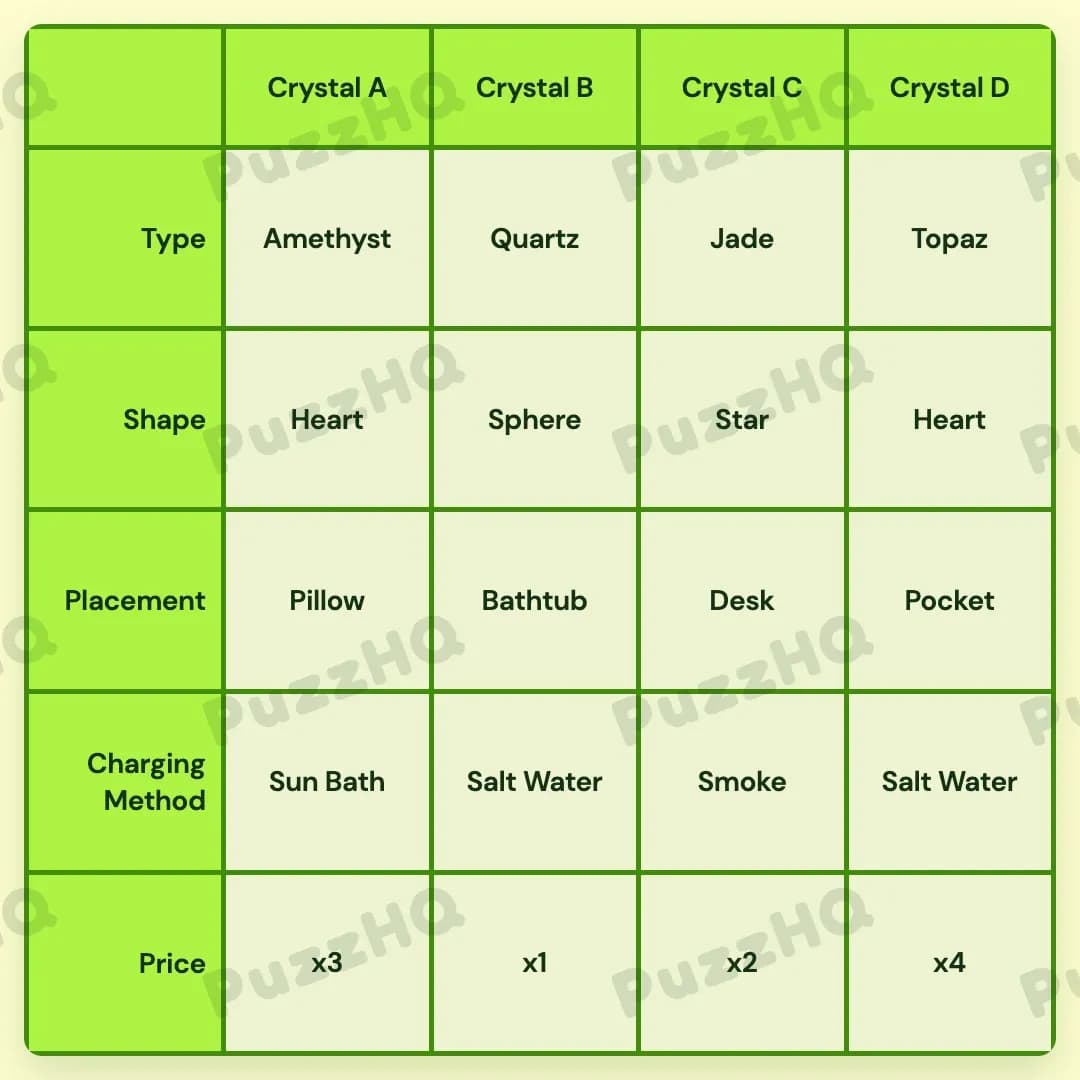
The completed grid below reveals every crystal profile, followed by a step-by-step walkthrough explaining how to deduce each value.
| Trait | Crystal A | Crystal B | Crystal C | Crystal D |
|---|---|---|---|---|
| Type | Amethyst | Quartz | Jade | Topaz |
| Shape | Heart | Sphere | Star | Heart |
| Placement | Pillow | Bathtub | Desk | |
| Charging Method | Sun Bath | Salt Water | Smoke | Salt Water |
| Price | x3 | x1 | x2 | x4 |
Clues of Profile Perfect Level 440
- crystal is 2 columns away from the Amethyst
- Charging the Amethyst requires ultraviolet light
- Crystal commonly used by ancient Chinese is on the right half
- Unlike Crystal C, leftmost crystal is placed on a fluffy cushion
- The second cheapest crystal is put on the Desk
- Crystal currently being showered is to the left of
- Owner of the Topaz carries it around on their Pocket
- Jade's neighbors are shaped into Sphere and Heart
- Crystal inside the Bathtub is not the most expensive
- The 2 crystals charged at the beach have a stark price difference
- The cheapest crystal is Sphere-shaped
How To Solve Profile Perfect Level 440
This puzzle challenges you to arrange four distinct crystals across five traits, using column positioning and price comparisons to lock everything in place. While a couple of clues have missing words or cut off abruptly, you can still reach the exact solution by anchoring the definite subject placements first and letting neighbor requirements resolve the rest.
Step 1: Position Jade and Crystal A's placement
Start by looking at the positional clues that immediately restrict column assignments.
Clue 4 notes that, unlike Crystal C, the leftmost crystal is placed on a fluffy cushion. In a four-column grid running from left to right, the leftmost subject is Crystal A. A fluffy cushion corresponds to the Pillow value under Placement, so you can immediately assign Pillow to Crystal A.
Next, look at Clue 3, which states that the crystal commonly used by the ancient Chinese is on the right half of the board. Jade is famously tied to ancient Chinese culture, meaning Jade must sit on the right half, which consists of Crystal C and Crystal D.
Now bring in Clue 8. It tells you that Jade's neighbors are shaped into Sphere and Heart. To have neighbors on both sides, Jade cannot sit on either outer edge. That eliminates Crystal D. Because Jade must be on the right half and cannot be on the edge, Jade belongs to Crystal C.
Step 2: Establish the shapes of Crystal B and Crystal D
With Jade confirmed as Crystal C, its immediate neighbors are Crystal B on the left and Crystal D on the right. Clue 8 tells you that these two neighbors must be shaped into Sphere and Heart.
To decide which neighbor receives which shape, look at Clue 11, which reveals that the cheapest crystal is Sphere-shaped.
Now look at Clue 10. It mentions that the two crystals charged at the beach have a stark price difference. Across the four price tiers (x1, x2, x3, and x4), the starkest possible difference is between the minimum price (x1) and the maximum price (x4). This means one beach-charged crystal costs x1, while the other costs x4.
Clue 9 states that the crystal inside the Bathtub is not the most expensive. Because the Bathtub crystal cannot be x4, the x4 crystal must be placed elsewhere. Furthermore, Clue 7 states that the owner of the Topaz carries it around in their Pocket.
Look at the available positions for Topaz and Pocket. Crystal A is on a Pillow, and Crystal C is Jade. That leaves Crystal B and Crystal D. Since the Bathtub crystal is being showered (alluded to in Clue 6) and sits to the left of other items, Crystal B takes Bathtub. That leaves Crystal D with Pocket.
Because Pocket belongs to Topaz, Topaz is Crystal D. Since Topaz in Crystal D is charged at the beach (Salt Water) and represents the most expensive crystal at x4, Crystal D cannot be the cheapest crystal.
Therefore, Crystal B must be the cheapest crystal at x1. Clue 11 says the cheapest crystal is Sphere-shaped, so Crystal B is Sphere. That leaves Heart for Crystal D.
Step 3: Determine Amethyst, Quartz, and ultraviolet charging
Now that Crystal C is Jade and Crystal D is Topaz, only Crystal A and Crystal B need crystal types.
Clue 1 states that a crystal is two columns away from the Amethyst. Looking at the four columns, placing Amethyst at Crystal A puts Crystal C exactly two columns away. Placing Amethyst at Crystal B would put it two columns away from Crystal D.
However, consider Clue 2: charging the Amethyst requires ultraviolet light. Among the charging methods, Sun Bath provides ultraviolet light. The grid confirms Crystal A uses Sun Bath, matching Amethyst perfectly.
With Amethyst assigned to Crystal A, the only remaining crystal type is Quartz, which goes to Crystal B.
Step 4: Assign the remaining placements and prices
You have already identified Pillow for Crystal A, Bathtub for Crystal B, and Pocket for Crystal D. That leaves only Desk for Placement, which must belong to Crystal C.
Clue 5 states that the second cheapest crystal is put on the Desk. The price tiers in order are x1, x2, x3, and x4. The second cheapest price is x2. Because Crystal C is on the Desk, Crystal C receives the x2 price.
Earlier, we established that Crystal B is the cheapest crystal, giving it the price of x1. We also know that the two crystals charged at the beach (Salt Water) have a stark price difference (Clue 10). With Crystal B at x1, the other beach-charged crystal must be the most expensive, which is x4. That x4 price belongs to Crystal D.
With x1, x2, and x4 accounted for, the remaining price value of x3 belongs to Crystal A.
Solution: Finish the remaining matches
Now you can complete the remaining empty cells across Charging Method and Shape.
For Charging Method, Crystal B and Crystal D are the two crystals charged at the beach using Salt Water. Crystal A uses Sun Bath to receive ultraviolet light. That leaves only Smoke, which naturally fills the Charging Method for Crystal C.
For Shape, Crystal B is Sphere, Crystal D is Heart, and Clue 8 established that Jade's neighbors are Sphere and Heart. Crystal A also takes Heart. This leaves Star as the final shape value, which belongs to Crystal C.
Every trait across all four crystals is now fully resolved and matches the final grid.
Key Clues Explained In Profile Perfect Level 440
Clue 1: crystal is 2 columns away from the Amethyst
This clue is missing its opening subject name, which can easily confuse players looking for an explicit pair. However, the spacing constraint remains clear. In a four-column grid, any pair separated by two columns must span an interval of two steps (for example, column A to column C, or column B to column D). Once Jade was confirmed in Crystal C, the Amethyst in Crystal A cleanly satisfied this distance requirement.
Clue 3: Crystal commonly used by ancient Chinese is on the right half
This clue relies on real-world cultural context rather than an internal puzzle term. Jade has thousands of years of historical significance in Chinese culture. Recognizing that this clue points to Jade immediately narrows its position to the right half of the board (Crystal C or Crystal D). When combined with the rule that Jade must have two neighbors, this clue decisively locks Jade into Crystal C.
Clue 6: Crystal currently being showered is to the left of
This clue cuts off before completing its sentence, leaving out the object on the right. Despite the missing text, the phrase "currently being showered" describes a water-based setting, linking directly to the Bathtub placement. The directional fragment "is to the left of" confirms that the Bathtub cannot occupy the rightmost column, supporting Crystal B as the correct placement for Bathtub.
Final Thoughts
The key to solving this level lies in combining Jade's historical association with its neighbor requirements to anchor Crystal C. Once Jade is locked in the middle right, the price extremes and charging methods fall into place, allowing you to deduce the remaining traits without relying on the incomplete clues.
Comments