
Profile Perfect Level 467 Answer
Before you step into the steam, be warned that the finished seating chart and room readings are fully exposed below.
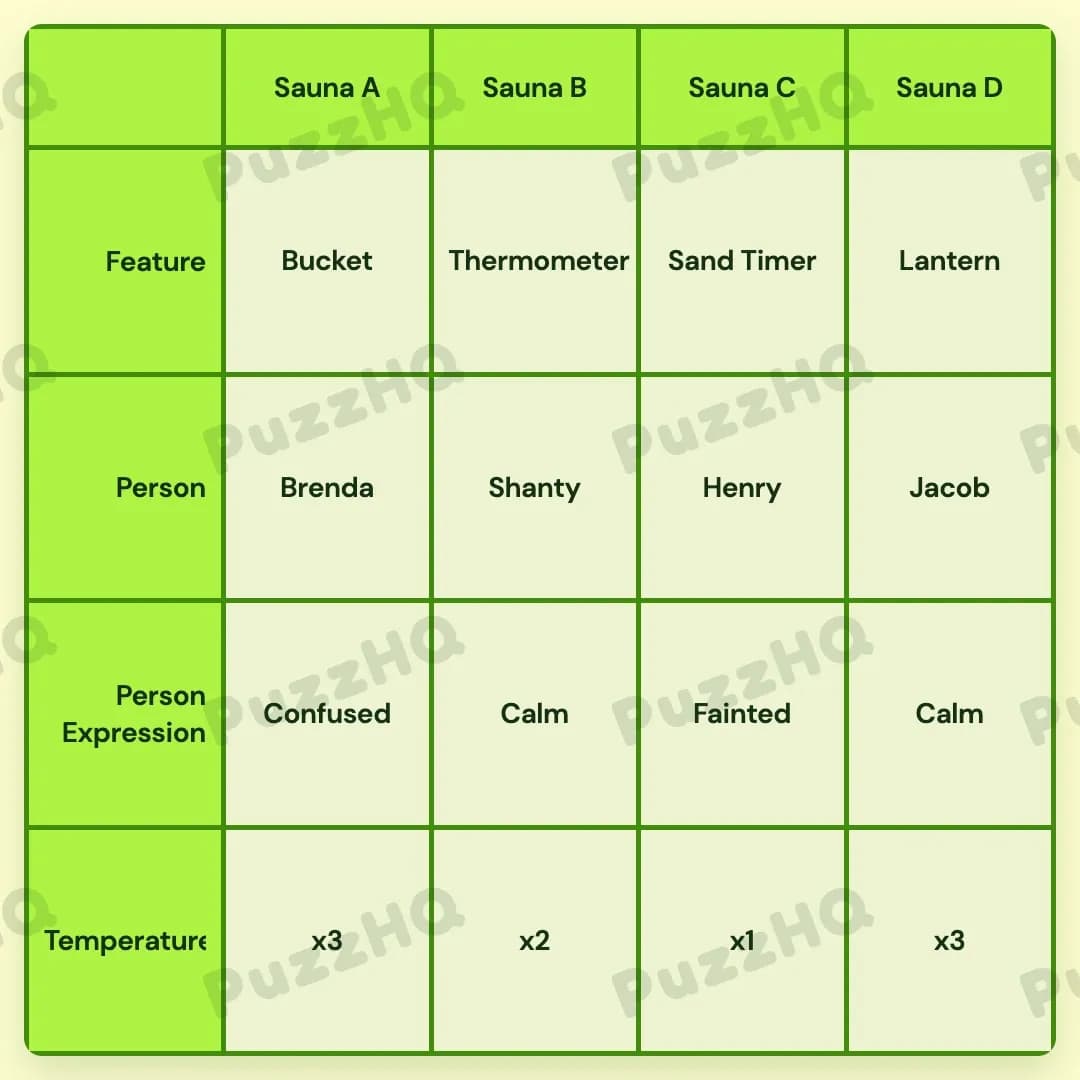
| Trait | Sauna A | Sauna B | Sauna C | Sauna D |
|---|---|---|---|---|
| Feature | Bucket | Thermometer | Sand Timer | Lantern |
| Person | Brenda | Shanty | Henry | Jacob |
| Person Expression | Confused | Calm | Fainted | Calm |
| Temperature | x3 | x2 | x1 | x3 |
The Logic Behind Profile Perfect Level 467
This grid finds its backbone through human reactions to escalating heat. Rather than forcing you to juggle abstract numbers or complex multi room arithmetic, the puzzle relies on how four distinct personalities cope with their environment. Once you identify who is struggling and who is sitting comfortably in the middle, the layout of the four saunas falls into place with remarkable smoothness.
The Center Sets The Seating Order
The breakthrough starts with physical placement and physical distress. We learn right away that a relaxed visitor sits directly between Henry and Brenda. At the same time, Brenda is in serious trouble. Her sweat is filling an entire bucket, and she is swaying on her bench as the physical toll of extreme heat sets in.
That tells us two crucial things about Brenda. First, her sauna is equipped with the bucket. Second, her swaying state directly points to her confused expression under triple heat. Because a calm bather sits between Brenda and Henry, Brenda cannot be in the middle of the row. Putting Brenda in Sauna A puts the relaxed visitor in Sauna B and Henry in Sauna C.
That middle seat belongs to Shanty. Shanty explicitly prefers an environment that is neither too hot nor too cold, which matches the moderate x2 temperature perfectly. Shanty is also calm, serving as the steady buffer between Brenda in room A and Henry in room C. With Brenda, Shanty, and Henry mapped out across the first three rooms from left to right, Jacob is left with Sauna D by simple elimination.
Gauging Time And Temperature
With the guest list almost complete, the objects inside each cabin begin to explain the visitors' mental states. Shanty feels safe knowing the exact reading in the room, which places the thermometer in Sauna B. It fits Shanty's desire for moderation. Having a reliable instrument on the wall keeps anxiety low and confirms the room is staying right at the middle mark.
Sauna C presents a different story. Henry occupies this space, and the clue about tracking a ten minute session points straight to a sand timer. Watching the grains fall does not seem to have helped Henry much, however. With Brenda swaying in Sauna A and Jacob thriving in high heat elsewhere, Henry is the visitor who has completely passed out. The mildest room, marked at x1 heat, still proved to be too much for him once ten minutes elapsed, leaving Henry fainted beside his timer.
Meanwhile, Brenda's room is already accounted for. She has the bucket that caught her sweat, and the swaying mentioned in the notes aligns with the confused tag in her profile. Sauna A is clearly running at maximum x3 heat, mirroring the intense distress she is experiencing.
Finding Calm In The Hottest Corner
That leaves Sauna D, where Jacob has settled in. Jacob actively loves an intensely hot sauna, so assigning the remaining x3 temperature to his room feels completely natural. Unlike Brenda, who is losing her balance under the same level of heat in Sauna A, Jacob takes the high temperature in stride.
The last feature to distribute is the lantern. We are told that an item inside a calm person's sauna may contribute to the room's warmth. Shanty already holds the thermometer, which merely observes heat rather than generating it. Jacob, sitting peacefully in Sauna D with a calm demeanor despite the scorching x3 environment, has the lantern hanging nearby. The lantern gives off its own heat, subtly adding to the blistering climate that Jacob enjoys.
Every visitor now has a distinct reaction, an instrument or accessory, and a temperature setting that explains why they look the way they do. The balance between those who can take the heat and those who should have stepped outside minutes ago brings the entire board to a neat conclusion.
The Clue I Would Read Twice
The clue stating that the item in a calm person's sauna may contribute to the heat is the easiest one to misplace if you rush. Early in the solve, Shanty looks like the only obvious candidate for a calm state because the text explicitly calls out a relaxed visitor between Brenda and Henry. It is tempting to try to force the heat contributing object into Sauna B right alongside Shanty's moderate temperature.
The catch is that Shanty needs a thermometer to feel secure about the temperature, and a thermometer does not generate heat. The puzzle actually features two calm people. Jacob is the second one, maintaining his composure in Sauna D despite the x3 temperature. Realizing that Jacob is equally calm unlocks the proper home for the lantern, allowing the lantern's warmth to support Jacob's love for extreme heat rather than conflicting with Shanty's desire for a middle ground.
Final Thoughts
What makes this level work so well is how closely the physical accessories reflect the narrative of each room. Instead of acting as arbitrary markers, the bucket, thermometer, sand timer, and lantern directly explain whether the person next to them is thriving, monitoring the room, or about to collapse.
Comments