
Profile Perfect Level 567 Answer
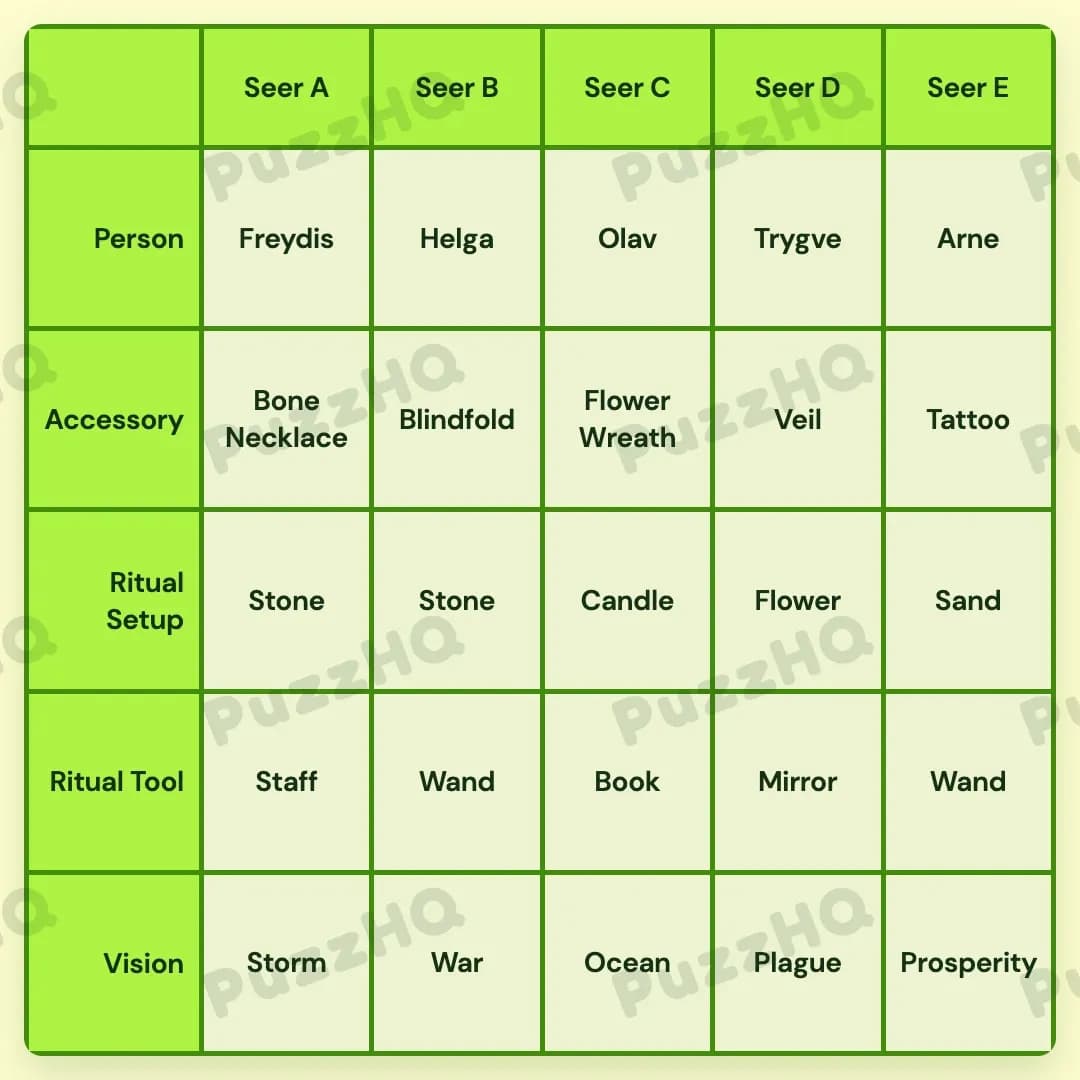
The completed grid for this puzzle is shown below, followed by the full step-by-step walkthrough.
| Trait | Seer A | Seer B | Seer C | Seer D | Seer E |
|---|---|---|---|---|---|
| Person | Freydis | Helga | Olav | Trygve | Arne |
| Accessory | Bone Necklace | Blindfold | Flower Wreath | Veil | Tattoo |
| Ritual Setup | Stone | Stone | Candle | Flower | Sand |
| Ritual Tool | Staff | Wand | Book | Mirror | Wand |
| Vision | Storm | War | Ocean | Plague | Prosperity |
Clues of Profile Perfect Level 567
- Freydis and Olav are next to the seer that saw slaugther
- Seer E does not use Stones, but a byproduct of them
- One of the female seers needs a Staff to complete her ritual
- The great fortune that is coming is the farthest from Freydis
- Blindfolded seer saw the arising conflict between tribes
- The Wand is used by the seer whose eyes covered in red
- It's kinda hard to see the face of the seer next to
- Olav''s accessory makes him look feminine
- Arne does not wear anything that hinders her vision
- wearer saw an unending disaster flooding the entire village
- Useful spells are written inside Wreath wearer's tool
- None of the female seers scatter the Flower
- The Mirror is between the Wand and Candle
- Seer surrounded by Candles expects a major voyage soon
How To Solve Profile Perfect Level 567
This puzzle revolves around five Nordic seers arranged from Seer A across to Seer E. Success depends on anchoring positions early, using relative spacing across the row, identifying specific ritual materials such as Sand and Candles, and sorting through gendered hints that distinguish Freydis, Helga, and Arne from their companions. Two incomplete clues appear in the list, so relying strictly on verified placements keeps your deductions solid.
Step 1: Establish positions for Freydis, Olav, and the war vision
Clue 1 states that Freydis and Olav are next to the seer who saw slaughter. For two people to stand on either side of someone, that central seer must sit directly between them. Clue 4 adds that the coming great fortune is farthest from Freydis. In a five-column lineup, the two farthest possible spots are the opposite outer ends, Seer A and Seer E.
Assigning Freydis to Seer A places the great fortune vision, Prosperity, at Seer E. Because Freydis sits at Seer A, the seer adjacent to her must be Seer B. Olav must sit on the other side of Seer B, placing Olav at Seer C. The vision of slaughter, War, belongs to Seer B.
Step 2: Identify the stone byproduct at Seer E
Clue 2 notes that Seer E does not use Stones, but instead uses a byproduct of them. Sand is formed from broken-down stones and rock over time. With Seer E already linked to the Prosperity vision, you can assign Sand as Seer E's ritual setup.
Step 3: Link the Blindfold to Seer B and tribal conflict
Clue 5 mentions that the blindfolded seer saw an arising conflict between tribes. Conflict between tribes matches the War vision, which already sits at Seer B. You can now confirm that Seer B wears the Blindfold and experienced the War vision.
Step 4: Give Olav the Flower Wreath and Book
Clue 8 notes that Olav's accessory makes him look feminine. Olav is confirmed at Seer C, and the Flower Wreath fits this description.
Next, Clue 11 points out that useful spells are written inside the tool used by the wreath wearer. Since Olav wears the Flower Wreath, his ritual tool must be an item you can write inside. That points directly to the Book, giving Seer C the Book as a ritual tool.
Step 5: Connect Candles and the voyage vision to Seer C
Clue 14 states that the seer surrounded by Candles expects a major voyage soon. An impending major voyage aligns with the Ocean vision.
Looking at the remaining columns, Seer C already has Olav, the Flower Wreath, and the Book, but lacks a ritual setup and a vision. Placing Candle as the ritual setup and Ocean as the vision completes those two rows for Seer C.
Step 6: Position the Mirror between the Wand and Candle
Clue 13 tells you that the Mirror is between the Wand and Candle. Seer C already has the Candle. That means Seer D, which sits directly to the right of Seer C, must hold the Mirror.
For the Mirror at Seer D to sit between Candle and Wand, Seer E must hold the Wand. This gives Seer E the Wand as a ritual tool and gives Seer D the Mirror.
Step 7: Assign the Staff and remaining names
Clue 3 specifies that one of the female seers needs a Staff to complete her ritual. The available tools are Staff and a second Wand. Seer A, who is Freydis, currently has no tool assigned. Giving Freydis the Staff satisfies this clue. That leaves the second Wand to fill Seer B's ritual tool slot.
Now evaluate the remaining names: Helga, Trygve, and Arne. Clue 9 mentions that Arne does not wear anything that hinders her vision, confirming Arne is female. Clue 12 states that none of the female seers scatter the Flower ritual setup. Trygve is the remaining male figure, so Trygve must take the Flower setup at Seer D, making Trygve Seer D's person.
Between Helga and Arne, Seer B wears a Blindfold, which clearly hinders sight. Because Arne cannot wear vision-hindering accessories, Arne must be Seer E. That leaves Helga as Seer B.
Solution: Finish the remaining matches
With the names and tools largely settled, look at what remains open across each row:
For accessories, Seer A, Seer D, and Seer E still need items from Bone Necklace, Veil, and Tattoo. Clue 9 already established that Arne at Seer E wears nothing that hinders her vision, ruling out the Veil. Arne receives the Tattoo. Trygve at Seer D takes the Veil. Freydis at Seer A takes the Bone Necklace.
For ritual setups, Seer A and Seer B both take Stone, which satisfies Clue 2 where only Seer E explicitly rejects stones for sand.
For visions, Seer A and Seer D remain unfilled between Storm and Plague. Seer A takes Storm, and Seer D takes Plague, completing the entire grid.
Key Clues Explained In Profile Perfect Level 567
Clue 1 and Clue 4: Locking the layout with end positions
Clue 1 requires Freydis and Olav to flank the seer who saw slaughter. On its own, this three-person block could sit in columns A-B-C or B-C-D. Clue 4 resolves the ambiguity by placing the great fortune vision at the maximum distance from Freydis. In a five-column grid, the maximum distance is always between column 1 and column 5. Positioning Freydis at Seer A immediately forces Seer B into the middle and Olav into Seer C, while placing the Prosperity vision at Seer E.
Clue 7 and Clue 10: Working around broken clue text
Clue 7 cuts off abruptly, and Clue 10 is missing its opening subject. Players often get stuck trying to guess what these sentences were intended to say. You do not need to guess. The rest of the clue list provides enough direct placements, such as the positions from Clue 1, the byproduct hint from Clue 2, the feminine accessory note from Clue 8, and the tool placement from Clue 13, to solve every column without relying on the incomplete clues.
Clue 13: Arranging the ritual tools
Clue 13 states that the Mirror is between the Wand and Candle. Because Candle belongs to Seer C, the Mirror can only sit at Seer D if the Wand sits at Seer E. This single clue locks two separate ritual tools into place at once and prepares the board for the final tool assignments.
Final Thoughts
The key to solving Level 567 lies in combining the row spacing of Clue 1 with the extreme distance requirement in Clue 4. Once Freydis, Olav, and the central war vision lock into the first three columns, the ritual tools and setups fall into place through direct eliminations.
Comments