
Profile Perfect Level 692 Answer
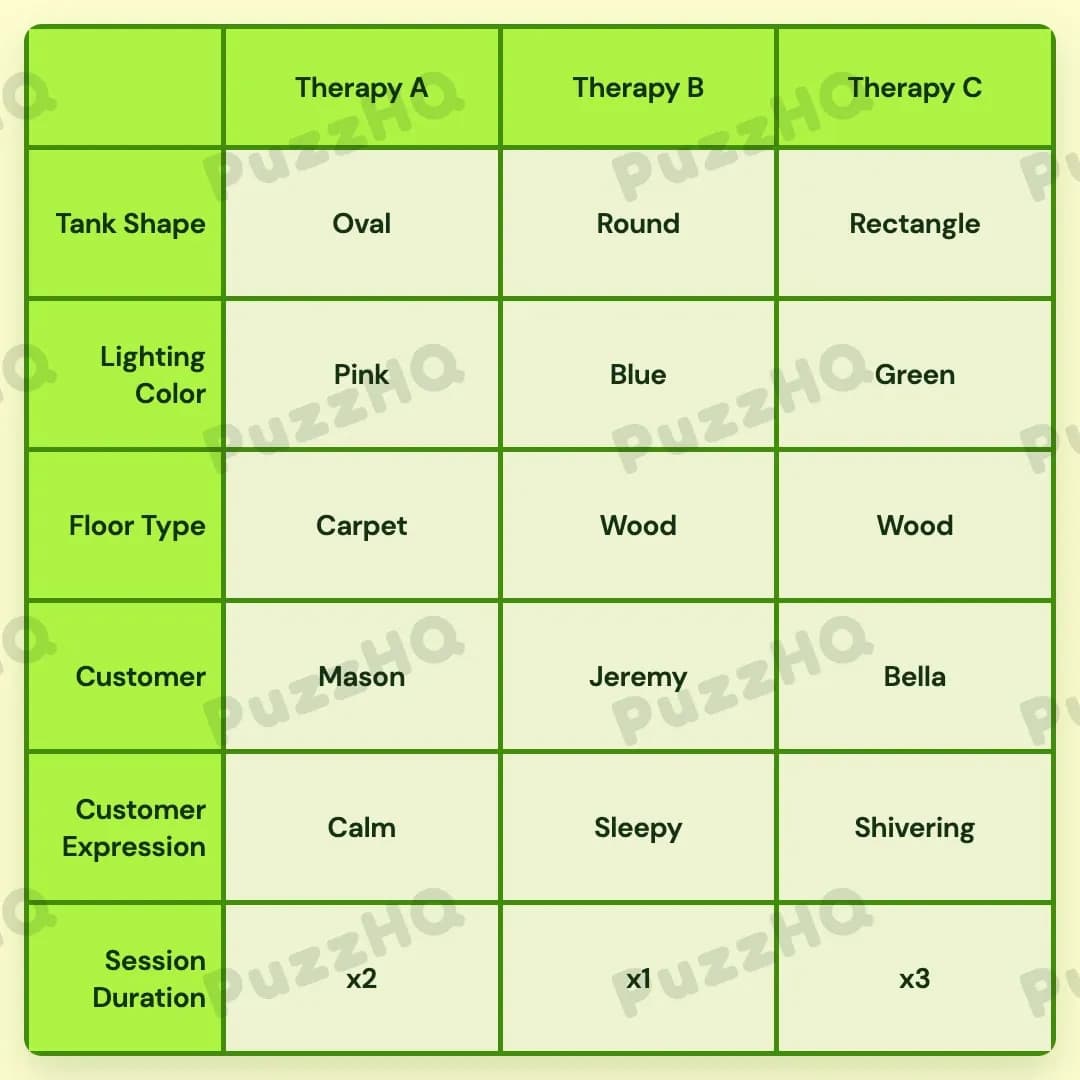
By aligning the structural clues about room neighbors and tank shapes first, every therapy chamber falls into place alongside its respective guest and environmental conditions.
| Trait | Therapy A | Therapy B | Therapy C |
|---|---|---|---|
| Tank Shape | Oval | Round | Rectangle |
| Lighting Color | Pink | Blue | Green |
| Floor Type | Carpet | Wood | Wood |
| Customer | Mason | Jeremy | Bella |
| Customer Expression | Calm | Sleepy | Shivering |
| Session Duration | x2 | x1 | x3 |
Building The Grid By Trait
Starting with spatial positioning provides the cleanest entry point for this puzzle. Because the rooms stand in physical order from left to right, geometric traits like tank shape and lighting color act as foundational anchors, creating fixed coordinates that allow every subsequent trait row to slide into place effortlessly.
Tank Shape And Lighting Color Establish The Spatial Layout
The spatial arrangement immediately unlocks when observing the ends and centers of the facility. We know that the therapy chambers are laid out sequentially from Therapy A to Therapy C. This means Therapy A sits on the far left with one neighbor, Therapy B sits in the center with two neighbors, and Therapy C sits on the far right with one neighbor.
A key clue notes that the Green and Pink rooms have the exact same number of neighbors. The only two positions sharing an identical neighbor count are the two outside ends, Therapy A and Therapy C. Therefore, Pink and Green occupy the ends, while Blue must belong to the middle room, Therapy B.
Meanwhile, physical tank geometry comes into play. We are told that the right tank is the only one with sharp edges. Comparing the available shapes, rectangles possess sharp corners while circles and ovals do not. This fixes Rectangle firmly to Therapy C on the right side.
A separate observation links the Pink light directly to an Oval tank. Because Therapy C is already proven to hold the rectangular tank, the Pink light cannot belong to Therapy C. Consequently, Pink must belong to Therapy A on the far left, leaving Green for Therapy C on the right. With Pink in Therapy A, its paired Oval shape fills Therapy A's tank shape row. Only one shape remains unassigned, which places the Round tub directly into the central chamber, Therapy B. In just a few logical deductions, both the Lighting Color row and the Tank Shape row are entirely solved.
Session Duration And Floor Type Follow The Room Environments
With the structural identities of the chambers settled, the environmental attributes quickly align. The same clue that linked Pink lighting to the Oval tank also mentioned that this combination features an average session duration. Looking at the session values of x1, x2, and x3, the middle average duration is x2. This directly assigns an x2 duration to Therapy A.
Next, a clue states that therapy inside the tank takes longer than the Blue light room. We already established that Therapy B is the Blue light room. Since Therapy A's session is locked at x2, the Blue room cannot be x2 or x3 if another room takes longer than it. Therapy B must be the shortest duration, x1. This leaves the longest duration, x3, to Therapy C, completely finishing the Session Duration row.
The Floor Type row resolves smoothly right behind it. We know that the tank illuminated by Pink light rests on top of Carpet. Because Therapy A has the Pink light, Therapy A receives Carpet. Another observation notes that Bella and another person are inside wooden floor rooms. Since two people share a wooden floor room and only three rooms exist, both remaining chambers, Therapy B and Therapy C, must feature Wood floors.
Customer Expression And Customer Profiles Complete The Rooms
The customer traits resolve by watching how people react to their surroundings. We learn that the individual in the Green light room cannot handle the cold. Therapy C is the Green room, so the guest in Therapy C is experiencing extreme cold, which matches the Shivering expression.
At the same time, the guest resting inside the Round tub is described as getting way too relaxed. Because Therapy B contains the Round tank, the guest in Therapy B receives the Sleepy expression. With Shivering placed in Therapy C and Sleepy placed in Therapy B, the only expression left is Calm, which belongs to Therapy A.
Finally, we identify the customers by name. A clue mentions that Jeremy's neighbor might be getting hypothermia. Shivering from cold directly correlates with hypothermia, meaning Jeremy must be adjacent to the Shivering guest in Therapy C. The only neighbor to Therapy C is Therapy B in the center, which places Jeremy squarely in Therapy B.
Recalling that Bella is inside a room with a wooden floor alongside another individual, Bella must be in either Therapy B or Therapy C. With Jeremy occupying Therapy B, Bella naturally takes Therapy C. This leaves Mason to take the opening in Therapy A, wrapping up the entire customer roster.
Where The Trait Rows Intersect
Geometry And Lighting Dictate Tank Identity
The decisive moment in the puzzle occurs when spatial neighbor counts cross reference with tank silhouettes. Clues relating neighbor counts isolated Pink and Green to the outer edges, but could not determine which was on the left and which was on the right. Bringing in the clue about sharp edges isolated the Rectangle to Therapy C. When combined with the clue joining Pink light to an Oval shape, the two separate rows instantly resolved one another. This multi category bridge broke open the layout without requiring guesswork.
Temperature Symptoms Connect Customer Experience To Room Design
Another powerful intersection occurs between lighting color, physical reactions, and customer names. The clue mentioning that the occupant of the Green room cannot handle cold temperatures immediately attaches the Shivering trait to Therapy C. When another clue warns that Jeremy's neighbor appears to have hypothermia, the puzzle ties a physical symptom to room geography and customer names all at once. Recognizing that hypothermia and cold intolerance describe the same condition locks Jeremy to Therapy B and Bella to Therapy C.
Duration Comparison Locks The Scheduling Order
The progression of session lengths hinges on connecting color and time. Knowing that Pink Oval had an average duration established Therapy A at x2. When the duration comparison pointed out that an unspecified therapy lasted longer than the Blue room, knowing that Therapy B was Blue made it impossible for Therapy B to be anything other than x1. This single relative clue snapped both Therapy B and Therapy C into place along the Session Duration row.
Final Grid Check
Every row in the completed grid validates the surrounding clues. The rightmost chamber holds the sharp cornered Rectangle, the outer rooms share matching neighbor counts under Pink and Green lights, and the durations scale logically around the central Blue room. Furthermore, Bella and Jeremy share the wooden floors while their physical states align precisely with the thermal conditions of each chamber.
Comments