
Profile Perfect Level 94 Answer
This guide contains full spoilers for every trait and item in Level 94. If you only need a hint to get moving again, consider reading just the first question below before looking at the complete grid.
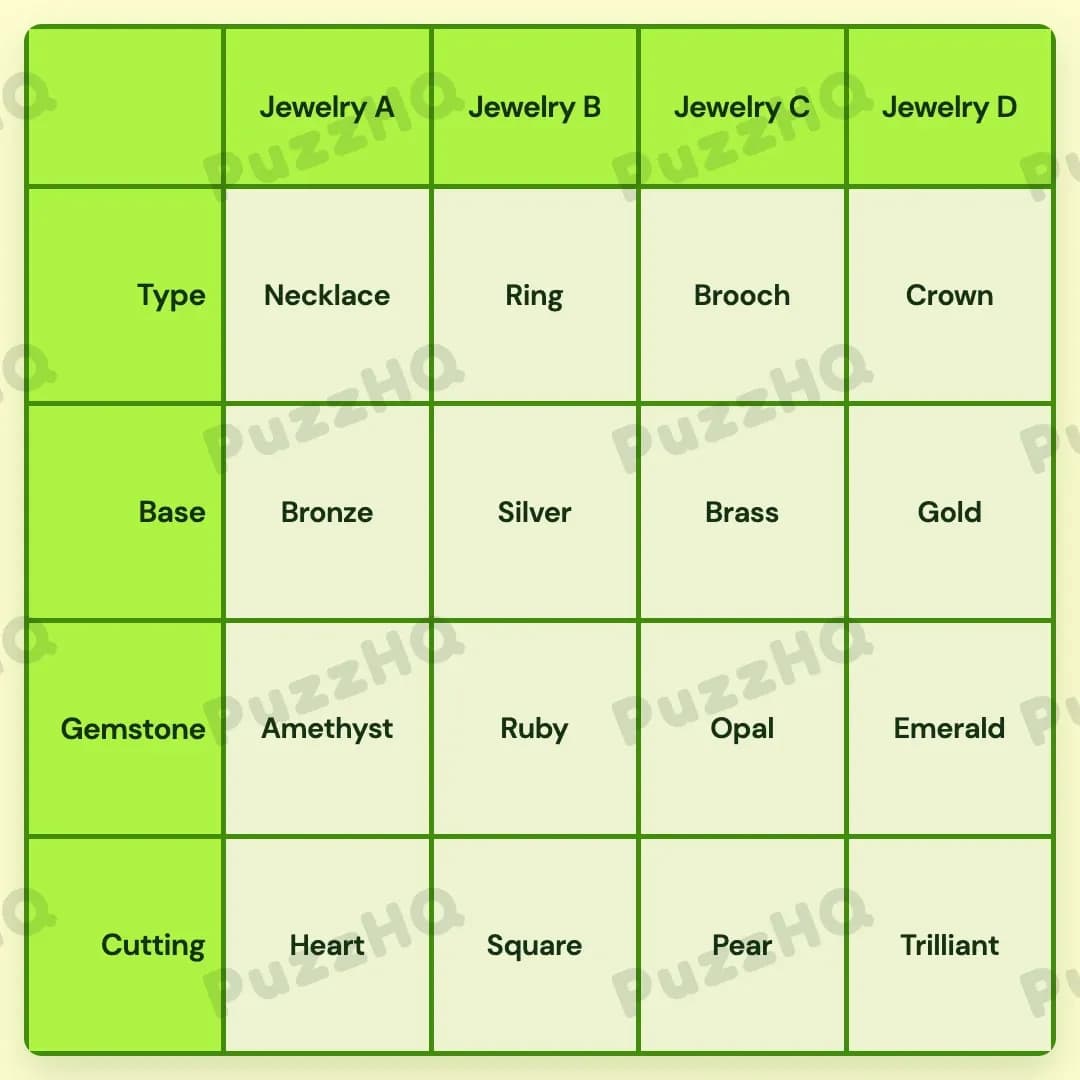
| Trait | Jewelry A | Jewelry B | Jewelry C | Jewelry D |
|---|---|---|---|---|
| Type | Necklace | Ring | Brooch | Crown |
| Base | Bronze | Silver | Brass | Gold |
| Gemstone | Amethyst | Ruby | Opal | Emerald |
| Cutting | Heart | Square | Pear | Trilliant |
Stuck On Profile Perfect Level 94?
The trickiest part of this puzzle involves chaining the positional clues to anchor the types and gemstones across the board. You also need to combine gemstone colors and base metal requirements to prevent misplacing the Crown.
Which Item Is Jewelry B, And What Sits Next To It?
The clue mentioning wedding celebrations points directly to the Ring, making Jewelry B the Ring.
Once you know Jewelry B is the Ring, the clue stating that the jewelry on the right of the Ring has an Opal gemstone immediately assigns the Opal to Jewelry C. This single pair of deductions anchors two major traits across the middle of your grid.
Where Does The Emerald-Crown Pair Go?
The first clue links the Emerald gemstone and the Crown together on the very same piece of jewelry.
You also learn that the Crown must have either a Bronze or Gold base. However, the purple gemstone, which is the Amethyst, must take the Bronze base. Because one piece cannot hold both Emerald and Amethyst, the Crown cannot take Bronze. That leaves Gold as the base for the Crown.
Since Jewelry C holds the Opal and Jewelry B is the Ring, the Emerald-Crown with the Gold base fits only into Jewelry D. This also satisfies the rule that Amethyst cannot sit right next to the Emerald-Crown, because placing Amethyst on Jewelry A keeps it separated from Jewelry D.
How Do You Place The Remaining Bases And Gemstones?
With Gold assigned to Jewelry D and the Opal sitting at Jewelry C, look at the base positions. The clue notes that the Silver base is to the left of the Opal. Because Jewelry A takes the Bronze base with the Amethyst, Jewelry B must take the Silver base.
That leaves only the Brass base, which goes directly to Jewelry C.
For the gemstones, Amethyst belongs to Jewelry A, Opal belongs to Jewelry C, and Emerald belongs to Jewelry D. The only gemstone left is the Ruby, which fills the open slot on Jewelry B.
How Do You Finish The Jewelry Types?
At this point, you have the Ring at Jewelry B and the Crown at Jewelry D, leaving the Necklace and Brooch for Jewelry A and Jewelry C.
The clue mentions that the Necklace does not use Ruby. Since Jewelry B holds the Ruby and Jewelry C is already paired with Opal, the Necklace must belong to Jewelry A. This leaves the Brooch as the type for Jewelry C.
Where Do The Different Cuttings Belong?
One clue directly states that Jewelry C has the Pear-shaped cutting.
To place the Square cutting, check the clue stating that Square is not to the right of the Brass base. Jewelry C has the Brass base, so the Square cutting must sit to its left. Jewelry A is the love-symbolizing Necklace with the Heart cutting, which places the Square cutting squarely onto Jewelry B.
With Pear on Jewelry C, Square on Jewelry B, and Heart on Jewelry A, the Trilliant cutting belongs to Jewelry D.
One Clue You Should Not Overthink
The clue stating that Amethyst jewelry is not next to Emerald-Crown sounds like a complex spatial restriction. In practice, as soon as you realize Emerald and Crown share the same item and place them at Jewelry D, placing Amethyst at Jewelry A naturally satisfies the condition without any extra maneuvering.
Quick Answer Check
To verify your solution quickly, check that your bases read Bronze, Silver, Brass, Gold from left to right, with the Ring on the Silver base holding the Ruby and the Pear cutting sitting on the Brass Brooch with the Opal.
Comments