
Profile Perfect Level 98 Answer
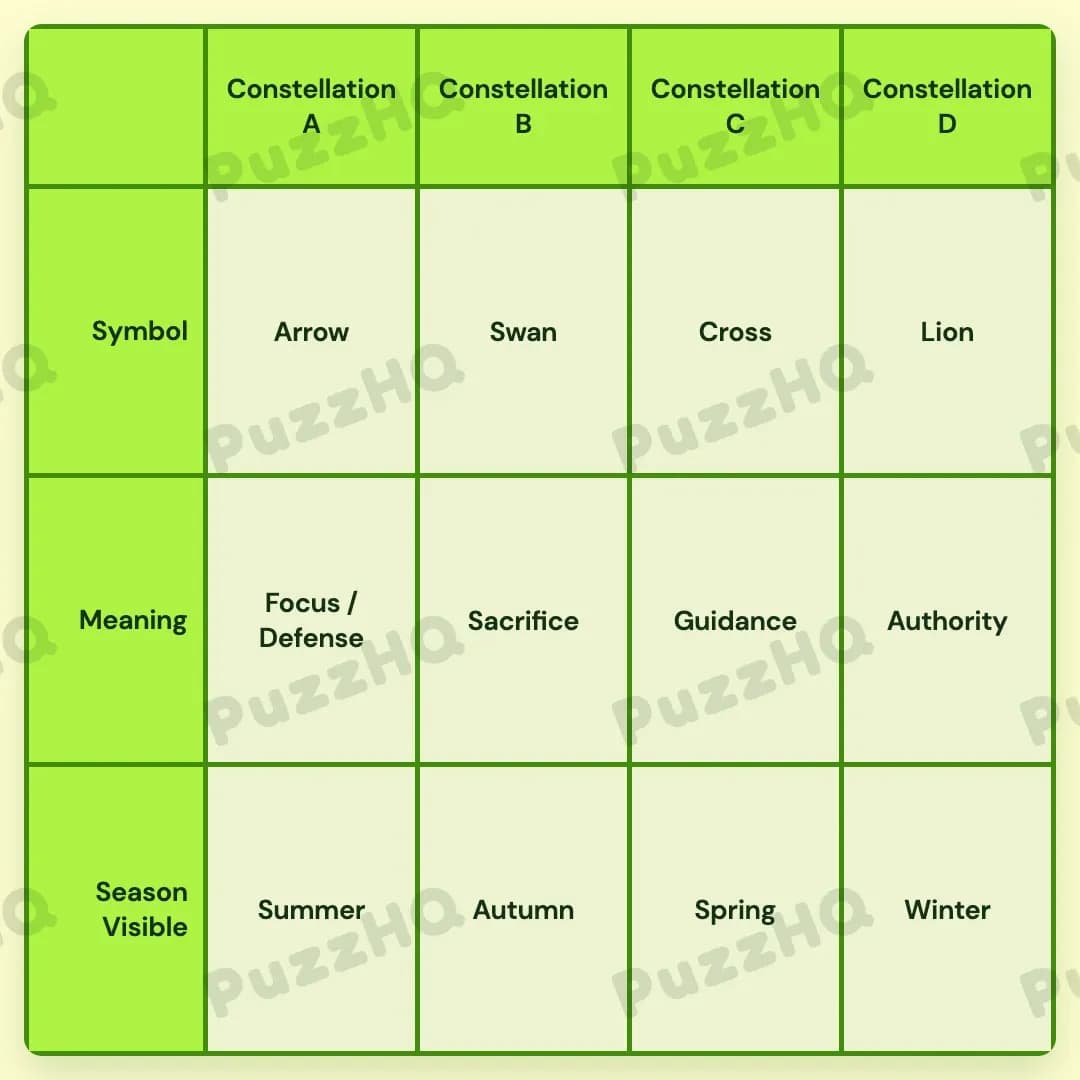
Constellation A is the Arrow of Focus and Defense visible in Summer, Constellation B is the Swan of Sacrifice visible in Autumn, Constellation C is the Cross of Guidance visible in Spring, and Constellation D is the Lion of Authority visible in Winter.
| Trait | Constellation A | Constellation B | Constellation C | Constellation D |
|---|---|---|---|---|
| Symbol | Arrow | Swan | Cross | Lion |
| Meaning | Focus / Defense | Sacrifice | Guidance | Authority |
| Season Visible | Summer | Autumn | Spring | Winter |
How To Think Through Profile Perfect Level 98
The key habit for solving this puzzle is anchoring fixed positions early and using distance restrictions to eliminate options across the line. When a clue mentions that two items cannot be neighbors, or that one element is as far as possible from another, you can only make reliable deductions once you know where at least one anchor sits.
Here is the step by step process showing how each technique unlocks the grid.
Start With Direct Anchors: Autumn Belongs To Constellation B
Direct identity clues provide solid ground. When a clue directly assigns a trait to a named subject, write it down immediately because it establishes a reference point for neighbor clues.
- Clue 1 states: "Constellation B can be seen during Autumn."
Place Autumn directly under Constellation B in the Season Visible row.
This single placement turns later positional clues from vague rules into actionable constraints. Without Constellation B fixed in the second slot, any neighbor rules involving Autumn would remain unusable.
Use Negative Neighbor Clues: Placing The Winter Constellation
Once an anchor is locked into position, look for clues that forbid adjacency. Negative neighbor clues rule out adjacent slots and force items to the outer edges.
- Clue 2 states: "Winter constellation is not next to the Autumn one."
Constellation B is Autumn. The neighbors of Constellation B are Constellation A on the left and Constellation C on the right.
Because Winter cannot sit next to Autumn, Winter cannot belong to Constellation A or Constellation C. That leaves only one valid spot:
- Place Winter under Constellation D.
By identifying the invalid adjacent cells around your anchor, you isolate the only open cell remaining for Winter.
Leverage Distance Relationships: Locating The Arrow Symbol
Distance clues describe relative spacing across the row. The phrase "farthest from" requires you to look at the maximum possible span on the board.
- Clue 3 states: "Arrow constellation is the farthest from the Winter one."
Winter is placed at Constellation D, which sits at the far right end of the line. The position farthest away from Constellation D is Constellation A on the far left.
- Place the Arrow symbol under Constellation A.
Using an extreme end position as an anchor allows distance clues to resolve instantly without guesswork.
Combine Multi Trait Links: Matching Summer And Focus
Multi trait clues link two traits together without naming a specific subject. You must scan the board to find an open column that can hold both traits simultaneously.
- Clue 5 states: "Constellation that means Focus is seen during Summer."
Look at the remaining empty Season Visible slots at Constellation A and Constellation C:
- Constellation A already has the Arrow symbol, but its Season Visible and Meaning rows are empty.
- Constellation C has empty slots as well.
Now check Clue 7: "Defense and Sacrifice constellations are neighbors." We also know from Clue 4 that the Swan signifies sadness and sorrow, which connects to the Sacrifice theme, and the grid ties Focus and Defense together in Constellation A.
Looking at Season Visible options, Summer must go to Constellation A because the remaining open season for Constellation C is Spring.
- Place Summer under Constellation A.
- Place Spring under Constellation C, completing the Season Visible row.
- Assign the Meaning of Focus / Defense to Constellation A.
Pairing traits in tandem prevents you from splitting connected traits across different columns.
Apply Neighbor Constraints: Placing Sacrifice Next To Defense
Neighbor requirements help link meanings to subjects when one neighbor is already established.
- Clue 7 states: "Defense and Sacrifice constellations are neighbors."
Constellation A holds Defense. The only adjacent neighbor to Constellation A is Constellation B.
- Assign the Meaning of Sacrifice to Constellation B.
This fulfills the adjacency requirement and fills the Meaning row for the second constellation.
Separate Animals By Spacing: Assigning Swan And Lion
When clues forbid similar categories from standing next to each other, use the existing symbols to test placements.
- Clue 4 states: "Swan constellation signifies sadness and sorrow."
- Clue 6 states: "The animal constellations are not next to each other."
The animal symbols in this puzzle are the Swan and the Lion.
We know from Clue 4 that the Swan is tied to the themes of sorrow and sacrifice. Constellation B holds Sacrifice, so the Swan belongs to Constellation B.
- Place the Swan under Constellation B.
Now apply Clue 6. The Lion cannot sit next to the Swan. Constellation B's neighbors are Constellation A and Constellation C. Therefore, the Lion cannot belong to Constellation C.
The only remaining position for an animal symbol is the far right:
- Place the Lion under Constellation D.
Fill The Final Values By Elimination: Cross, Guidance, And Authority
After applying all explicit clues, complete the remaining cells by simple elimination.
- Symbol row: Constellation A has Arrow, Constellation B has Swan, Constellation D has Lion. The only remaining symbol is Cross.
- Place Cross under Constellation C.
- Meaning row: Constellation A has Focus / Defense, Constellation B has Sacrifice. The remaining open meanings are Guidance and Authority.
- Guidance fits Constellation C.
- Authority fits Constellation D.
All four profiles are now fully resolved and verified against every clue.
What This Level Teaches You
Lesson 1: Fix One Position Before Testing Adjacency Rules
A clue stating that two items are not neighbors is useless until one of those items has a confirmed spot. In this level, knowing that Winter was not next to Autumn meant nothing until Clue 1 put Autumn in Constellation B. Always prioritize placing the anchor first. Once Autumn was fixed at Constellation B, both neighboring slots were eliminated immediately, locking Winter into Constellation D.
Lesson 2: Farthest Relationships Require Edge Tracking
Phrases such as "farthest from" rely entirely on the absolute distance between columns. When an anchor sits at one edge of the grid, the item farthest from it must occupy the opposite edge. Because Winter landed on Constellation D at the extreme right, the Arrow had to take Constellation A at the extreme left. Tracking the outer edges gives you direct solutions to relative distance clues.
Lesson 3: Category Clues Act As Negative Neighbor Filters
Clue 6 applied a rule to a category rather than a specific name by stating that animal constellations cannot be adjacent. Recognizing that both the Swan and the Lion belong to the animal category allowed you to treat the Lion as forbidden in every cell touching the Swan. Grouping items into broad categories helps you enforce spatial rules across multiple traits.
Final Thoughts
The most critical habit in this level was using established anchor positions to drive spatial eliminations. By anchoring Constellation B early, you turned negative neighbor rules and maximum distance clues into guaranteed placements across the board.
Comments