
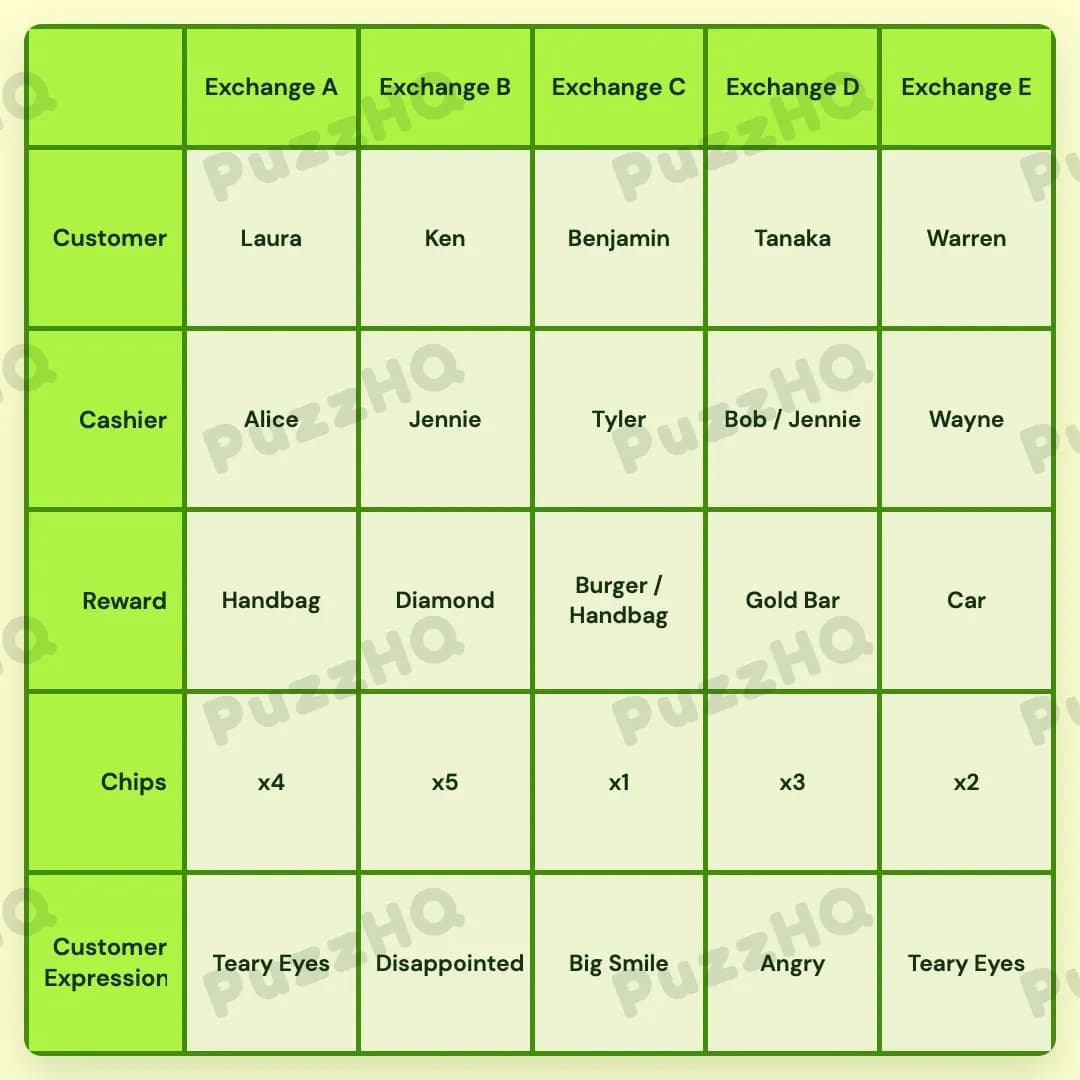
Profile Perfect Level 231 Answer
Check the complete grid below if you need the solution right away, followed by step by step logic to help you work through the puzzle.
| Trait | Exchange A | Exchange B | Exchange C | Exchange D | Exchange E |
|---|---|---|---|---|---|
| Customer | Laura | Ken | Benjamin | Tanaka | Warren |
| Cashier | Alice | Jennie | Tyler | Bob / Jennie | Wayne |
| Reward | Handbag | Diamond | Burger / Handbag | Gold Bar | Car |
| Chips | x4 | x5 | x1 | x3 | x2 |
| Customer Expression | Teary Eyes | Disappointed | Big Smile | Angry | Teary Eyes |
Clues of Profile Perfect Level 231
- Customer exchanging chips is not Smiling nor Disappointed
- Customer at Exchange B is getting a lab-grown jewelry reward
- Tyler is helping Benjamin to exchange his chips
- One of the 2 customers Jennie handling is Angry
- Rightmost customer holds back their tear in front of Wayne
- Someone next to Tyler is exchanging Gold Bar
- The cashier next to Wayne exchanges for ingots
- Sobbing Laura is not handled by Wayne
- Laura has the second most chips to be exchanged
- The only person that gets the Car is moved by the occasion
- The 2 people exchanging Handbag have no complaints
- Angry customer is to the left of Teary Eyes one
- Tanaka is being served by Bob at the cashier
- Ken exchanges more chips than others
- chips are being exchanged 3 columns away from Alice
How To Solve Profile Perfect Level 231
This puzzle revolves around five exchange counters labeled Exchange A through Exchange E. You must align cashiers, chip counts, customer emotional expressions, and high-tier rewards such as Diamonds, Gold Bars, and Cars by tracking exact counter placements and neighbor relationships.
Step 1: Identify the outer exchange counters and cashiers
Start with the clues that name specific counter locations. The clue tells us that the rightmost customer holds back tears in front of Wayne. Because Exchange E is the rightmost counter, Wayne is the cashier at Exchange E, and the customer expression at Exchange E is Teary Eyes.
Another clue mentions that customer chips are being exchanged three columns away from Alice. Alice must be at Exchange A, placing the three column gap across the grid. At the same time, the customer at Exchange B receives a lab-grown jewelry reward, which directly places Diamond under Exchange B.
Step 2: Connect Wayne, the Gold Bar, and Tyler
The clue states that the cashier next to Wayne exchanges for ingots. The only counter adjacent to Exchange E is Exchange D, meaning Exchange D receives the Gold Bar reward.
Next, a clue notes that someone next to Tyler is exchanging a Gold Bar. Because the Gold Bar is confirmed at Exchange D, Tyler must be stationed at Exchange C. A separate clue confirms that Tyler is helping Benjamin to exchange chips, so Benjamin is the customer at Exchange C.
Step 3: Assign Bob, Jennie, and Tanaka
We know that Tanaka is served by Bob at the cashier. The only open cashier spot that can fit Bob is Exchange D, where Bob shares duties with Jennie. This places Tanaka as the customer at Exchange D.
Jennie assists at both Exchange B and Exchange D. With Alice at Exchange A, Tyler at Exchange C, Bob and Jennie at Exchange D, and Wayne at Exchange E, Jennie is the cashier assigned to Exchange B.
Step 4: Rank the chip counts and place Ken and Laura
Look at the chip quantities. Ken exchanges more chips than anyone else, which gives Ken the maximum value of x5 chips. Because Benjamin is at Exchange C, Tanaka is at Exchange D, and the rightmost spot is still open, Ken fits into Exchange B.
The clue tells us that Laura has the second most chips to be exchanged, which corresponds to x4 chips. Another clue notes that sobbing Laura is not handled by Wayne at Exchange E. That leaves Exchange A for Laura. The final remaining customer name, Warren, belongs to Exchange E.
Step 5: Determine expressions and rewards
One clue mentions that one of the two customers Jennie is handling is Angry. Jennie handles Exchange B and Exchange D. Ken at Exchange B is Disappointed, leaving Tanaka at Exchange D with the Angry expression. This also satisfies the clue stating that the Angry customer is to the left of a Teary Eyes customer at Exchange E.
Because Laura at Exchange A is described as sobbing, her expression is Teary Eyes. Benjamin at Exchange C is pleased to exchange his chips with no complaints, giving him a Big Smile.
For rewards, the only person who gets the Car is moved by the occasion, matching the emotional customer at Exchange E. The two people exchanging Handbags have no complaints, placing Handbags at Exchange A and Exchange C alongside Benjamin's Burger.
Solution: Finish the remaining matches
With customer names and expressions settled, finish the remaining chip counts. Laura has x4 at Exchange A, Ken has x5 at Exchange B, Tanaka has x3 at Exchange D, Warren holds x2 at Exchange E, and Benjamin holds x1 at Exchange C. All five exchange counters are now completely solved.
Key Clues Explained In Profile Perfect Level 231
Rightmost customer holds back their tear in front of Wayne
This clue anchors the far end of the grid immediately. Because the counters are laid out from Exchange A to Exchange E, the rightmost position is Exchange E. This directly confirms Wayne as the cashier and Teary Eyes as the expression for that column.
The cashier next to Wayne exchanges for ingots
Ingots refers to the Gold Bar reward. Since Wayne is at Exchange E on the outer edge, the only adjacent counter is Exchange D. This clue securely links Exchange D with the Gold Bar without needing to test multiple positions.
Laura has the second most chips to be exchanged
Comparing the chip totals reveals that x5 is the highest and x4 is the second highest. Once Ken takes x5 as the top chip holder, Laura is confirmed for x4. Since Laura cannot be paired with Wayne at Exchange E, she must be at Exchange A.
Final Thoughts
The key to solving this exchange counter puzzle is using Wayne's placement on the far right edge to locate the Gold Bar at Exchange D. Once Exchange D is locked down, Tyler and Benjamin easily slot into Exchange C, allowing the chip totals and customer rewards to fall into place.
Comments