
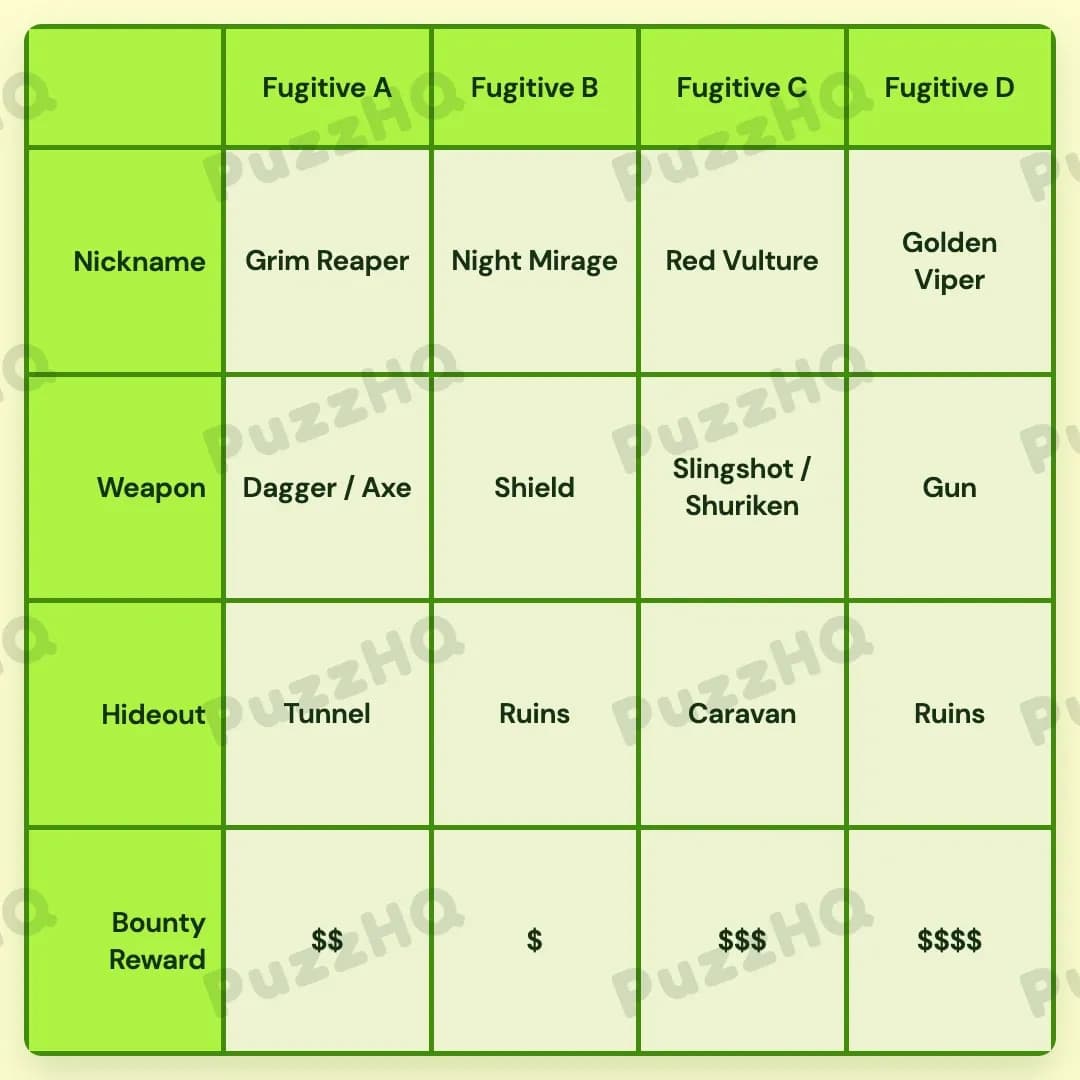
Profile Perfect Level 307 Answer
Every fugitive's identity falls into place once you link weapon choices to nicknames and map their spatial clues across the lineup.
| Trait | Fugitive A | Fugitive B | Fugitive C | Fugitive D |
|---|---|---|---|---|
| Nickname | Grim Reaper | Night Mirage | Red Vulture | Golden Viper |
| Weapon | Dagger / Axe | Shield | Slingshot / Shuriken | Gun |
| Hideout | Tunnel | Ruins | Caravan | Ruins |
| Bounty Reward | $$ | $ | $$$ | $$$$ |
Building The Grid By Trait
The clearest path through this puzzle starts with the direct pairings between Nickname and Weapon, which immediately provide concrete hooks for column positions. From there, positional bounty restrictions lock the columns into sequence before hideouts finish the remaining open slots.
Nicknames And Weapons Lock Core Identities
The relationship between nicknames and combat gear provides the most direct entry point. We learn that Golden Viper possesses top-notch shooting skills from her background as a sheriff, directly connecting her to the Gun. Similarly, the fugitive known as the Angel of Death, which corresponds to the Grim Reaper, carries a Dagger. Red Vulture is described as a master of projectile weapons, pairing that name with the Slingshot and Shuriken combination.
With three of the weapons firmly attached to specific names, the Shield naturally pairs with the remaining name, Night Mirage. Spatial clues now fix where these pairs sit relative to each other across the four columns. The Night Mirage is located exactly two columns away from the Gun. Placing Night Mirage in Fugitive B's column and the Gun with Golden Viper in Fugitive D satisfies this spacing while leaving Fugitive C between them.
Fugitive C claims the projectile master Red Vulture along with the Slingshot and Shuriken. That leaves Fugitive A to take the Grim Reaper and the Dagger with Axe. In addition, the clue stating that the Shield has three sharp weapon choices around it confirms Fugitive B holds the defensive Shield while surrounded by adjacent edged or pointed threats.
Bounty Rewards Establish Relative Order
Once nicknames and weapons establish the four columns, Bounty Reward values organize the economic ladder of the manhunt. The clues state that two fugitives sit between the highest bounty and the second lowest bounty. In a four-column grid, having two subjects between two specific values means those values must sit on the far ends, occupying Fugitive A and Fugitive D.
We know hunters favor Golden Viper's bounty over the Reaper's bounty. Because Golden Viper sits under Fugitive D and the Grim Reaper sits under Fugitive A, the highest payout of four dollar signs must belong to Fugitive D. Consequently, the second lowest bounty of two dollar signs belongs to Fugitive A on the opposite end.
The middle two bounty values can now be resolved using the Shield's placement. The clue notes that the second highest bounty sits directly next to the Shield. Fugitive B holds the Shield, and Fugitive C is adjacent to Fugitive B, meaning Fugitive C claims the three dollar sign reward. This leaves the lowest reward of a single dollar sign for Fugitive B, completing the entire Bounty Reward row in clean ascending order from B through D.
Hideouts Fill The Final Row
With three complete trait rows established, the Hideout row resolves through simple deduction and remaining spatial facts. Fugitive C is explicitly noted as not living in any fixed location. A wandering Caravan fits this description perfectly, securing Caravan for Fugitive C.
Next, the clue records that the Ruins serve as a hideout for the Night Mirage. Since Night Mirage is Fugitive B, Fugitive B takes Ruins. The remaining puzzle slots balance out between Tunnel and Ruins. Fugitive A takes the Tunnel hideout, while Fugitive D also shares a Ruins hideout, finishing every column in full harmony with the established profiles.
Where The Trait Rows Intersect
Solving this puzzle relies heavily on moments where information from one trait category unlocks constraints in another.
Positioning The Gun Against The Night Mirage
The spatial clue placing Night Mirage two columns away from the Gun acts as the master key for the board layout. Nicknames and weapons cannot be solved independently here. We must recognize that Golden Viper wields the Gun and Night Mirage holds the Shield before the two-column gap can be applied. Once that cross-trait deduction occurs, Fugitive B and Fugitive D become immovable anchors, instantly resolving where every subject belongs.
Bounties Anchoring Fugitive Placements Next To The Shield
The bounty distribution relies on knowing which fugitive holds defensive gear. The clue stating that the second highest bounty is adjacent to the Shield bridges the Weapon trait directly into the Bounty Reward trait. Because the Shield is locked to Fugitive B in the middle of the board, the three dollar sign bounty must attach to Fugitive C rather than Fugitive A, which already holds the two dollar sign bounty from the boundary clue.
Matching Projectile Skills To Mobile Lifestyles
Fugitive C sits at the crossroads of several descriptive clues. The Nickname clue establishes Red Vulture as a projectile specialist with a Slingshot and Shuriken, while the Hideout clue highlights a lifestyle without a fixed base. Connecting these two traits allows Caravan to slide naturally into Fugitive C's column without conflicting with the stationary hideouts assigned to the other three outlaws.
Final Grid Check
Every row in the completed table reinforces the others without contradiction. The Grim Reaper and Golden Viper frame the outside edges, satisfying both the weapon spacing requirements and the outer boundary bounty conditions. The central columns balance Night Mirage's defensive Shield in the Ruins with Red Vulture's mobile projectile arsenal, leaving all clue conditions fully verified across every subject.
Comments