
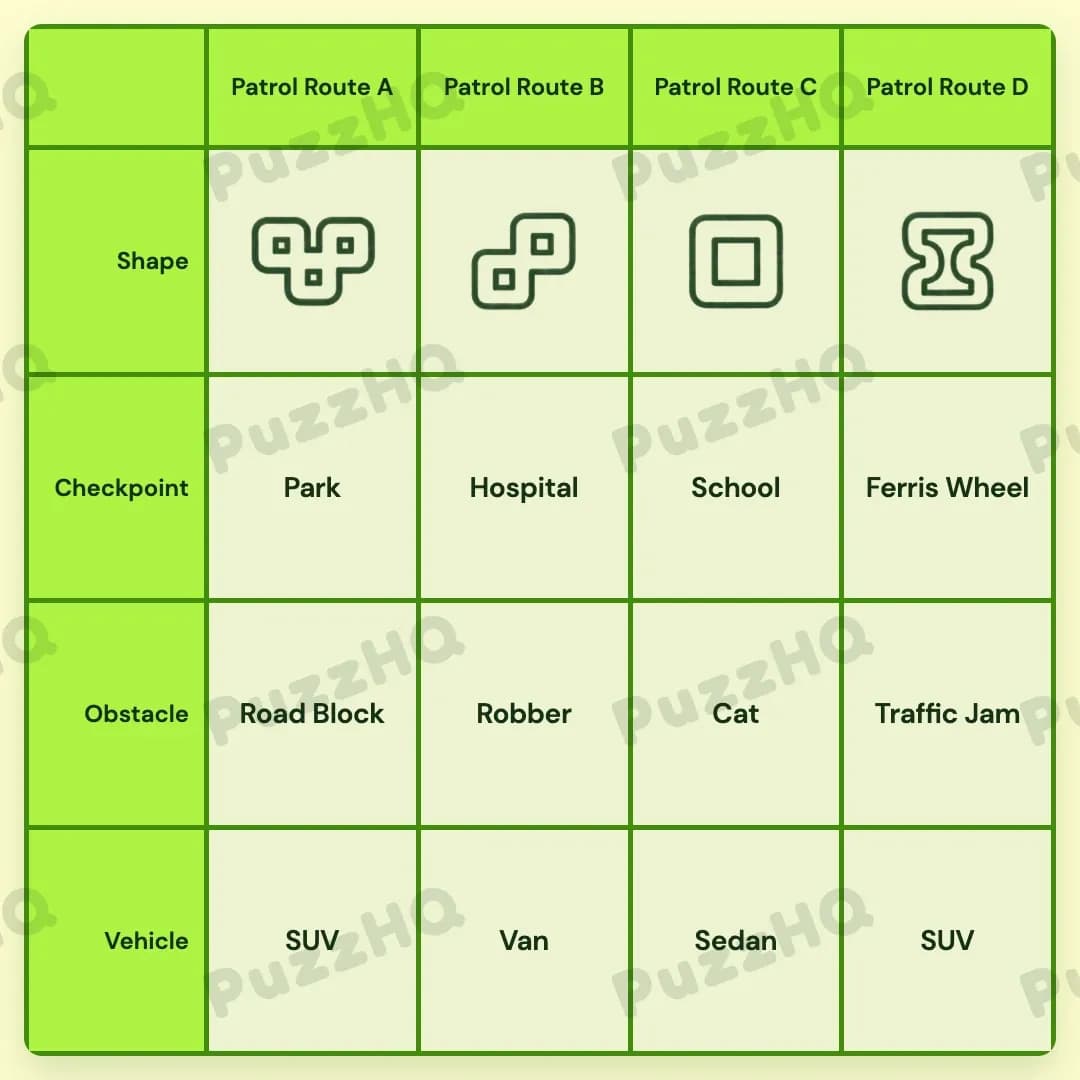
Profile Perfect Level 590 Answer
Check the complete grid below if you need the solution immediately, or read on for the full step-by-step walkthrough.
| Trait | Patrol Route A | Patrol Route B | Patrol Route C | Patrol Route D |
|---|---|---|---|---|
| Shape | Shape1 | Shape2 | Shape3 | Shape4 |
| Checkpoint | Park | Hospital | School | Ferris Wheel |
| Obstacle | Road Block | Robber | Cat | Traffic Jam |
| Vehicle | SUV | Van | Sedan | SUV |
Clues of Profile Perfect Level 590
- The simplest route is not at the edges
- Hospital route forms a shape of 2 connected squares
- Officer following Route A passes at least 2 traffic lights
- Leftmost officer is frustrated by repeated Blockages
- Route C's vehicle carries fewer passengers than Route A's
- Van's officer plans to check on her sick mother during patrol
- Traffic from the amusement park delays the rightmost officer
- Headmaster's Cat likes to nap in the middle of the street
How To Solve Profile Perfect Level 590
This puzzle organizes four patrol paths, Patrol Route A through Patrol Route D, based on their column positions from left to right. Solving this level requires identifying how positional edge clues pin down checkpoints and obstacles, pairing thematic clues like a sick mother visiting a hospital, and comparing vehicle capacities.
Step 1: Use edge clues to secure the leftmost and rightmost positions
The puzzle grid lays out four patrol routes in order from left to right, making Patrol Route A the leftmost route and Patrol Route D the rightmost route. Two clues immediately target these outer positions.
The clue noting that the leftmost officer is frustrated by repeated blockages places the Road Block obstacle directly into Patrol Route A.
Next, the clue stating that traffic from the amusement park delays the rightmost officer tells you two key facts about Patrol Route D. The amusement park theme identifies the Ferris Wheel checkpoint, while the traffic delay assigns the Traffic Jam obstacle.
With those two edges anchored, Patrol Route A has Road Block as its obstacle, and Patrol Route D has Ferris Wheel as its checkpoint and Traffic Jam as its obstacle.
Step 2: Connect the sick mother, Hospital checkpoint, and the Van
One clue mentions that the van's officer plans to check on her sick mother during patrol. Visiting a sick mother directly associates this officer with the Hospital checkpoint, meaning the Van and Hospital belong to the exact same route.
Another clue points out that the hospital route forms a shape of 2 connected squares. This directly ties the Hospital checkpoint to Shape2.
Because Patrol Route A already has the Road Block and Patrol Route D already has the Ferris Wheel, the combined package of Hospital, Van, and Shape2 must belong to one of the inner columns. As the grid confirms, Patrol Route B takes the Hospital checkpoint, the Van vehicle, and Shape2.
Step 3: Match the Headmaster's Cat to the School checkpoint
The clue regarding the headmaster's cat napping in the street links two specific puzzle elements: the Cat obstacle and the headmaster. A headmaster runs an academic institution, which identifies the School checkpoint.
Since Patrol Route A and Patrol Route D already have their checkpoints and obstacles assigned, and Patrol Route B is claimed by the Hospital, the School checkpoint and Cat obstacle naturally fit Patrol Route C.
Step 4: Compare vehicle capacities between Route C and Route A
We learn that Route C's vehicle carries fewer passengers than Route A's vehicle. Looking at the remaining vehicle options, a standard Sedan holds fewer passengers than an SUV.
This establishes that Patrol Route C is assigned the Sedan, while Patrol Route A receives an SUV. By extension, Patrol Route D also takes the remaining SUV.
Solution: Finish the remaining matches
With the core connections established, you can resolve the few remaining open slots across the grid.
For the checkpoints, Patrol Route A needs an assignment. With Hospital, School, and Ferris Wheel accounted for, Patrol Route A claims Park.
For obstacles, Patrol Route B still needs an entry. Road Block, Cat, and Traffic Jam are taken, leaving Robber as the only match for Patrol Route B.
For the shapes, Clue 1 notes that the simplest route is not at the edges, keeping simpler shapes away from Route A and Route D. With Shape2 firmly tied to the Hospital on Patrol Route B, the remaining route numbers fall neatly into their designated columns, giving Shape1 to Patrol Route A, Shape3 to Patrol Route C, and Shape4 to Patrol Route D.
All four patrol routes are now completely solved.
Key Clues Explained In Profile Perfect Level 590
Traffic from the amusement park delays the rightmost officer
This clue is powerful because it addresses two traits at once based purely on column layout. Because the patrol routes are laid out from A to D, the rightmost route is Patrol Route D. The phrase amusement park connects directly to the Ferris Wheel checkpoint, while delays from traffic points to the Traffic Jam obstacle.
Van's officer plans to check on her sick mother during patrol
This clue does not name a checkpoint directly, which can throw players off initially. The narrative context of visiting an ailing parent points straight to the Hospital checkpoint. Pairing the Van with the Hospital gives you an anchor that unlocks both the vehicle and checkpoint traits for Patrol Route B.
Route C's vehicle carries fewer passengers than Route A's
Rather than stating the vehicle models outright, this clue relies on real-world capacity logic. A sedan carries fewer people than a sport utility vehicle. Recognizing this comparison allows you to assign the Sedan to Patrol Route C and the SUV to Patrol Route A without guesswork.
Final Thoughts
The key to cracking this layout is turning directional clues into fixed placements on Patrol Route A and Patrol Route D right at the start. Once the outer edges have their obstacles and checkpoints assigned, narrative clues easily link the Van to the Hospital and the Cat to the School, bringing the entire patrol grid together.
Comments