
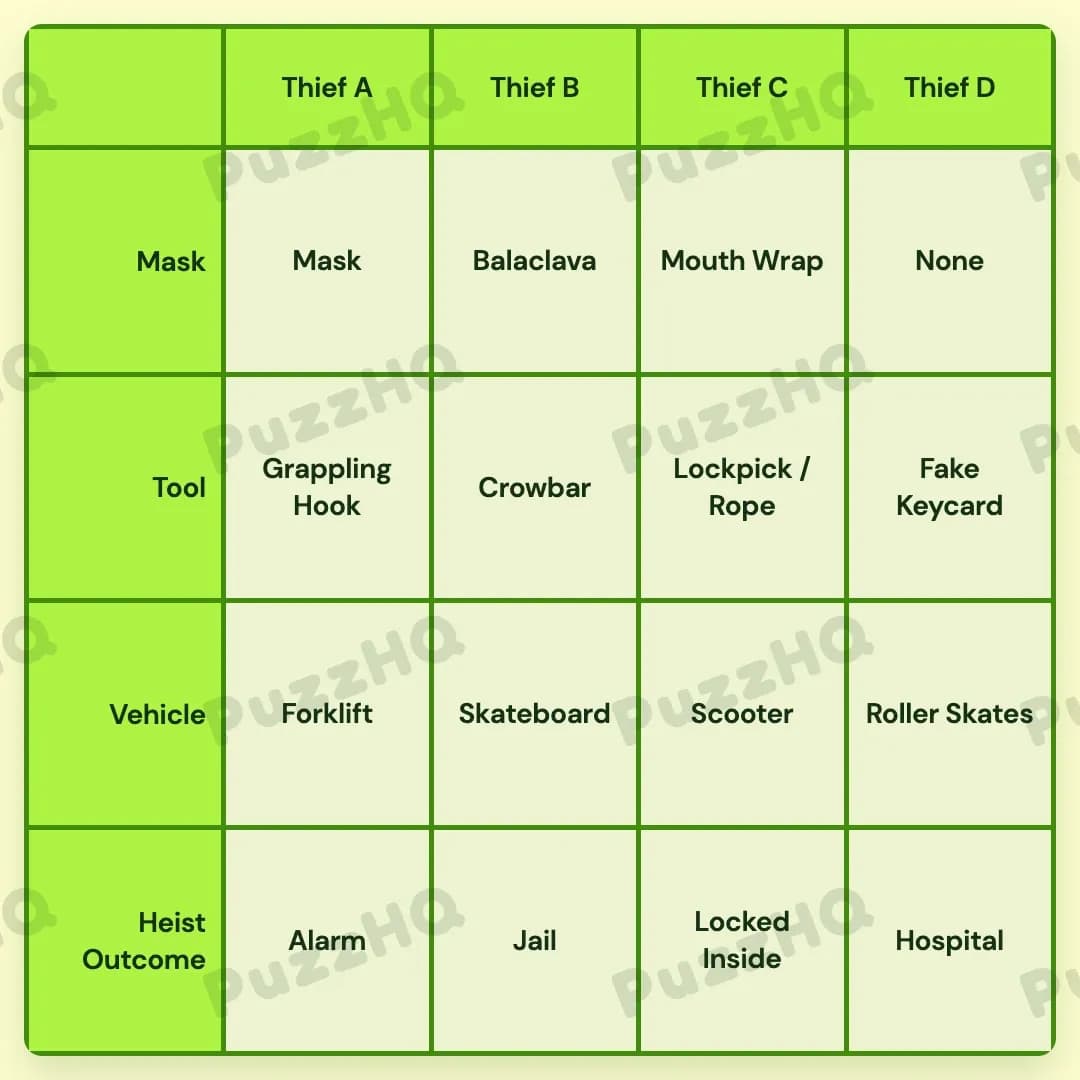
Profile Perfect Level 187 Answer
All four thieves are identified by linking their face coverings and tools directly to their getaway vehicles and ultimate heist outcomes.
| Trait | Thief A | Thief B | Thief C | Thief D |\n| --- | --- | --- | --- | --- |\n| Mask | Mask | Balaclava | Mouth Wrap | None |\n| Tool | Grappling Hook | Crowbar | Lockpick / Rope | Fake Keycard |\n| Vehicle | Forklift | Skateboard | Scooter | Roller Skates |\n| Heist Outcome | Alarm | Jail | Locked Inside | Hospital |
Building The Grid By Trait
The Mask trait serves as the master anchor for this puzzle because spatial clues immediately lock the extreme ends of the lineup into place before tool and vehicle assignments narrow down the center.
Mask Positions Anchor The Four Thieves
The deduction begins with the bare-faced criminal. Clue 4 establishes that one suspect operates without any face cover. Clue 2 then notes that the thief positioned furthest away from this bare-faced thief entered the bank from the roof. In a four-column grid spanning Thief A to Thief D, the greatest possible distance lies between the outer flanks.
Placing the bare-faced suspect at Thief D forces the roof entrant into Thief A. This sets Thief D's mask trait to None.
Looking at the remaining face coverings, we have Balaclava, Mouth Wrap, and a full Mask. Clue 6 refers to a thief whose face is completely hidden, which corresponds to the standard Mask at Thief A, while Clue 3 links Balaclava to a specific vehicle. Clue 5 and Clue 9 describe the specialist using a Mouth Wrap.
Because Thief B and Thief C are the only open middle positions, assigning the remaining traits will quickly slot Balaclava into Thief B and Mouth Wrap into Thief C.
Tools Establish Criminal Roles Across The Lineup
Once the mask identities are pinned down, the Tool row fills out through direct role associations.
Clue 2 reveals that Thief A came in from the roof, pointing directly to the Grappling Hook.
Clue 5 and Clue 9 both focus on the Mouth Wrap specialist at Thief C, stating that this thief needs to pick locks silently and also carries a rope to secure items. Combining these clues gives Thief C the multi-item entry of Lockpick / Rope.
For the remaining tools, Clue 7 states that the thief on skates forged a Fake Keycard to slip inside, while Clue 8 mentions a heavy tool user who gets caught by the law. A crowbar is the heavy pry tool of the group, which leaves the Fake Keycard for Thief D and the Crowbar for Thief B.
Vehicles Establish Spatial Constraints
With the tools and masks established, the getaway vehicles lock the layout together.
Clue 3 states that the thief in the Balaclava came through with a Skateboard. Since Thief B wears the Balaclava, Thief B rides the Skateboard.
Clue 7 associates the Fake Keycard with the thief on Roller Skates. Since Thief D holds the Fake Keycard, Thief D takes the Roller Skates.
Only two vehicles remain: the Forklift and the Scooter. Clue 1 states that the thief using the Forklift is not beside the Scooter. Placing the Forklift at Thief A and the Scooter at Thief C leaves a one-person gap at Thief B, satisfying the spacing rule cleanly.
Heist Outcomes Conclude The Operation
The final trait row details the fate of each crew member after the robbery.
Clue 4 explains that the thief without a face cover suffered broken bones during the heist. With Thief D confirmed as the bare-faced thief, Thief D ends up at the Hospital.
Clue 6 indicates that the alarm siren startled the thief whose face was fully concealed. Thief A, wearing the full Mask, triggers the Alarm.
Clue 8 notes that the heavy tool user was caught by the authorities. Thief B wields the Crowbar, meaning Thief B goes to Jail.
This leaves only one outcome unassigned. Thief C, who handled the locks and rope, gets trapped on site and ends up Locked Inside.
Where The Trait Rows Intersect
Bare Faces, Broken Bones, And Escape Wheels
The resolution of Thief D relies on three clues overlapping across different categories. Clue 4 links a bare face (Mask) with broken bones (Heist Outcome: Hospital). Clue 7 links forged keycards (Tool) with skates (Vehicle). Because Thief D is geographically locked as the bare-faced thief opposite the roof climber, both outcomes converge on this single column, making Thief D the skater with the fake keycard in the hospital.
The Roof Infiltration And Heavy Equipment
Thief A and Thief B are solved by pairing entry methods with tool weights. Clue 2 matches the furthest column from Thief D with a rooftop entrance, demanding a Grappling Hook and heavy machinery like a Forklift. Meanwhile, Clue 8 takes the Crowbar tool and immediately resolves Thief B's fate as Jail, confirming the Balaclava and Skateboard combination at Thief B.
Silent Infiltration With Lockpicks And Mouth Wraps
Clue 5 and Clue 9 both cross-reference the Mouth Wrap mask with stealth tools, namely lockpicks and rope. Because Thief A is already using the Grappling Hook and Thief D is using a Fake Keycard, Thief C becomes the only viable candidate for this double-tool assignment. This immediately isolates the Scooter as Thief C's vehicle, perfectly obeying the distance requirement from Thief A's Forklift.
Final Grid Check
Every category now aligns without contradiction. The Mask row anchors the layout from Thief A to Thief D, the Tool and Vehicle rows balance heavy gear against silent lockpicking, and the Heist Outcome row neatly accounts for all four criminal fates.
Comments