
Profile Perfect Level 195 Answer
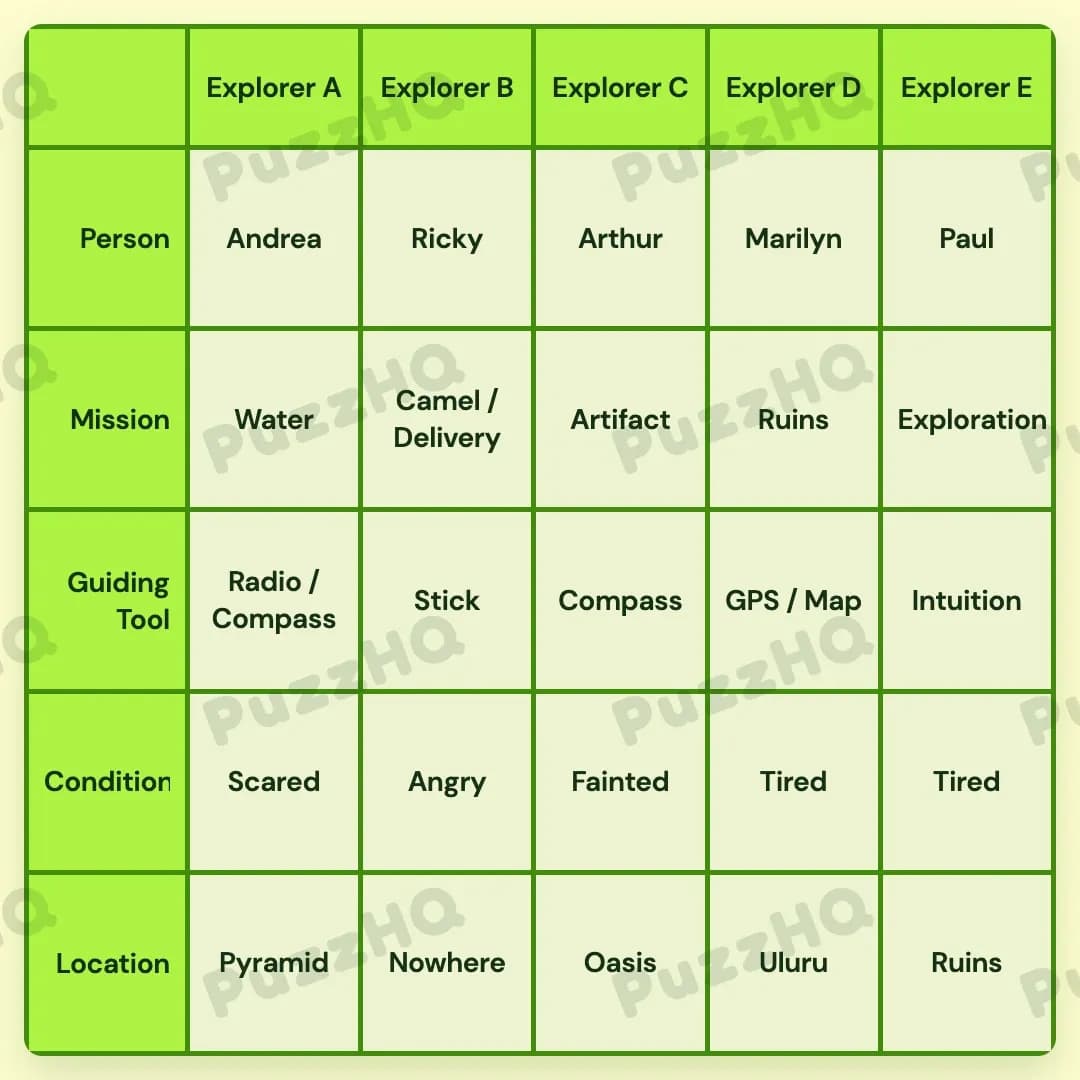
Here is the complete solution grid for this puzzle, followed by the step-by-step logic to help you solve it.
| Trait | Explorer A | Explorer B | Explorer C | Explorer D | Explorer E |
|---|---|---|---|---|---|
| Person | Andrea | Ricky | Arthur | Marilyn | Paul |
| Mission | Water | Camel / Delivery | Artifact | Ruins | Exploration |
| Guiding Tool | Radio / Compass | Stick | Compass | GPS / Map | Intuition |
| Condition | Scared | Angry | Fainted | Tired | Tired |
| Location | Pyramid | Nowhere | Oasis | Uluru | Ruins |
Clues of Profile Perfect Level 195
- Andrea is Scared that she would not survive dehydration
- Explorer E is confident to travel with his knowledge alone
- Fainted explorer was looking for the ancient Artifact
- Desert's sanctuary is 2 columns away from Scared person
- The sweating explorer is not beside the frightened one
- No Camel can be found anywhere in Uluru
- There are 3 guiding tools between Ricky and Intuition
- Ricky needs to get a ride to Deliver the package
- Marilyn''s goal is to find what Paul is currently exploring
- Explorer 2 columns on the left of Arthur is at the Pyramid
- Woman explorer at Uluru needs several tools to help her
- Explorer at Uluru used both physical and electronic maps
- The Stick is not neighbors with the GPS
- Arthur does not bring any kinds of Radio with him
- Andrea is trying to contact her team since her Compass broke
How To Solve Profile Perfect Level 195
This desert expedition puzzle hinges on establishing column positions for Arthur, Andrea, and the oasis sanctuary before mapping out the specific gear combinations and mission targets across the five explorers.
Step 1: Establish Explorer E's tool and find Arthur and the Pyramid
The second clue states that Explorer E travels with his knowledge alone, which assigns Intuition as Explorer E's guiding tool.
Next, look at the clue stating that the explorer two columns to the left of Arthur is at the Pyramid. Because there must be two open columns to Arthur's left, Arthur cannot be in Explorer A or Explorer B. Placing Arthur as Explorer C places the Pyramid at Explorer A.
Step 2: Place Andrea, the Oasis sanctuary, and Arthur's expedition details
The first clue reveals that Andrea is Scared about dehydration, and clue 15 adds that she is contacting her team because her compass broke. This links Andrea with the Scared condition, the Water mission, and the Radio / Compass tool. Because Andrea is Scared and Explorer A is already at the Pyramid, Andrea fits into Explorer A.
Clue 4 notes that the desert's sanctuary is two columns away from the Scared person. Since Andrea is at Explorer A, the sanctuary, which is the Oasis, must be located at Explorer C.
Now look at Arthur at Explorer C. Clue 3 links the Fainted explorer with the ancient Artifact. This fits Arthur at the Oasis, giving him the Fainted condition and the Artifact mission. Clue 14 notes that Arthur brings no radio, leaving him with the single Compass as his guiding tool.
Step 3: Identify Marilyn and the tools at Uluru
Clue 11 mentions that the woman explorer at Uluru needs several tools, and clue 12 clarifies that the explorer at Uluru used both physical and electronic maps. This assigns GPS / Map to Uluru.
Because Marilyn is the woman explorer whose goal connects to Uluru, Marilyn must be placed at Explorer D. This confirms Uluru as Explorer D's location and GPS / Map as her guiding tool.
Step 4: Map Paul's mission and Ricky's delivery
Clue 9 states that Marilyn's goal is to find what Paul is currently exploring. This places Paul as Explorer E, exploring the Ruins. Marilyn at Explorer D takes the Ruins mission as her target.
Clue 8 notes that Ricky needs a ride to deliver his package, linking Ricky with the Camel / Delivery mission. This places Ricky in the remaining person slot at Explorer B.
Step 5: Assign the remaining tools, locations, and conditions
With Ricky at Explorer B, clue 13 tells us that the Stick is not neighbors with the GPS at Explorer D. This assigns the Stick to Explorer B.
With Uluru, the Oasis, the Pyramid, and the Ruins already claimed, Explorer B's location is Nowhere, and Explorer E's location is the Ruins.
For the conditions, clue 5 notes that the sweating explorer is not beside the frightened one at Explorer A. The remaining conditions fill in naturally, with Ricky becoming Angry at Explorer B, while Marilyn and Paul take the Tired condition.
Solution: Finish the remaining matches
Reviewing all traits confirms the final setup:
- Explorer A is Andrea at the Pyramid, Scared, seeking Water with a Radio / Compass.
- Explorer B is Ricky, stranded Nowhere, Angry, on a Camel / Delivery mission with a Stick.
- Explorer C is Arthur at the Oasis, Fainted, seeking the Artifact with a Compass.
- Explorer D is Marilyn at Uluru, Tired, tracking the Ruins with a GPS / Map.
- Explorer E is Paul at the Ruins, Tired, on an Exploration mission guided by Intuition.
Key Clues Explained In Profile Perfect Level 195
Explorer 2 columns on the left of Arthur is at the Pyramid
This clue provides the structural anchor for the entire grid. Because the subject two spaces to the left must exist on the board, Arthur has to be positioned in the middle or right side. Placing Arthur at Explorer C immediately locks the Pyramid into Explorer A.
Marilyn's goal is to find what Paul is currently exploring
This clue pairs two characters and their mission goals together. Once Marilyn is located at Explorer D, Paul must take Explorer E, and his location at the Ruins directly defines Marilyn's mission objective.
Desert's sanctuary is 2 columns away from Scared person
Once Andrea is identified as the Scared explorer at Explorer A, counting two columns to the right leads directly to Explorer C, defining the Oasis sanctuary for Arthur.
Final Thoughts
Solving this puzzle relies on converting positional clues into fixed columns early on. Once Arthur, Andrea, and the Oasis lock into columns A and C, the rest of the gear assignments and character locations fall smoothly into place.
Comments