
Profile Perfect Level 559 Answer
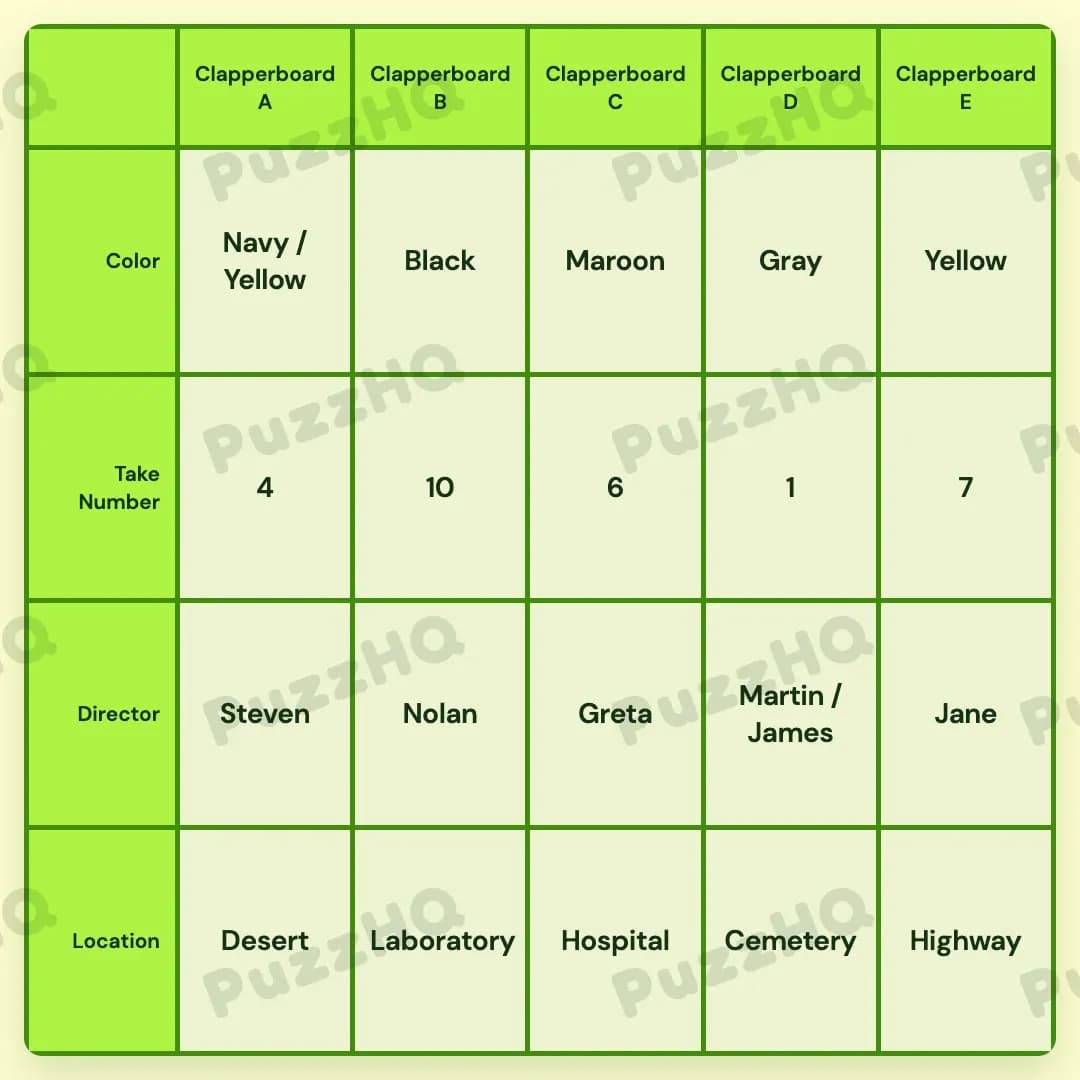
Every clapperboard finds its exact film crew by anchoring the shooting locations first, matching the take counts to those sets, and pairing directors with their custom board colors.
| Trait | Clapperboard A | Clapperboard B | Clapperboard C | Clapperboard D | Clapperboard E |
|---|---|---|---|---|---|
| Color | Navy / Yellow | Black | Maroon | Gray | Yellow |
| Take Number | 4 | 10 | 6 | 1 | 7 |
| Director | Steven | Nolan | Greta | Martin / James | Jane |
| Location | Desert | Laboratory | Hospital | Cemetery | Highway |
Building The Grid By Trait
Starting with Location provides the cleanest foundation for Level 559 because spatial relationships immediately distribute the film sets across the five physical boards. Once the locations fix the structural order, the numerical counts and aesthetic traits fall neatly into line.
Location And Take Number Establish The Production Framework
The Location category provides immediate geographic placement across the boards. Clapperboard E is directly assigned to the Highway scene for an action movie. Meanwhile, the Laboratory scene sits directly between the Hospital and the Desert scenes. Because the Highway already holds the far right slot at Clapperboard E, the three consecutive scenes must occupy Clapperboard A, Clapperboard B, and Clapperboard C. Within that trio, the Laboratory must take Clapperboard B so that it rests between the other two. The remaining unused subject, Clapperboard D, accommodates the burial scene, which represents the Cemetery.
Take Number links directly to these established locations to clear up the scene order. The burial scene at Clapperboard D represents the very first take, immediately giving Clapperboard D a take count of 1. The Desert scene features a take count that can be counted on one hand, limiting its value to five or fewer. Because take 1 is already assigned to the Cemetery, the Desert at Clapperboard A takes 4.
The Laboratory at Clapperboard B and the Hospital at Clapperboard C can now be differentiated. Greta directs a scene that has reached 6 takes, which coordinates with the Hospital. The highest take number sits to the left of the third highest take. With 6 being the third highest take on the board, the highest take of 10 must sit to its left at Clapperboard B in the Laboratory. That leaves take 7 to finish Clapperboard E at the Highway.
With both Location and Take Number fully locked across all five columns, the physical layout is set. Clapperboard A is the Desert at 4 takes, Clapperboard B is the Laboratory at 10 takes, Clapperboard C is the Hospital at 6 takes, Clapperboard D is the Cemetery at 1 take, and Clapperboard E is the Highway at 7 takes. This structured framework tightly restricts where the remaining directors and colors can land.
Director And Color Resolve The Creative Teams
With the production layout locked in place, Director and Color work hand in hand to identify the specific crew running each board. Multiple clues package a director together with their signature color, allowing these two traits to solve almost simultaneously.
Greta is already tied to the scene with 6 takes, which anchors her at Clapperboard C. Her clue notes that she uses a Maroon clapperboard, instantly solving both Director and Color for the Hospital set.
Jane is assigned to direct the Highway scene at Clapperboard E. Her set relies on a reflective color clapperboard, designating Yellow to Clapperboard E. Since the Hospital cannot use a Yellow clapperboard, this assignment aligns smoothly with the rest of the board.
Nolan works with a simple Black clapperboard. Looking at the open slots, Clapperboard B, Clapperboard D, and Clapperboard A remain. Martin directs with a Gray clapperboard, but Martin cannot film his scene next to Nolan. Because Clapperboard B sits directly between Clapperboard A and Clapperboard C, putting Martin at Clapperboard B would force him next to whoever occupies Clapperboard A. More importantly, Nolan requires an open slot that accepts both his name and the Black color. Assigning Nolan to Clapperboard B leaves Martin with Clapperboard D, which is separated from Nolan by Greta at Clapperboard C. This satisfies the rule that Martin does not film next to Nolan. Clapperboard D therefore receives the Gray clapperboard, shared under the Martin and James production credit.
Only Clapperboard A remains without a named director and color. Steven fills the director position for Clapperboard A in the Desert. Because the Navy color cannot appear on James's set at Clapperboard D, Navy belongs with Clapperboard A, where it pairs as Navy and Yellow. Every director is now tied to their specific board color and location.
Where The Trait Rows Intersect
Examining how different categories cross paths reveals the logical bridges that make Level 559 solve cleanly.
The Burial Scene Connects Cemetery To The Initial Take
The clue mentioning the burial scene links Location and Take Number in a single stroke. By identifying the burial environment as a Cemetery and declaring it to be the very first take, the puzzle instantly pins take 1 to Clapperboard D. Rather than trying to figure out the numbers in isolation, this clue binds a narrative setting to a mathematical value, anchoring the Cemetery before any director steps onto the set.
Greta Merges Direction, Board Color, And Numerical Takes
Greta's clue is a three way intersection connecting Director, Color, and Take Number. It explicitly pairs Greta with the Maroon board and assigns her exactly 6 takes. This prevents an overwhelming number of combinations. Once the take sequence shows that 6 belongs at Clapperboard C, Greta and Maroon automatically claim the Hospital column, solving three rows for that subject all at once.
Jane Connects Highway Location With Reflective Color
Jane's clue ties Director, Location, and Color together. By stating that Jane films the Highway scene using a reflective clapperboard, the clue immediately claims Clapperboard E. It eliminates Jane and the Yellow color from every other location, ensuring that neither the Hospital nor the Desert can accidentally absorb the reflective Yellow assignment.
Final Grid Check
Reviewing the finished grid confirms that every trait row harmonizes with the clues in Level 559. The locations flow logically from the Desert at Clapperboard A through to the Highway at Clapperboard E, with the Laboratory positioned neatly between the Desert and Hospital. The take counts ascend and descend in full agreement with the positional rules, placing the maximum take of 10 to the left of take 6, while keeping the Cemetery at take 1 and the Desert at take 4. Directors and their chosen board colors fit without any overlap or boundary violations, proving that the cross category deductions lock together seamlessly.
Comments