
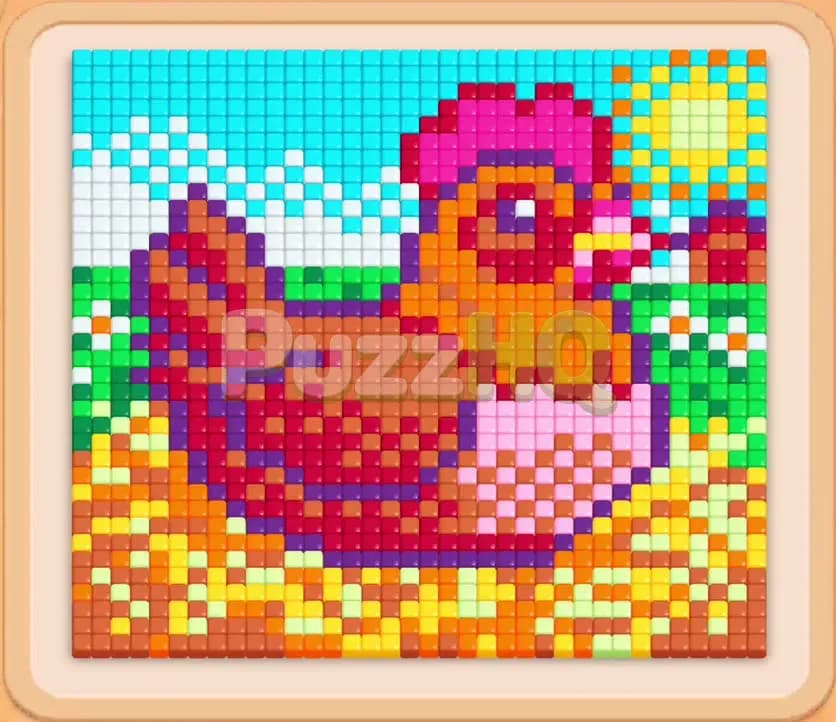
Colony Flow Level 2237 presents a dense pixel art hen resting on a nest of straw eggs beneath a sunny sky. The board requires careful slot management because you face multiple layered colors and tricky connected boxes that take up two slots at once. You must plan your pulls so your ant paths stay active and your five waiting slots never fill with dormant blocks.
Colony Flow Level 2237 Overview
What You Are Working With
The picture on your screen shows a colorful barnyard scene. At the center sits a large hen with a rich chestnut body, a speckled pink wing, an orange face, and a bright red comb. The lower section consists of golden straw tiles mixed with white and yellow eggs. Behind the hen, you see a crisp cyan sky, yellow sunshine, and green vegetation. Every section of this picture is built from colored food tiles that your ants must reach and consume.
Below the picture, your ants emerge from a central nest hole in the ground. You guide them using the block tray at the bottom. This tray contains rows of numbered blocks in varying amounts. You will see large numbers such as cyan 48, brown 24, green 20, and several stacks of pink, white, magenta, and yellow.
This stage features two specific mechanics that dictate how you move. First, you have Hidden Box blocks marked with question marks. These blocks conceal their true color until you clear the blocks sitting directly in front of them. Second, you have Connected Boxes. These are pairs of blocks linked together with a visible metal bracket. When you tap a connected box, both linked blocks move into your waiting slots simultaneously. Because you only have five waiting slots, a connected pair instantly consumes two spaces. If you misjudge the board state when pulling them, you risk clogging your waiting line immediately.
What It Takes to Clear Level 2237 Board
To clear the board, your ants must eat every single pixel tile until the wooden frame is completely empty. The primary danger on this level is the five slot limit. When all five waiting slots hold blocks that cannot match any currently reachable food tiles, the ants stop moving and you fail the level.
Clearing this board requires peeling the image in deliberate layers. The outer edges and bottom nest section provide the initial points of entry for your ant streams. As ants clear external tiles, they expose the deeper internal colors of the hen body and the hidden box elements in your tray. You must maintain at least one active ant march at all times. Every pull from the tray must either immediately feed the colony or unlock the precise color needed for the next step.
Colony Flow Level 2237 Step by Step Solution
Step 1: Clear the lower nest straw and deploy your first connected pair
Begin by examining the outer perimeter of the straw nest at the bottom of the board. The nest exposes orange, yellow, and pink tiles right above the ant hole. Tap the front pink 11 and pink 10 blocks from the tray. Your pink ants will surge forward to chew away the decorative edge of the nest and the bottom tip of the wing. As those numbers decrease, pull the connected orange and brown pair into the waiting slots. Because orange tiles are exposed across the lower straw, the orange block activates instantly and begins counting down from its starting value. This keeps two slots working while brown waits patiently for the inner plumage to open up. Watch the numbers count down to zero so those slots clear before you touch the deeper layers of the tray.
Step 2: Direct pink and magenta streams into the wing pattern
With the lower boundary trimmed, the delicate pink checkerboard on the hen wing becomes accessible. Move the magenta 19 block into a waiting slot alongside the remaining pink blocks. Bright magenta and light pink ants will march out together in dual lines. They will quickly strip away the pastel wing feathers, which directly reveals the darker plumage underneath. As the magenta number drops from 19 down to 9 and then finishes off, the central nest area clears out significantly. Keep an eye on your waiting slots during this sequence. Ensure you leave at least two slots completely vacant so you do not box yourself into a corner while the ants finish their meals.
Step 3: Strip away the white egg highlights and clouds to reveal hidden tray boxes
The front row of your tray is now open enough to pull the white blocks. Select the white 19 block and send white ants toward the eggs nestled beneath the hen and the fluffy cloud edges in the sky. As the white tiles vanish, you expose the question mark block in the middle column of the tray. Clearing the front white and pink blocks unveils this hidden box, turning it into a usable color. Meanwhile, the white block counts down toward zero as the eggs disappear from the picture. The board now has wide paths running along both the base of the nest and the top boundary of the hen back.
Step 4: Deploy green and purple blocks to trim the foliage and shadow lines
Now look to the right side of the picture where green leaves and dark purple accent pixels border the straw nest. Select the green 20 block from the tray. Green ants will head toward the right border, consuming the greenery and breaking open the side of the nest. Pull the purple 5 block into an open waiting slot. Your purple ants will immediately march into the shadow folds beneath the hen body and around the lower feathers. Because these counts are relatively small, both the green and purple blocks will drain their numbers quickly. This rapid turnaround keeps your five waiting slots clean and prevents any stagnation while opening the central body tiles.
Step 5: Send the cyan swarm to clear the wide blue sky
At this stage, the entire upper portion of the sky is completely exposed and ready to be stripped. Pull the large cyan 48 block from the left side of your tray into an open waiting slot. A massive stream of bright blue ants will pour from the nest hole and travel along the cleared perimeter up into the sky. They will eat across the blue backdrop from left to right, encircling the head and back of the hen. The cyan counter will drop rapidly as it consumes dozens of sky pixels. While the cyan ants are marching, you can safely pull the yellow blocks to eliminate the sun in the upper corner without risking a slot jam.
Step 6: Unlock the hen chest and beak using the remaining connected blocks
With the sky and outer nest cleared, only the hen herself remains on the board. The bird consists of orange, dark brown, and deep red pixels. Tap the connected brown and orange pair sitting in your tray. Both blocks will slide into the waiting slots. Because the chest and face are fully exposed, both the orange and brown ants can feed simultaneously. Orange ants will target the face, beak, and straw remnants, while brown ants will carve directly into the torso feathers. Watch the numbers count down from the teens toward zero. The picture will rapidly diminish into disconnected clusters of plumage.
Step 7: Clean the final body pixels to finish the board
You are left with a handful of stray pixels representing the comb, beak tip, and tail feathers. Pull the final crimson block with value 33 and the remaining small white and brown singles. The crimson ants will devour the tall red comb atop the hen head. The remaining brown and orange ants will snap up the last few body tiles. Once the final number ticks down to zero, the last pixel vanishes from the wooden frame, the ant streams march back into their nest hole, and the victory banner appears on your screen.
Final Thought
Colony Flow Level 2237 demands strict discipline with your five waiting slots, particularly when handling the bulky connected boxes that consume double space. If you ever feel stuck on the order of tray pulls or struggle to see which color path opens next, take a moment to watch the complete walkthrough video above this article. Seeing the ant paths navigate the hen plumage in real time will make your winning run smooth and stress free.
Comments