
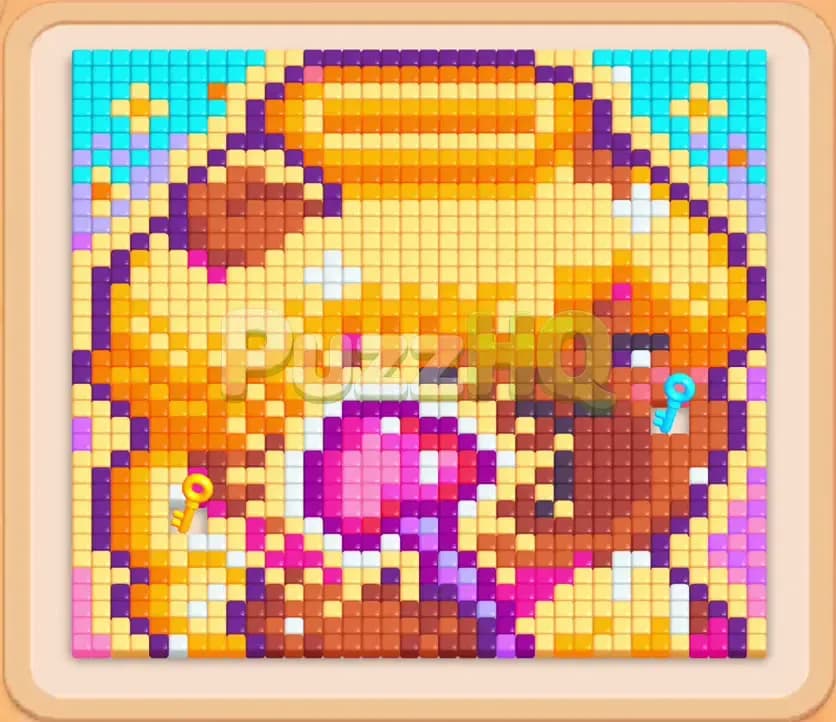
Colony Flow Level 1070 presents a vibrant pixel art puzzle featuring a golden honey pot flanked by decorative cyan corners and a glowing magenta heart resting at its base. Your goal is to guide swarms of colorful ants out from the nest to devour every single food block while carefully balancing your tray space. Managing your selections with precision is vital because a single misplaced block can jam your waiting area and bring your entire operation to an abrupt halt.
Colony Flow Level 1070 Board Breakdown
Starting Colors and Blocks
The pixel board displays an intricate composition dominated by yellow, gold, and orange tones that form the bulky body of a honey pot. Rich brown tiles accent the upper lid and right shoulder, while vibrant cyan and light blue tiles frame the top corners in decorative diamond patterns. Down near the center, a dense core of magenta and pink tiles forms a heart shape wrapped tightly in a dark purple border. Scattered white and lilac tiles settle along the base, adding extra layers that your ants must eventually chew through.
Down in your lower tray, the blocks sit in multiple tiered rows beneath your five open waiting slots. The front line offers immediate access to an orange 30, a dark purple 35, a yellow 30, another dark purple 35, and a cream yellow 35. Trapped beneath these starting blocks are deeper reserves of pink 8, orange 30, cream 35, purple 34, and additional yellow and brown counts. Every number on these blocks directly correlates to the exact count of matching colored food tiles your ants will consume on the board above.
Paths, Obstacles, and Limited Space
At the start of the puzzle, the ants emerging from the central nest hole can only reach the outer edges of the honey pot and the loose perimeter tiles. The inner purple shell, the pink heart, and the upper cyan corner decorations remain completely blocked off by thick walls of yellow and orange food. You have exactly five waiting slots at your disposal. Whenever you tap a block from the lower reserve, it slides into one of these five slots, deploying matching worker ants onto the field. If all five slots become occupied and none of those ants can find a valid path to their color, your run ends immediately.
This stage introduces special mechanics that demand strict attention. A yellow padlock seals off a yellow 35 block deep in the left stack of your queue, requiring your ants to chew toward the yellow key sitting on the lower left region of the board. Another blue key rests among the brown tiles on the upper right side. Furthermore, connected boxes appear later in the queue, forcing you to pick paired blocks that enter your waiting slots simultaneously. You cannot separate these linked pairs, meaning you must reserve enough open slots before pulling them into play.
Colony Flow Level 1070 Complete Solution
Step 1: Deploy yellow and brown blocks to strip the outer pot
Begin by selecting the yellow 30 from your accessible tray row to get yellow ants swarming the lower flanks and outer belly of the honey pot. Follow this immediately by releasing the brown blocks as they become exposed, loading brown counts of 13 and 14 into your active slots alongside yellow counts of 14 and 20. The yellow ants march up the left and right contours of the vessel, peeling away the golden crust and exposing the darker layers beneath. Meanwhile, the brown ants chew through the right shoulder of the pot and chip away at the upper rim, carving the very first corridors into the upper section of the board.
Step 2: Clear perimeter orange and collect the first keys
With outer yellow and brown tiles crumbling, the orange paths become accessible. Bring the orange 8 and orange 5 into your active lineup, allowing orange ants to gnaw into the left base and right perimeter. As the yellow ants continue grinding through their numbers down to 19 and 23, they reach the lower left food tile holding the yellow key. Collecting this key instantly unlocks the yellow padlock sealing the yellow block down in your queue. At the same time, the brown workers chew deep into the right flank, reaching the blue key and freeing up pathing options around the right boundary.
Step 3: Handle the connected orange and pink pair to penetrate the center
Your queue now introduces a connected pair consisting of an orange 6 linked directly to a pink 7. Because you kept your waiting slots tidy during the initial clear, you have plenty of room to take both blocks at once. Tapping this connected unit places both the orange and pink blocks into your active slots side by side. Orange ants quickly finish off remaining orange crumbs along the middle rim, while the pink ants begin nibbling at the loose pink flecks bordering the purple shell. Bring in purple 4 and purple 10 right behind them so the dark purple ants can begin attacking the dense perimeter around the heart.
Step 4: Dismantle the purple barrier around the central core
The purple shell must vanish before you can make any meaningful progress on the central gem. Slide the purple 1 and purple 2 blocks into your active slots. Because their required tile counts are small, these purple blocks deplete almost instantly as purple ants strip away the final framing tiles encasing the pink interior. As those slots clear out, select the yellow 9 and white 12 blocks. Yellow ants run along the upper rim to break down the neck of the pot, while white ants begin gnawing at the white highlight tiles along the bottom edge, widening the pathways toward the lower corners.
Step 5: Send cyan ants to the top corners and pink ants into the heart
With the outer shell stripped down, wide corridors now lead directly to the upper cyan diamond patterns and the central pink mass. Select the cyan 1 block and pair it with the large pink 27 block. Cyan ants surge upward along the newly cleared diagonal channels, devouring the bright blue pixels in the upper corners. Simultaneously, pink ants flood the exposed center of the board, chewing aggressively through the magenta core. Keep your momentum going by feeding in brown 1 and orange 4, which clean up leftover stragglers along the upper horizontal bar of the pot.
Step 6: Trigger the connected white and pink blocks to sweep the base
A second set of connected boxes now arrives, featuring an orange 2 linked to a yellow 1, alongside a paired white 25 and pink 24 block set. Ensure you have at least three open waiting slots before tapping these pairs. The orange and yellow ants mop up the last few flecks near the upper neck in seconds. Then, the white and pink ants swarm the lower cluster, devouring the base structures and erasing the final remnants of the central heart. Watching the numbers on the white 25 and pink 24 drop in harmony confirms that your pathways to the bottom are completely clear.
Step 7: Finish the top golden rim to clear the board
Only a handful of stubborn yellow tiles remain along the upper lip of the honey pot. Bring in your final yellow 9 and yellow 22 blocks into your empty waiting slots. Golden ants march straight up the wide open central avenue, methodically stripping away the final horizontal lines of food. As the last yellow block reaches zero, the final crumb vanishes from the board, triggering the celebration confetti and completing the level cleanly.
Key Moments in Colony Flow Level 1070
The Move That Opens Up the Board
The turning point of this puzzle occurs during the transition from the outer yellow shell into the purple boundary. Early on, the board feels suffocating because the honey pot acts as a solid shield preventing your ants from reaching anything inside. The decisive moment happens when you deploy the orange 6 and pink 7 connected pair alongside the low purple blocks. By directing your ants to chew through that specific boundary segment, you collapse the protective ring around the center. This single sequence frees up the pathing to the pink heart and allows ants to travel freely into the upper corridors.
Finishing the Remaining Food
Closing out this stage requires absolute respect for the white and pink connected blocks near the end. Many players run into trouble here because white tiles sit buried beneath layers of purple and pink food. If you pull the white 25 and pink 24 pair too early, the white ants find themselves locked out of their targets, effectively wasting a waiting slot. By holding off until the purple rim is completely gone, both colors can feed at the same time. Once those large numbers vanish, you are left with simple, unobstructed yellow tiles that any basic yellow block can finish in seconds.
How to Avoid Getting Stuck on Level 1070
The biggest danger in Colony Flow Level 1070 is choosing colors based purely on their tray availability rather than actual board access. Looking at your queue, it is tempting to tap high value blocks like pink or white early in the run simply because they appear near the top of the stack. Doing so is an easy way to ruin your game. If you place a pink or white block into a waiting slot while the outer yellow and brown walls are still standing, those ants will have nowhere to walk. That block will sit frozen in your waiting area, reducing your available slots from five down to four or even three.
Another major hazard involves the connected boxes. Linked blocks consume two waiting slots in a single tap. If your active slots are already cluttered with two or three slow clearing blocks and you accidentally tap a connected pair, your waiting row will fill to maximum capacity. If any of those ants encounter a blocked path, you will suffer an instant defeat with zero room left to maneuver. Always check the board state and ensure your open lanes match both colors in a linked pair before bringing them into your active area.
Lastly, keep a close watch on the keys. The yellow padlock on your tray blocks a substantial yellow reserve that you will need for the later stages of the honey pot. If you ignore the yellow key on the lower left board and allow your yellow blocks to run out, you will find yourself unable to clear path blocking yellow tiles later on. Focus on chewing directly toward the keys as soon as the outer crust opens up.
Final Thoughts
Patience and careful slot management are the true secrets to conquering Colony Flow Level 1070. By steadily peeling away the outer golden honey pot, unlocking the keys, and properly timing your connected block pairs, you can clear every single crumb without ever risking a slot jam. If you run into any confusion regarding the exact order of moves or the timing of the connected boxes, take a moment to watch the complete walkthrough video above to see every placement executed in real time.
Comments