
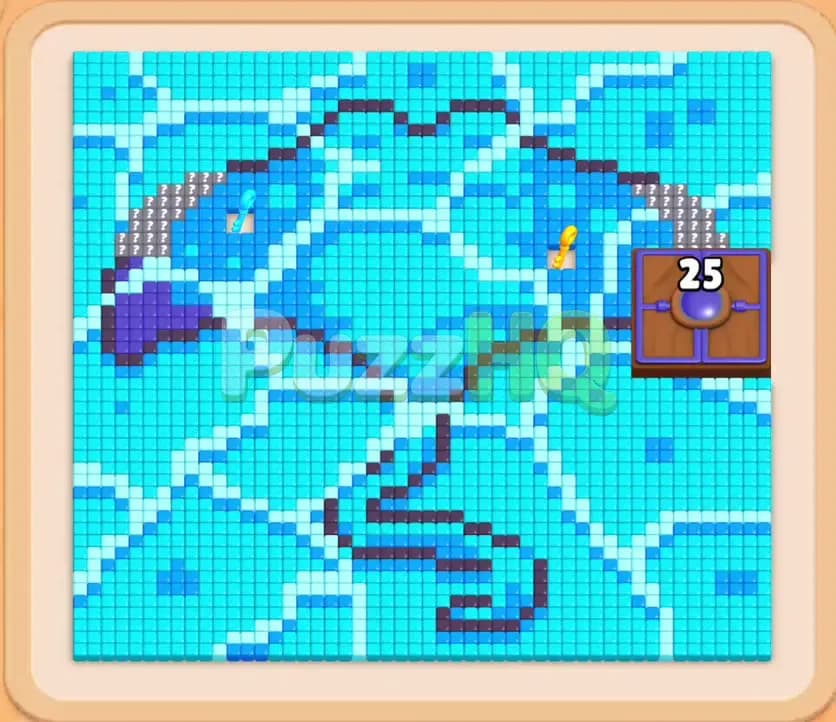
Colony Flow Level 680 brings a massive marine creature picture that demands sharp management of your queue. You face a wide manta ray composed of light cyan, soft blue, and dark navy food tiles stretching across the entire upper display. Because multiple paths open at once and your five waiting slots fill quickly, you must plan every pull from your tray to keep your ant colony moving without interruption.
Colony Flow Level 680 Overview
What You Are Working With
When you begin this puzzle, you look at a majestic manta ray spread wide over the feeding board. The bulk of the creature consists of bright cyan food tiles, while dark navy tiles outline the long winding tail, the wing borders, and internal markings. Light sky blue tiles form water patches and accent lines across the broad wings. Near the bottom center of the board, an ant nest rests ready to dispatch steady worker streams toward whatever open food matches your current blocks.
Below the nest, you have five empty waiting slots. Beneath these slots sits your block inventory, organized in stacked rows. You will immediately notice several special obstacles in this level. First, you have Connected Boxes. These pairs link two distinct colors together, such as a dark navy block tied directly to a light cyan block, requiring you to consume both colors to clear the pair from your tray. Second, you have Hidden Box tiles marked with question marks that keep their true colors secret until you remove the blocks sitting in front of them. Third, you face the Lock and Key mechanic. A gleaming golden key sits embedded inside the manta ray near the right wing, while a locked block with a padlock symbol sits in your tray, paired with a locked wooden chest blocking tiles on the right edge of the board.
What It Takes to Clear Level 680 Board
Clearing this board requires deliberate balance between opening pathways and spending down high value numbers. If you fill all five waiting slots with blocks whose matching colors cannot be reached by your ants, the colony stalls out and you immediately fail the puzzle. The manta ray tail and lower wing rims physically isolate the deeper sections of the creature, meaning you must clear outer layers before your ants can touch inner food tiles.
To finish the board, you must direct your ants into the right wing to collect the golden key. Grabbing that key unlocks the sealed tray block and removes the wooden obstruction on the board. Simultaneously, you must expose and identify every Hidden Box, unlinking and exhausting the Connected Boxes before they crowd your queue. Victory happens when your ants chew through every single tile of the manta ray, consuming the tail, wings, body, and head until the entire screen stands bare.
Colony Flow Level 680 Step by Step Solution
Step 1: Open the lower perimeter with front row cyan blocks
Your first objective is opening the lowest sections of the manta ray so your ants have valid targets. Select the front row light cyan block with thirty four points and place it into your first waiting slot. Ants pour out from the nest and immediately attack the lowest cyan food tiles on the underside of the creature. Follow this by pulling the forty value cyan block and the eighty value cyan block from the front row into the next waiting slots. Because large groups of cyan food tiles sit right at the bottom edge, your ants consume these points without delay. The numbers on your active blocks tick downward quickly as the colony tears through the lower belly of the manta ray. By matching colors that your ants can reach instantly, you prevent your waiting slots from clogging right at the start.
Step 2: Bring the connected pair into play to target the tail and wings
Now that the lower cyan belly has opened, the dark navy tiles of the creature tail and wing borders become reachable. Select the Connected Boxes from the second row, which link a twenty two dark navy block with a forty light cyan block. This linked pair drops into your open waiting slots together. Your ants split their efforts, sending workers along the lower tail to eat dark navy tiles while other workers strip away adjacent cyan tiles on the wings. Watch the numbers count down simultaneously. As the cyan half drops toward zero and the navy block shrinks, you draw the front light blue twenty block into a free slot. This lets your ants carve into the light blue water accents along the sides. Keeping your slots active ensures that the ants always have a pathway to walk, preventing an early jam.
Step 3: Tunnel through the right wing toward the golden key
With the lower borders thinning out, turn your full focus toward the golden key embedded in the right wing. Pull the thirty four light cyan block and the seventy two cyan block from the tray into your working slots. Your ants swarm into the right side of the manta ray, chewing through layers of bright cyan food tiles. As these tiles disappear, a clear corridor opens directly toward the golden key. At the same time, this clearing work reveals the first Hidden Box in your tray, which changes from a question mark into a usable color block. Always monitor the count on your active blocks. Do not pull blocks of colors that sit behind uncleared walls. Guide your ants straight along the right wing channel until they reach the golden key.
Step 4: Unlock the wooden chest and unleash the unlocked tray block
The moment your ants touch the golden key, the locked wooden chest with the number twenty five on the right wing vanishes from the board. At the exact same second, the locked block in your tray loses its padlock graphic and transforms into a normal thirty point light cyan block. Your ants now have unrestricted access to the entire upper right corner of the manta ray. Pull the newly unlocked thirty cyan block into an empty waiting slot. The colony surges into the newly revealed territory, devouring the dark navy tiles and light cyan tiles that were previously trapped behind the chest. This massive meal drains your queued blocks down to zero, opening valuable empty slots in your waiting area.
Step 5: Dismantle the tail and chew through the center body
Now you must eliminate the dark navy whip tail that winds across the lower half of the board. Pull the twenty value dark navy blocks from your tray into your waiting slots alongside the fresh thirty five cyan block. The ants march up and down the winding tail path, eating away the dark navy tiles segment by segment. Watch the tail break into small isolated chunks as the numbers on your navy blocks decrease toward zero. Once the tail disappears, the ants move directly into the thick central body of the manta ray. Pulling a forty light cyan block keeps the central feeding frenzy moving at top speed. Because the entire lower board is now open space, your ants travel freely across wide lanes, keeping your waiting slots completely safe from deadlock.
Step 6: Reveal the remaining hidden blocks and reduce the head section
With the tail gone and the body largely hollowed out, shift your attention to the upper head and wings. Several question mark blocks sit in the lower rows of your tray. Pull the remaining twenty nine navy block and thirty eight cyan block to uncover the Hidden Boxes behind them. As the front blocks move into the queue, the question mark tiles flip to show their true colors. Feed the twenty nine navy block to your ants so they can clean up the thick navy brow and forehead lines of the creature. Follow up by slotting the revealed thirty four cyan block and fifteen light blue block. Your ants eat away the front head tiles and the remaining outer wing tips, steadily clearing the upper board from the center outward.
Step 7: Clear the final upper edge tiles to complete the board
Only a thin strip of cyan and light blue food tiles remains along the very top edge of the board. Pull your final twenty six light cyan block and the small five value navy block into your open waiting slots. The ants march in long organized lines straight up the board, wrapping around the perimeter to gobble up the last lingering clusters. The active numbers on your final blocks count down to one and then disappear. As the last cyan pixel tile vanishes into the colony, golden victory stars burst across your screen, confirming that you have cleared the board without ever jamming your five waiting slots.
Final Thought
Colony Flow Level 680 provides a great test of path planning, especially with the locked chest and connected pairs demanding your attention early. The secret to success lies in rushing the golden key on the right wing so you can free up blocked territory and unlock your tray before the queue tightens up. If any of the block transitions or path reveals feel tricky to visualize on your screen, take a moment to watch the video above this article to see every move executed in real time.
Comments