
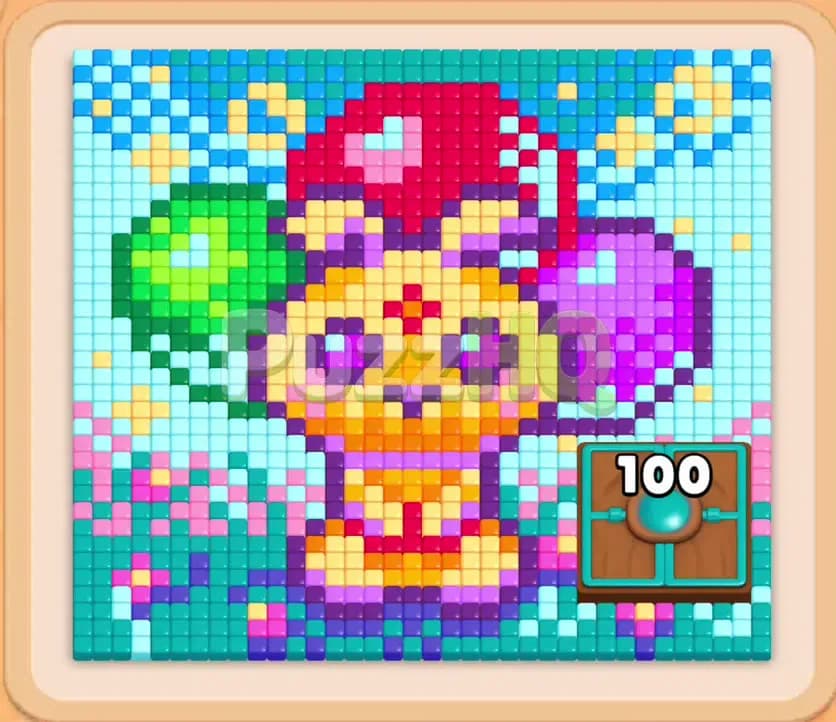
Colony Flow Level 1100 presents a vibrant pixel art challenge featuring a colorful cartoon rabbit flanked by party balloons and topped with a bright red hat. The primary obstacle is a massive Hungry Door resting in the lower right corner of the board, demanding one hundred food points before it opens. Successfully clearing this stage requires careful management of the five waiting slots while choosing Connected Boxes that steadily open new paths across the board.
Colony Flow Level 1100 Starting Setup
Reading the Board
The main board displays an intricate pixel portrait built out of many distinct food shades. In the center sits the yellow and orange face of a rabbit with purple eyes and pink inner ears. Above the head rests a large red hat dotted with white highlights, while green balloons float to the left and purple balloons decorate the right side. The lower perimeter and outer border are filled with a dense mix of cyan and teal tiles that surround the entire scene.
At the bottom right of the food canvas sits a prominent Hungry Door showing the number 100 on its face. This obstacle locks away the tiles behind it until your ants chew through enough matching food to satisfy its requirement. Down in the selection area, you will find several rows of numbered blocks. Some of these blocks are Connected Boxes, linked vertically by translucent tubes. When you pick the top box of a connected pair, the lower box becomes available, requiring you to think ahead about how incoming colors will interact with the board.
What You Need to Watch Out For
The five waiting slots near the nest entrance are your greatest vulnerability. If all five slots become filled with blocks whose matching food tiles cannot be reached, the level ends in defeat. Because the perimeter is packed tightly with cyan, purple, and teal tiles, interior colors like the rabbit yellow facial tiles and the upper red hat are initially blocked off from the marching ants.
Choosing interior colors too early leaves those blocks trapped in your tray, consuming precious space while your ants search aimlessly for accessible food. In addition, the Hungry Door absorbs a significant amount of food before releasing the hidden sections underneath it. You must carefully coordinate your block choices so that every block you move into the waiting slots immediately sends ants along clear paths.
Colony Flow Level 1100 Step by Step Walkthrough
Step 1: Open the Lower Paths and Chip Away at the Hungry Door
Begin by activating the accessible blocks that target the bottom edges of the canvas. Pick the initial purple and cyan blocks from the top row of the tray. This immediately sends waves of purple and cyan ants out from the nest. They swarm the exposed lower border, chewing away the outer layers of tiles directly in front of the nest and carving pathways toward the bottom right.
As these ants digest food tiles, the counter on the Hungry Door drops rapidly from 100 down to 70. This initial reduction confirms that clearing boundary food directly feeds into unlocking the door. Meanwhile, clearing the top blocks frees the lower halves of the Connected Boxes, bringing fresh options like a teal 30 and cyan 35 into play. Keep an eye on your waiting slots and ensure you do not pull any bright yellow or red blocks yet, because the central character remains barricaded behind the cyan foundation.
Step 2: Establish Flow to the Face and Lower Balloons
With the outer bottom perimeter opened, your next move is to pull the purple 12, dark blue 38, and pink 23 blocks into the slots. These colors match the accessible tiles along the bottom edges of the purple balloon on the right and the lower jaw of the rabbit portrait. The ants immediately rush along the newly carved paths, clearing out the jawline and stripping the lower border of the purple balloon.
This aggressive clearing action drives the Hungry Door counter down from 70 to 40. Notice how the bottom left corner begins to thin out substantially, exposing paths that reach toward the green balloon on the opposite flank. Because your ants are actively chewing matching food, the numbers on your tray blocks drop steadily. Slot turnover remains smooth, leaving at least two empty slots open at all times to absorb incoming Connected Boxes.
Step 3: Eliminate the Hungry Door and Expose the Inner Board
Continue your push toward the bottom right by calling up the red 15, purple 7, and pink 7 blocks. At the same time, engage the teal block from the tray. Your ants swarm the remaining barrier tiles surrounding the Hungry Door. As the teal and purple ants devour the final layer of blocking tiles, the door counter plunges from 40 down to 10, before disappearing completely from the board.
The disappearance of the Hungry Door opens a massive corridor into the lower right quadrant. Scattered clusters of pink and purple tiles that were previously concealed behind the door now become fully reachable. With the door out of the way, the entire lower half of the pixel art is exposed, removing the primary bottleneck that restricted ant navigation across the canvas.
Step 4: Dismantle the Central Character Portrait
Now that wide corridors extend from the nest directly into the core of the picture, it is time to consume the rabbit face. Select the yellow blocks and supporting pink blocks that match the cheeks, nose, and inner ears. Ants stream through the center of the board, chewing away the yellow and orange facial structure until the entire portrait dissolves into empty space.
While the face disappears, deploy the green 5 and green 8 blocks to begin breaking down the balloon on the left side of the canvas. The green balloon has thick layers, but because the lower left path was opened earlier, the green ants march directly to the target without stalling in the waiting slots. At this stage, your waiting slots hold small numbers like a purple 2, a cyan 4, and a pink 7, meaning each block will leave the tray very quickly.
Step 5: Clear the Red Hat and Outer Balloon Remnants
With the central character completely cleared, the board opens wide from top to bottom. Direct your attention to the upper section by bringing in the red blocks for the hat and the purple blocks for the remnants of the right balloon. Your red ants march upward through the cleared facial area, devouring the brim and crown of the red mushroom style hat.
Simultaneously, green ants finish stripping down the left balloon, leaving only a tiny patch of green tiles near the upper border. The cyan border along the outer perimeter also begins to crumble as cyan ants chip away at the upper left and upper right corners. Keep your tray selections focused on matching the exact remaining numbers so you do not overload the waiting slots with surplus ant capacity.
Step 6: Sweep the Final Border Tiles and Stray Clusters
The remaining board consists of scattered remnants, including a few cyan border tiles, tiny patches of red from the hat, and small clusters of dark purple near the sides. Pull the cyan 34, blue 8, and dark purple 17 blocks from the tray. Your ants fan out across the edges of the canvas, systematically gathering the final pieces of food.
Because each cluster is isolated and the paths are completely clear, the ants reach every tile without obstruction. Watch the numbers count down to zero across all active blocks. Once the final cyan border tile and stray purple pixel are eaten, the entire board clears and the level is successfully completed.
Colony Flow Level 1100 Winning Strategy
The Most Important Moves
The decisive factor in this level is your treatment of the Hungry Door. Many players fail because they attempt to tackle the rabbit face while the door still sits at 100. This fills the waiting slots with yellow blocks that cannot find enough open surface area to clear quickly.
By prioritizing the cyan and purple boundary tiles first, you steadily feed the Hungry Door until it collapses. Opening that right flank provides the necessary space for your ant columns to split and reach both balloons and the central face from multiple angles. Unlocking the Connected Boxes in the lower tray is equally vital, as revealing those secondary colors gives you the exact tile counts needed for the mid game clearing phase.
Keeping the Ants Moving
To maintain a safe flow through the five waiting slots, never pull more than two deep interior colors at the same time. The yellow face and red hat require considerable clear area before ants can access them in large numbers. Always balance an interior color with a boundary color like cyan or teal.
This balance guarantees that at least one or two blocks are actively counting down and vacating their slots while another block works through a narrower passage. Furthermore, pay close attention to the Connected Boxes. Avoid pulling a top box if the box attached beneath it is an interior color that you cannot immediately clear.
Colony Flow Level 1100 Final Tips
When you play through this stage, watch the numbers on the lower edges of the tray before making selections. Connected Boxes give you a clear preview of what color will slide up next, so plan two moves ahead. If you see a connected yellow or red block waiting underneath, verify that your ants have already opened a broad path to the rabbit face or hat before pulling the top block.
Patience around the Hungry Door pays off. Do not panic when the door sits with high numbers early on. Simply focus on the accessible purple, cyan, and teal food tiles along the lower edge, and the counter will drop in clean chunks of thirty points. Keeping your waiting slots limited to three occupied spaces leaves a vital safety cushion for managing unexpected color transitions.
If any path or block selection feels tricky to time properly, watching the video walkthrough above this article will help you visualize the exact ant routes and slot rotations used to conquer the level.
Comments