
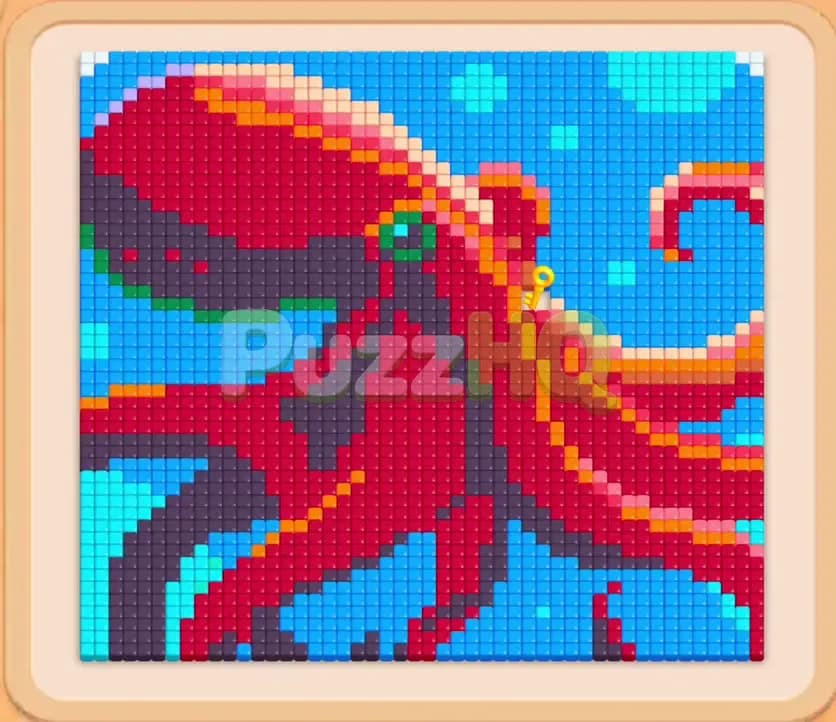
Colony Flow Level 1040 presents a dense pixel art challenge featuring a giant red octopus surrounded by vibrant blue ocean water. Your primary focus must be steadily carving out perimeter paths through the background water while juggling connected boxes and locked items in the tray. Managing your five waiting slots carefully ensures your colony never grinds to a halt while clearing both the outer ocean and the thick tentacles.
Colony Flow Level 1040 Walkthrough
Understanding the Starting Board
The puzzle begins with an elaborate sea creature dominating the center and lower half of the frame. The octopus itself consists of dark red and burgundy mantle and tentacle tiles, accented with dark purple shading underneath and light pink or orange details on the curled tips. A vibrant turquoise eye sits near the upper left of the creature. Encasing the entire subject is a solid field of blue and cyan ocean tiles that border every edge of the board.
Ants emerge from the nests near the bottom edge of the board and must find immediate access points along the bottom margin. Because the ocean tiles completely wrap around the octopus, your ants cannot immediately burrow into the inner body without first biting away surrounding water or lower tentacle tips.
Below the board, the block tray holds multiple layers of numbered colored blocks. You will notice dark red, burgundy, cyan, deep blue, dark purple, orange, and pink blocks stacked up to three or four rows deep. Among these blocks, two distinct special mechanics appear during the stage. First, you will find connected boxes linked by bright elastic bands, such as pairs of pink blocks and green blocks that require clearing in coordination. Second, a locked box with a keyhole icon sits buried under the upper layers in the tray, requiring you to reveal keys and open up deeper rows before its slot can be used. The main obstacle is the sheer volume of dark red and blue tiles, which can quickly flood your five waiting slots if you pull colors whose paths are currently blocked by outer layers.
The Key to Clearing Level 1040
Success on Colony Flow Level 1040 depends on stripping away the outer blue sea tiles to build a wide perimeter highway for your worker ants. If you attempt to dig straight into the deep red octopus head early, your red ants will reach a dead end because the tentacles and surrounding water prevent them from reaching higher clusters.
You must alternate between blue and cyan blocks to push the water line upward, while using low count red and orange blocks to trim the tips of the tentacles as they make contact with open space. Keeping at least one or two waiting slots vacant is essential because connected boxes force you to commit to paired colors. Pulling a linked pair when your waiting area is crowded will immediately result in a failed board. By maintaining open space and steadily chipping away at the ocean perimeter, you unlock the locked tray box safely and grant your ants continuous, unobstructed travel routes to the head of the octopus.
How to Beat Colony Flow Level 1040
Step 1: Open the lower perimeter with blue and red blocks
Begin by tapping the accessible dark red thirty block and the cyan forty two block from the top row of your tray. The red ants stream toward the lowest tentacle tips that brush against the bottom edge, while the blue ants target the surrounding sea water tiles nearby. As those bottom tiles vanish, select the adjacent blue thirty block to keep the outer clearing active. The ants quickly consume the ocean tiles along the bottom boundary, creating initial breathing room. This dual push ensures that both red and blue blocks count down simultaneously without stalling in the waiting slots.
Step 2: Push up the right edge with orange and light blue
Once the bottom right corner of the water is cleared, select the orange six block to eat the exposed suction cups on the lower right tentacle. Follow this by bringing in the light blue thirty four block and deep blue blocks to continue devouring the right side ocean border. As the blue ants march northward along the right wall, they create an open runway. Clearing this right flank relieves pressure on your tray, exposing lower tier blocks including the pink connected boxes and revealing the locked yellow chest deeper down.
Step 3: Tackle the pink connected boxes and expose the locked tile
With the right perimeter opened up, select the pink eleven block and the pink fourteen connected box linked to the pink block below it. The pink ants follow the fresh right hand corridor to devour the light pink suction cups running along the underside of the curling tentacles. While the pink ants work, drop in the orange twenty five and orange three blocks to pick up the orange accent tiles newly exposed along the right side. This clears out several top tray positions, fully revealing the yellow keyhole lock in the second column and granting access to fresh dark purple and cyan blocks.
Step 4: Clear the left water pocket and activate purple shading
Shift your attention to the left side of the octopus where a thick cluster of blue water still traps the tentacles. Select the cyan thirty five block and light blue twenty seven block to route worker ants along the left edge. As the water recedes on the left, the dark purple shading under the creature becomes exposed. Tap the dark purple twenty five block from the tray. Your purple ants immediately travel along the cleared left border to eat the shadow tiles beneath the tentacles. Keep one slot open by waiting for the pink and orange blocks to finish counting down before choosing new blocks from the tray.
Step 5: Unlock the yellow key box and sweep the lower tentacles
As your ants finish digesting the lower suction cups and bottom shading, key icons on the board are gathered, unlocking the yellow keyhole box in the tray. Tap the newly available blocks beneath it. Bring in the dark red twenty two block and the pink seven block. The red ants now have wide open paths from both the bottom and right sides, allowing them to rapidly chew through the thick tentacle bases. The remaining water along the right border is almost entirely consumed at this point, leaving only the upper ocean section intact.
Step 6: Clear the connected green boxes and advance toward the head
With the tentacles nearly gone, the green eye and upper mantle of the octopus become reachable. The tray now exposes a pair of green blocks linked by a green connector band. Tap the green twenty eight and green twenty five connected blocks along with the dark purple three block. Your purple ants clear the remaining dark base of the mantle, while the green ants travel straight up the right and left avenues to target the turquoise eye and adjacent decorative accents. At the same time, keep feeding dark red blocks such as the dark red sixteen and fifteen to clear the massive volume of tiles in the main head.
Step 7: Clear the upper water line and top perimeter
Now that the lower half of the board is completely empty, the ants can travel along the outer side walls all the way to the top of the board. Select the remaining blue and cyan blocks, including the blue seventeen and cyan six blocks, to eat away the upper blue ocean strip. Ants scurry around the entire outer perimeter track, biting into the top blue edge from both directions. This strips away the final environmental tiles, leaving only the central dark red dome of the octopus head.
Step 8: Finish off the octopus head and clear the board
With all obstacles, connected boxes, and water tiles removed, select the final dark red blocks, including the dark red twenty and remaining reserve red tiles. Your red ants swarm the remaining cluster of red and burgundy tiles from all directions, rapidly counting the blocks down to zero. The final block disappears with a burst of golden sparkles, leaving the board entirely clean and completing the level.
Why This Solution Works
The primary challenge of this layout stems from how the ocean water encloses the octopus. Attempting to clear the central body first is impossible because the red tiles are surrounded by blue and dark purple tiles. By methodically using blue and cyan blocks in the early moves, you carve out essential perimeter highways on the left and right borders. These corridors allow worker ants to reach higher sections of the board without getting blocked by the bulky tentacles in the center.
Another critical factor is the timing of the connected boxes. Connected pairs take up valuable space across rows and demand immediate attention once tapped. If you activate linked pink or green boxes while your waiting slots are clogged with inactive colors, you will trigger an instant game over. By waiting until the right flank and the creature eye are exposed before pulling their corresponding linked colors, you ensure that every ant finds open food immediately upon exiting the nest.
Managing the five waiting slots also requires respecting the flow rate of the ants. Large tile clusters like the deep red mantle take considerable time to digest. By pairing large red blocks with smaller accent colors like orange, pink, or purple, the smaller blocks clear out of the waiting slots quickly. This rotation maintains open slots throughout the entire run, preventing tray gridlock while the heavy red tiles steadily diminish.
Final Thoughts
Colony Flow Level 1040 tests your ability to dismantle a board from the outside inward while handling connected tray items under tight slot limits. Prioritizing the outer ocean tiles gives your colony the open lanes needed to strike the tentacles, eye, and mantle without stalling. If you find yourself getting stuck on a particular sequence or want to see the exact ant routes in motion, be sure to watch the video above the article for a full visual demonstration.
Comments