
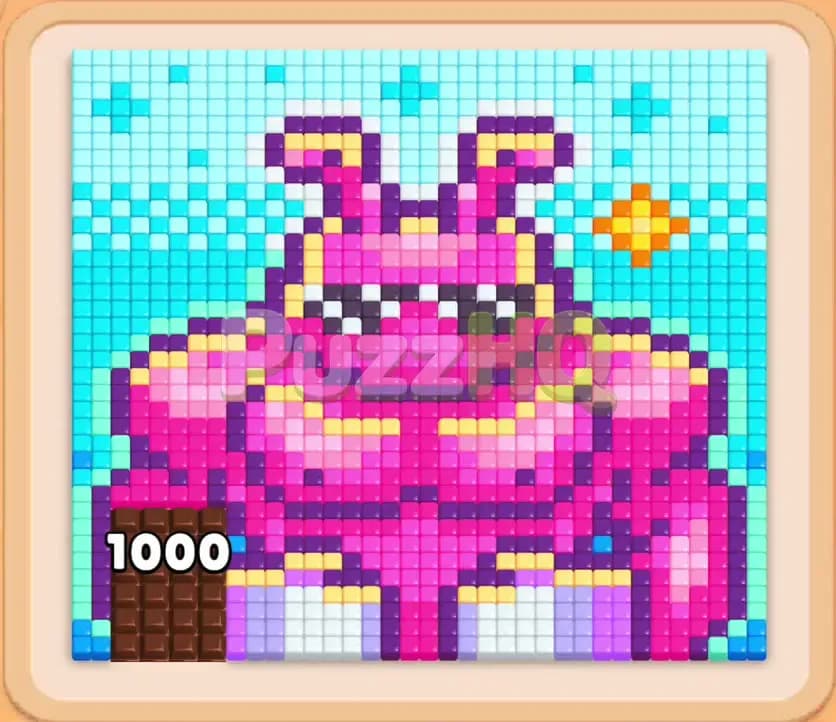
Colony Flow Level 2070 presents an intricate pixel art puzzle featuring a massive pink monster set against a wide cyan sky. The real challenge comes from managing the five waiting slots while unraveling interconnected colored blocks and connected boxes from the lower supply. Clearing the outer perimeter to unlock the central character requires strict color discipline and precise move planning.
Colony Flow Level 2070 Starting Setup
Reading the Board
When the stage opens, you are looking at a full pixel portrait made up of exactly one thousand food tiles. The artwork depicts a muscular pink monster wearing dark sunglasses, standing boldly against a solid cyan background with bright yellow sparkle stars in the upper corners. White tiles form the monster belt, teeth, and bright sky accents, while dark purple lines define the sunglasses, horns, and muscular contouring.
At the very bottom of the screen sits your tile tray, stacked three rows deep with numbered blocks. The visible top row presents a cyan eighteen, a white sixteen, a magenta fourteen, a white twenty one, and a cyan fifty four. Beneath these top blocks rest further layers of cyan, dark purple, and lavender tiles. You also have five empty waiting slots directly above the block tray where selected tiles sit while ants march out of the underground nest. Several blocks across the lower racks feature physical links, meaning picking one can drag a partner tile or require matching adjacent requirements before clearing. Connected boxes also appear, occupying multiple slots simultaneously or sharing progress as ants chew through the grid.
What You Need to Watch Out For
The primary hazard in this stage is the tight five slot waiting area combined with wide, multi slot connected boxes. Because the monster occupies the entire center of the grid, only the outer cyan tiles and a few exposed white edge pieces are initially reachable by your ants. If you tap blocks whose colors are buried deep within the monster torso, those blocks will sit idle in your waiting slots without sending out a single ant.
Connected boxes make this danger twice as severe. When you pull a connected box that spans two full slots, your available holding space instantly shrinks from five slots down to three. If those slots fill with dead colors, your run ends on the spot. You must systematically chip away the outer cyan background, strip the perimeter white highlights, and expose the monster limbs before touching the core magenta and dark purple tiles.
Colony Flow Level 2070 Step by Step Walkthrough
Step 1: Clear the Outer Cyan Border and White Highlights
Begin your run by pulling the cyan eighteen and the white sixteen from the top row of your supply rack. Ants flood out of the nest immediately, traveling along the bottom path and heading up the outer borders of the board. The cyan ants start chewing into the bottom edges of the sky, peeling away the lower borders and gradually working upward. Meanwhile, your white ants latch onto the exposed white belt tiles and outer light pixels near the bottom corner.
With the first cyan block emptying rapidly, pull the cyan fifty four from the right side of the rack. This massive block keeps a steady stream of cyan ants running up both side columns, stripping away the entire outer frame of the pixel art. As the outer edges peel away, the total tile counter drops sharply from one thousand into the seven hundreds. Crucially, clearing these perimeter tiles creates open flight corridors toward the inner regions of the monster body.
Step 2: Introduce the First Connected Box and Peel the Upper Sky
As your initial cyan supply winds down, look to the supply tray where a two slot wide connected box containing both cyan and yellow becomes available. Tap this connected box to place it across two waiting slots. Because the yellow sparkle star in the upper right is now accessible from the cleared outer cyan border, yellow ants surge up the right flank while cyan ants continue eroding the upper corners of the background.
To prevent your remaining slots from clogging, select the white nine to clean up the teeth and chest highlights revealed by the retreating cyan border. Watch the waiting slots closely here. The connected box ties up two spaces, and the white block holds a third, leaving you only two open slots for flexibility. Let the yellow and cyan ants finish consuming their targets so the connected box completely dissolves, freeing up those two vital holding spaces.
Step 3: Deploy Dark Purple to Strip the Horns and Shadows
Once the upper corners and outer frame are hollowed out, the dark purple outlines along the monster horns, sunglasses, and arm contours become fully exposed. Tap the dark purple twelve and follow it immediately with the dark purple twenty four from the second row of the supply tray. Dark purple ants pour across the stage in dense swarms, chewing through the wide band across the face and stripping the dark borders lining the shoulders and chest.
While the purple ants work, tap the yellow four to clean out the final remnants of the bright sparkles near the monster head. By addressing yellow now, you eliminate that color entirely from the upper board, ensuring that no stray yellow tiles remain trapped behind future moves. The remaining tile counter drops past five hundred as the dark purple outlines break apart, leaving the pink muscle groups isolated and ready to eat.
Step 4: Break into the Pink Torso and Deep Muscle Layers
With the dark framing removed, the main bulk of the monster body is ripe for clearing. Pull the pink six into an open slot, followed by the connected yellow and pale block from the lower tray. A steady line of pink ants marches directly from the nest into the lower abdomen and arms, rapidly devouring the bright magenta tiles. At the same time, select the dark purple three to mop up the remaining lower shadow pixels beneath the arms.
The pink tiles dissolve at a blistering pace, opening wide gaps through the middle of the board. Pull the pink fourteen and the pink sixteen to maintain continuous ant flow across the chest and neck. Because pink represents the largest single color pool in the monster itself, keeping these high value pink blocks moving through your slots prevents pauses in action. The board counter plummets down through the three hundreds as the torso completely disintegrates into scattered fragments.
Step 5: Clean the Blue Underlayers and Residual Sky Tiles
After the chest and abdomen disappear, small clusters of light blue and deep cyan remain along the top edge above the monster head. Tap the cyan nine and the cyan twenty three, sending fresh waves of light blue and cyan ants up the lateral paths to sweep the remaining sky clean. Because the center of the board is now entirely hollow, ants can travel straight through the middle of the canvas rather than circling around the outside.
Follow this up by tapping the white two and the dark purple eleven to eliminate the stray outline pixels around the jaw and collarbone. Your waiting slots will momentarily hold several low value blocks, but because all target colors have wide open access paths, the numbers count down rapidly. The tile counter drops under one hundred and fifty, leaving only the facial structure and sunglasses floating in the center of the grid.
Step 6: Eliminate the Glasses and Final Facial Pixels
Now that the canvas is almost entirely bare, focus exclusively on the remaining cluster in the center. Tap the final pink block to wipe out the pink forehead and ear tips. Send in the dark purple twelve, accompanied by the white two, to consume the sunglasses lenses and the nose bridge.
Ants stream up from the nest directly into the cluster, devouring every single remaining pixel without obstruction. The last dark purple block hits zero and vanishes from the tray, followed instantly by the final pink block. The counter hits zero, the remaining food clears, and the level completes successfully.
Colony Flow Level 2070 Winning Strategy
The Most Important Moves
The defining turning point in Colony Flow Level 2070 happens during the transition from the outer cyan border to the dark purple facial framing. Many players make the mistake of picking pink blocks too early because the pink monster dominates the visual presentation. However, picking pink before stripping the cyan sky and purple outlines will strand those pink blocks in your waiting tray, because the outer layers physically shield the interior body.
Selecting the large cyan fifty four early on is the single most productive move in the entire run. It burns away dozens of edge tiles on both sides simultaneously, opening two distinct highways for subsequent ant colors to enter the grid from multiple angles. Similarly, holding off on the connected boxes until their matching colors have clear, line of sight pathways ensures that those bulky multi slot pieces clear quickly instead of choking your tray.
Keeping the Ants Moving
Maintaining continuous flow in this level requires you to synchronize your tray picks with physical board openings. When an ant line finishes chewing its assigned color, the block disappears, instantly freeing up a waiting slot for the next selection. If you ever find your waiting tray holding three or four blocks, you must resist the urge to tap another piece unless you are positive it matches an actively exposed tile group.
By following the outside in strategy, cyan, white, yellow, dark purple, and finally pink, every block you place into the waiting slots begins dispatching ants immediately. The continuous countdown of numbers prevents slot congestion, even when two slot connected boxes occupy valuable space. The key is treating every move as a key that unlocks the door for the next color behind it.
Colony Flow Level 2070 Final Tips
Pay very close attention to connected boxes that link across two waiting slots. These pieces demand double the spatial commitment, which severely limits your margin for error. Before tapping any connected box, scan the board to confirm that both represented colors are already exposed and accessible to incoming ants. If one color is open but the other is buried behind uncarved sections, that box will linger across your slots and threaten a sudden board lock.
Watch the numbers displayed on the blocks before you draw them from the lower tray. High value blocks like the cyan fifty four and magenta thirty four are fantastic for maintaining prolonged clearing momentum, but smaller precision blocks like the white two or dark purple three are essential for clearing out stubborn fragments without wasting tray real estate. Always balance heavy clears with nimble single digit picks to keep your slots rotating cleanly.
If any specific movement or timing sequence in this walkthrough feels hard to visualize, take a moment to watch the video above the article to see every block selection and ant path executed in real time.
Comments