
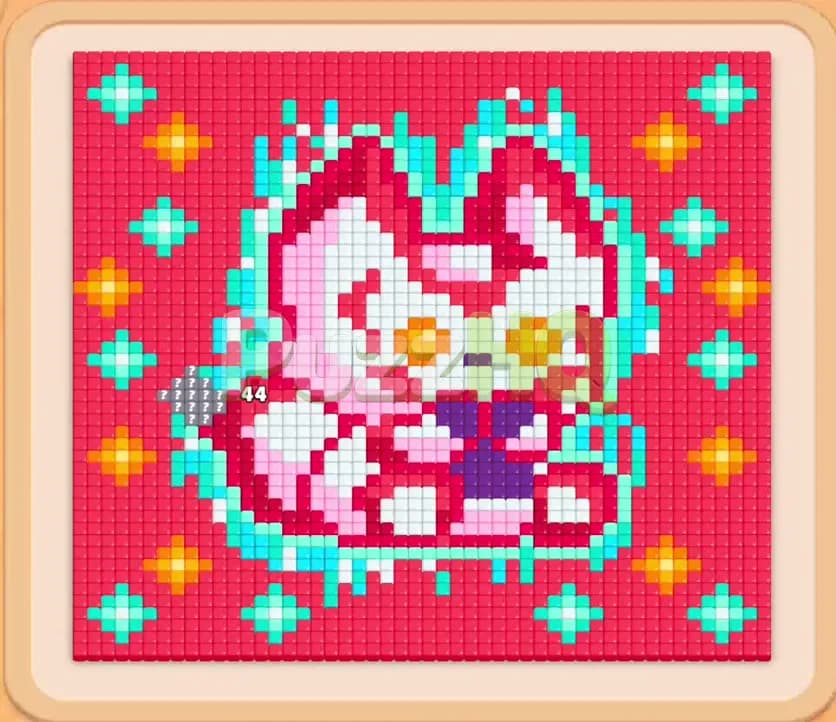
Colony Flow Level 1017 brings a vibrant pixel art challenge featuring a colorful feline framed by glowing borders and starry accents. The puzzle tests your ability to carve through deep layers of background tiles while unlocking paths to hidden sections underneath. Finding the right rhythm between clearing broad outer borders and targeting specific internal details is the key to mastering this stage.
Colony Flow Level 1017 Starting Setup
Reading the Board
The board presents an intricate portrait of a pink and white cat wearing a purple bow tie, surrounded by a bright cyan aura and glowing diamond stars on a rich red canvas. A nest sits just beneath the display area, providing the exit point for worker ants heading toward active targets. Your primary target colors at the start are the outer red border and the cyan outlines that wrap around the lower portions of the cat. A locked grey section marked with a counter sits across the tail area on the lower left side, requiring you to clear adjacent tiles before it fully releases. Below the board, five empty waiting slots sit ready to receive blocks from the tray. The tray holds a dense stack of colored blocks with high numbers, including heavy red blocks alongside cyan, pink, and white options resting in lower tiers. You will also spot linked blocks joined by connecting pipes that activate together as paths develop.
What You Need to Watch Out For
The main obstacle on this board is the overwhelming volume of red food tiles holding the outer canvas together. Because red dominates the perimeter, choosing non matching blocks too early will cause them to sit idle in your waiting slots. With only five waiting slots available, even two stalled blocks can trigger a sudden defeat if you run out of working room. You must also account for the grey counter on the lower left tail. That section remains sealed until neighboring tiles are eaten away, which means you cannot access the underlying white and pink fur until you strip away the surrounding red and cyan barrier.
Colony Flow Level 1017 Step by Step Walkthrough
Step 1: Open the Perimeter with Red and Cyan Blocks
Begin by selecting the red block from the front row to start your ants on the broad lower edge of the board. The red ants stream straight out from the nest and chew through the bottom wall of red tiles, creating your first open travel lanes. Follow up immediately with a cyan block from the tray. Cyan ants will peel away the glowing outer trim around the bottom of the cat and the centers of the lower stars. This dual assault reduces the counter on the locked tail segment from forty four down to twenty one, rapidly wearing down the protective barrier. Keep your slots clean by watching the numbers tick down before pulling additional colors into the waiting area.
Step 2: Clear the Lower Stars and Establish Side Routes
With the bottom edge cleared, pull in another red block and an available cyan block to widen the pathways upward along both flanks. Your red ants branch out along the left and right walls, dismantling the thick background columns that fence in the stars. Meanwhile, cyan workers target the perimeter aura, stripping away the bright edges and exposing the orange stars underneath. As these red and cyan numbers wind down into single digits, open space develops across the bottom third of the board, allowing future ants to navigate without bottlenecking around the nest entrance.
Step 3: Engage Connected Purple Blocks for the Center Detail
Once paths into the lower center of the cat open up, activate the connected purple block from the tray. The connecting pipe feeds directly into the purple bow tie resting beneath the chin of the cat. Purple ants rush into the newly exposed chest area and begin devouring the dark purple tiles. Because this purple cluster is self contained, ensure your purple blocks have direct access before calling them up, preventing them from idling in your waiting row. As the purple bow disappears, adjacent pink body tiles and white fur patches become fully exposed.
Step 4: Dismantle the Orange Stars and Lower Body Tiles
Bring in an orange block to tackle the diamond stars that are now completely detached from the outer walls. The orange ants scurry along the cleared outer channels, chewing up the starry accents on both the lower left and lower right quadrants. At the same time, cycle in your pink blocks to chew into the cat paws and lower torso. The remaining count on the tail section finally dissolves, turning those previously locked grey tiles into standard accessible food. This clears out the entire lower half of the playfield, leaving wide open lanes directly beneath the head.
Step 5: Carve into the Upper Head and Ears
Direct your attention toward the upper half of the board where the heavy pink ears and forehead remain. Select pink and red blocks in close coordination. Red ants continue chewing down the top red ceiling, while pink ants focus on the outer ears, inner ear shading, and cheek contours. The large pink numbers decrease steadily as your workers work their way from the cheeks inward. Make sure you alternate these picks carefully so that pink blocks clear out just as red workers finish clearing the supporting background above them.
Step 6: Consume the White Facial Fur and Remaining Glow
With the outer head structure hollowed out, pull forward the white blocks to clean up the cat face and body highlights. White ants flood the central area, consuming the white cheeks, forehead patch, and chest fur. As the white blocks count down from thirty toward zero, introduce your remaining cyan selections to erase the trailing aura pieces along the top and sides. The board should now consist only of floating fragments of cyan, white, and tiny red patches near the top boundary.
Step 7: Sweep Away the Final Upper Tiles
Select the final cyan and red blocks from the bottom tray to clear out the last remaining specks near the top corners. Worker ants march up both cleared side avenues, converging on the last handful of red border tiles and residual cyan pixels. With no obstructions left on the board, the ants clear the remaining food in seconds, emptying the board completely and securing victory.
Colony Flow Level 1017 Winning Strategy
The Most Important Moves
Your most critical decision on this level involves peeling the red and cyan layers in tandem rather than dumping every red block at once. The outer red frame seems tempting because it covers massive surface area, but ignoring the cyan border traps the locked tail counter and prevents paths from reaching the inner portrait. By activating cyan early alongside red, you open the bottom and sides evenly. Another pivotal choice is holding your purple and orange blocks until clear gaps appear around the bow tie and outer stars. Calling those specialty colors too soon leaves them marooned in your waiting slots with nowhere to go.
Keeping the Ants Moving
To prevent your five waiting slots from choking, always preserve at least two vacant slots during high volume phases. When you pull large red blocks, let their numbers run down into single digits before introducing new colors like orange or pink. Pay special attention to linked blocks that connect via pipes. These blocks demand reliable paths because they draw multiple ant groups at once. By keeping your active colors aligned with currently exposed food edges, you guarantee that every block in your waiting row is actively counting down rather than sitting stagnant.
Colony Flow Level 1017 Final Tips
Patience on the opening moves sets the pace for the entire board. Do not panic when the board looks crowded with high digit blocks in the tray. The red border has enough tiles to absorb several high value blocks, giving you steady progress as long as you do not bury your slots with colors that cannot reach their targets yet.
Keep a close eye on the tail counter on the lower left. Clearing tiles adjacent to that locked section is essential for exposing the underlying white and pink blocks later on. If you notice your ants slowing down, check whether an active block has lost its path due to awkward clearing angles, and use your next pick to carve an alternative approach.
If you find yourself stuck on block order or want to see the exact ant pathing in real time, take a moment to watch the video walkthrough above this guide to see each step executed cleanly.
Comments