
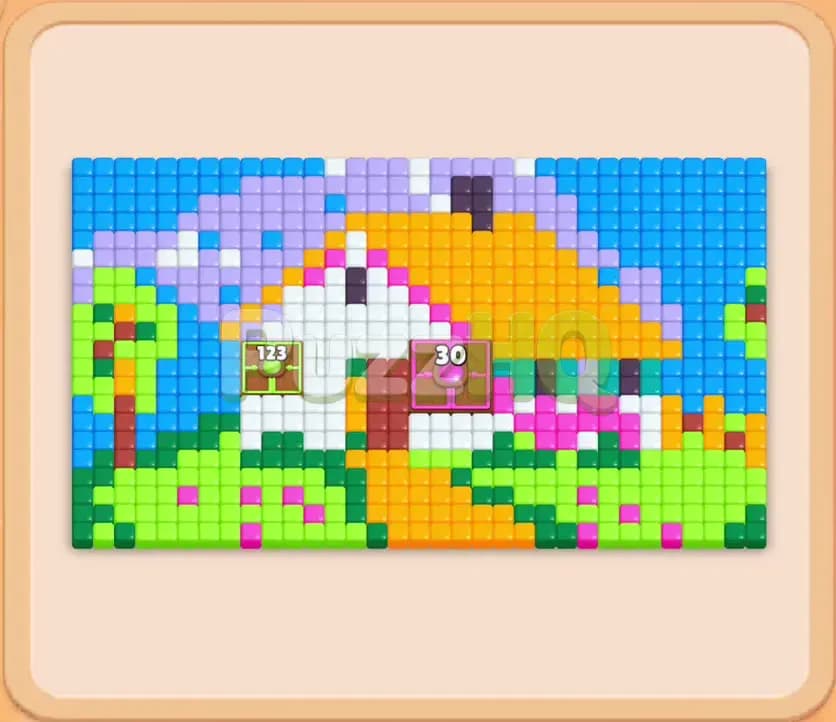
Colony Flow Level 1117 presents a vibrant pixel art cottage complete with a bright pitched roof, fluffy clouds, and lush garden greenery. While the landscape looks welcoming, the puzzle underneath demands tight coordination because two demanding Hungry Doors block access to the interior of the house. You must direct your ant colony along carefully chosen paths to wear down these barrier doors without overwhelming your five waiting slots.
Colony Flow Level 1117 Starting Setup
Reading the Board
The puzzle opens on a scenic countryside house framed against a wide sky. The upper section of the board features cyan and blue sky tiles mixed with lavender and white clouds. Below the sky sits a large pitched roof built from bright yellow, warm orange, and magenta accents. The cottage itself has clean white walls, a brown chimney, and a small porch entrance. Surrounding the base of the house is a sprawling garden composed of light green bushes, dark green hedges, and pink flower patches.
Two major obstacles dominate the central structure. On the left side of the facade sits a green Hungry Door showing a counter of 123. On the right side near the porch sits a pink Hungry Door showing a counter of 30. Neither door will disappear until your ants consume the exact quota of matching food tiles. Below the art board, your tray presents columns of numbered blocks. Several of these blocks feature Connected Boxes linked by rigid tubes. You can see pairings such as light green blocks linked together and blue blocks tethered to each other. Every move you make from the bottom tray sends colored ants marching out from the central nest along opened lanes.
What You Need to Watch Out For
The primary danger on this stage comes from managing the five waiting slots directly above your block columns. Because this layout contains multiple Connected Boxes, choosing a linked block automatically pulls its partner into play. If you pick a connected pair when only one color has reachable food on the board, the second block sits completely idle in your waiting slots.
You only have five waiting slots available at any time. If all five slots become occupied by blocks that cannot send ants toward valid food tiles, the run ends immediately. Furthermore, the massive 123 counter on the green Hungry Door means that the left interior of the house stays sealed off for the majority of the stage. You cannot rely on those hidden tiles to absorb your blocks during the early game. Every pick must target food that is already exposed along the perimeter, outer roof line, or lawn.
Colony Flow Level 1117 Step by Step Walkthrough
Step 1: Target the Garden Perimeter and Front Yard
Begin by activating the front lawn and outer flower beds where your ants have direct, unobstructed access. Select the exposed pink and light green blocks from the tray to target the blooming flowers and low grass bushes near the bottom center nest. Ants will immediately swarm outward, devouring the lowest boundary of the garden and opening clear lanes toward the cottage foundation.
As the pink food disappears, you will notice the pink Hungry Door counter instantly start dropping from its initial value of 30 down into the low twenties. At the same time, pick the low number white and orange blocks that connect to the bottom path and front steps. Clearing these surface tiles establishes a stable runway for your ants to reach both the left bush cluster and the right boundary without crowding your waiting slots.
Step 2: Engage the Connected Green Blocks and Cloud Perimeter
Now that the front lawn has cleared, turn your attention to the light green Connected Boxes. Activating these linked blocks sends a heavy wave of light green ants directly into the tall shrubs on the left side of the house and the hedges on the far right. Because these blocks are tethered, both enter the active flow together, but the abundance of exposed foliage ensures that the ants keep marching without stalling in your slots.
As the green ants consume the foliage, the left Hungry Door counter drops from 123 down toward 83. While that heavy counter continues to tick downward, draw a white block and a lavender block into your waiting slots to engage the fluffy clouds floating across the upper sky. The ants will climb the exterior edge of the picture to reach the clouds, whittling away the top border and preventing high value blocks from clogging your tray.
Step 3: Crack the Pink Hungry Door and Clear the Chimney
With the garden mostly cleared and the roof edges exposed, focus on the remaining pink tiles to eliminate the smaller Hungry Door. Pull the pink block showing value 6 into your waiting slots. These pink ants will target the remaining porch trim and garden petals, driving the pink Hungry Door counter from 19 down to zero. The door will vanish instantly, exposing a fresh cluster of orange, magenta, and white tiles inside the right wing of the house.
While those new paths open, select the dark navy and black blocks showing values of 6 and 5. These dark ants will march up the right side of the cottage to eat through the chimney tiles and dark roof trim. Clearing the chimney is essential because it prevents dark blocks from lingering in your lower tray while your focus shifts toward the larger central roof structure.
Step 4: Dismantle the Roof and Upper Sky
With the right door removed, your ants have open access to the vast orange and yellow pitched roof. Draw the orange blocks and yellow blocks into your waiting slots to initiate a heavy feeding cycle on the roof tiles. A steady stream of yellow and orange ants will file up from the nest, carving through the roof shingles layer by layer.
Simultaneously, bring in the cyan and dark blue blocks to clean up the open sky surrounding the house. The sky holds substantial tile counts, so pulling cyan blocks with values like 9 and 12 allows you to clear wide swaths of the upper board while your orange ants work on the structure below. Keep checking the green Hungry Door on the left. The constant clearing of green bushes and incidental green tiles will now bring its counter down into the teens.
Step 5: Shatter the Green Hungry Door
Focus all available pressure on the lingering green tiles to finally break open the left side of the cottage. Select the bright green blocks showing values 7 and 4. These ants will march directly against the stubborn left hedge and the frame surrounding the green Hungry Door.
Watch the numeric counter tick down rapidly from 14 down to 5, and finally down to zero. When the door shatters, the left interior rooms, window frames, and inner support walls are completely exposed to ant traffic. This breakthrough relieves the biggest bottleneck of the entire puzzle, allowing you to route ants directly through the middle of the cottage rather than forcing them to walk all the way around the outside edges.
Step 6: Clear the House Walls and Foundation
Now that both Hungry Doors have vanished, the cottage interior is fully accessible. Bring the remaining white blocks and brown blocks into your waiting slots. The white ants will systematically eat away the interior wall dividers, window frames, and upper eaves, while the brown ants clear the front door structure and foundation beams.
Because the board has opened up dramatically, ant paths are shorter and travel times are minimal. Your waiting slots should now cycle very quickly. As soon as a white or brown block empties its number, the slot frees up instantly, allowing you to pull the next block from the lower tray without any hesitation.
Step 7: Clean Up Lingering Perimeter Tiles and Complete the Board
Look closely across the canvas for isolated single tiles or small clusters that remain. You will find small patches of lavender clouds in the top left, a few cyan sky tiles along the upper border, and stray green or orange shingles scattered near the center.
Draw the final low value blocks into your slots, including the single digit white, blue, purple, and orange blocks. The ants will fan out in all directions, marching along the outer perimeter to collect the last distant pixels. Once the final food tile is consumed, the pixel art clears completely, and the victory sequence triggers smoothly.
Colony Flow Level 1117 Winning Strategy
The Most Important Moves
The absolute key to conquering Colony Flow Level 1117 is prioritizing the pink Hungry Door before you get distracted by the larger roof structures. The pink door requires only 30 tiles, making it an achievable early objective that yields an immediate reward. Opening that right side porch area unlocks a major thoroughfare for your ants, creating short paths that let your blocks resolve much faster.
The second vital decision involves how you handle the Connected Boxes in the lower tray. When you see two linked boxes, never pull them until you are certain that the board has accessible tiles for both colors. In this level, the light green pairs are safe to activate early because the lawn and shrubs offer dozens of valid tiles. In contrast, you must avoid pulling linked blue or cyan blocks until the lower walls and garden edges are clear enough to let sky ants navigate without creating traffic jams at the nest.
Keeping the Ants Moving
Slot starvation is the fastest way to fail this stage. With only five waiting slots, having two slots tied up by a connected pair leaves you with just three functional spaces to work with. If two of those remaining spaces hold colors that are trapped behind the green Hungry Door, your game is effectively over.
To keep ants flowing continuously, always balance heavy, high number blocks with quick, low number single blocks. When you pull a large block that will take thirty seconds of ant travel to clear, pair it with smaller blocks that you know will resolve within a few bites. This constant cycling ensures that you always have at least two open waiting slots ready to receive unexpected connected pieces from the lower tray.
Colony Flow Level 1117 Final Tips
Pay close attention to the visual borders of each color zone as the cottage breaks apart. Because pixel art levels use subtle shade differences, it can be easy to confuse lavender cloud tiles with white wall tiles or light blue sky with cyan background pieces. Before pulling a block from the tray, trace an imaginary line from the nest to the matching tile cluster to verify that an ant can actually walk there without running into an unopened door.
Be patient with the green Hungry Door on the left. Seeing a counter at 123 can tempt you to dump all your green blocks into the waiting slots at once, but that is a dangerous trap. Let the counter fall naturally as you work on adjacent garden tiles and boundary hedges. You do not need to rush the left door until the right side of the house is fully cleared and giving your ants open space to maneuver.
If you find yourself stuck on a particular sequence or if the connected tray blocks appear in an order that feels awkward to manage, watching a clean visual run can make all the difference. Be sure to check out the video walkthrough located directly above this guide to see the exact ant routes and slot timings in action.
Comments