
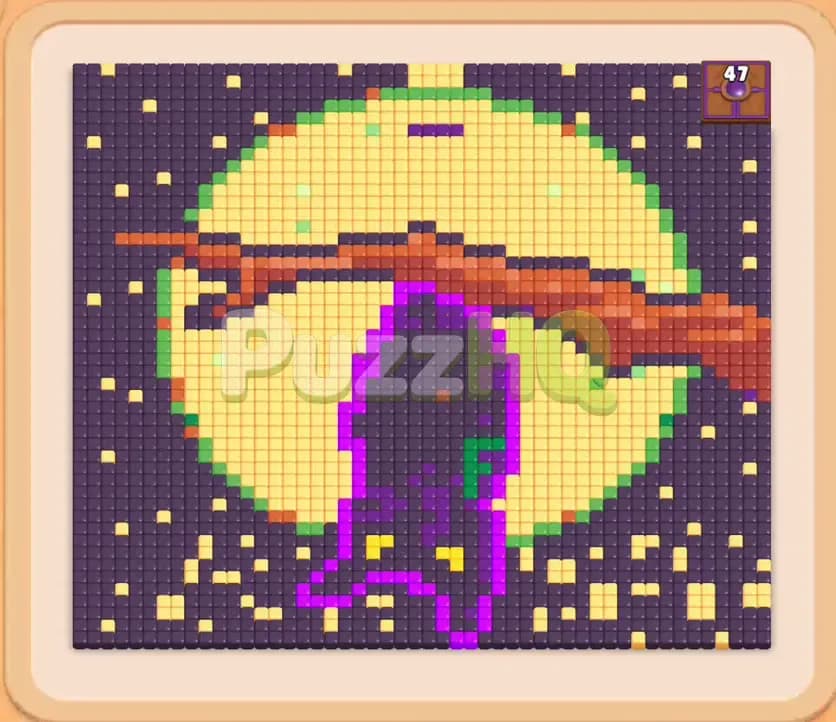
Colony Flow Level 1097 presents a tricky puzzle where you must dismantle a detailed night scene featuring a hanging bat and a giant moon. Clearing the food without overcrowding your five waiting slots requires strict attention to path access and block order. With multiple layers of dark sky, bright moon tiles, and branch sections blocking one another, finding the right flow is the key to victory.
Colony Flow Level 1097 Starting Setup
Reading the Board
When you load into Colony Flow Level 1097, the puzzle board displays an impressive pixel art scene. A large purple and black bat hangs upside down from a thick brown branch right in front of a glowing yellow full moon. The background consists of deep dark sky tiles sprinkled with small yellow star clusters. Near the chest of the bat, a small green emblem rests inside the body silhouette, while a vivid magenta outline defines the ears, wings, and feet.
The ant nest rests at the bottom center of the wooden frame. At the start, the only accessible food tiles are the dark night sky tiles and yellow stars directly above and beside the nest entrance. Directly below the board, your tray holds multiple rows of colored numbered blocks. You can see large dark blocks with numbers like 40, 20, 35, and 50, alongside yellow blocks valued at 35, 50, and 45, plus brown blocks for the branch.
You will also notice special mechanics on this stage. Certain blocks in your selection grid are Connected Boxes, marked by links that require you to manage their order carefully because pulling one can influence another. In the top right corner of the art display, a Hungry Door sits with a counter that demands specific food consumption before releasing its barrier. Above the tray sit your five empty waiting slots, ready to accept whichever blocks you tap.
What You Need to Watch Out For
The primary danger on Colony Flow Level 1097 is choosing colors before their paths are physically open to your ants. Because the bat and the night sky envelop the nest, colors like the brown of the branch and the bright yellow of the main moon body cannot be reached immediately. If you pick a yellow block too early, your ants might clear two or three tiny stars and then stop moving, stranding a high numbered block in your waiting slots.
With only five waiting slots available, dead blocks will quickly end your run. You also need to keep track of the Connected Boxes in the tray. Pulling connected blocks without an open path for both colors means you risk filling multiple slots at once with stagnant ants. The Hungry Door in the upper right corner adds pressure, demanding that you feed it matching tiles before the final quadrant of the sky becomes available. Balancing board expansion with slot space is the only way to succeed.
Colony Flow Level 1097 Step by Step Walkthrough
Step 1: Open the Lower Sky and Free the Nest
Begin by selecting the accessible dark blocks from your front row to clear the space around the nest. Tapping the black 40 block sends a stream of dark ants out of the hole, directing them straight into the bottom border of the night sky and the lowest edges of the bat. As these tiles disappear, your dark block counts down steadily.
Follow this up by bringing in another dark block from the front row to maintain the clearing momentum. Your ants carve a wide channel directly upward into the bat feet and outward toward the lower corners. As the dark tiles dissolve, several small yellow star tiles become exposed on either side of the nest. Watch the numbers on your active dark blocks drop toward zero so that your waiting slots remain as clear as possible.
Step 2: Clear the Lower Stars and Deploy Green Ants
With the lower boundary open, tap the yellow 8 block to release yellow ants toward the scattered stars near the bottom corners. Because this yellow block has a low number, the ants consume the exposed star pixels quickly and clear the block from your waiting tray without lingering. This step prevents slot clutter while exposing deeper dark tiles behind the stars.
Next, tap the green block to target the bright green emblem on the chest of the bat. A steady line of green ants marches directly up through the newly cleared channel between the bat legs and starts chewing through the green cluster. Clearing this green section opens up the core of the bat torso, which makes adjacent dark body tiles available for your main force of dark ants.
Step 3: Expand the Perimeter and Climb the Outer Edges
Now that the center channel is clear, focus on opening the outer vertical borders. Select a dark block with a higher value, such as the 53 or 49 block, along with a supporting yellow block for the outer rim. Your ants now have room to travel along the bottom wooden rim and turn upward along both the left and right borders of the frame.
As the dark ants eat their way up the side borders, they peel away the dark sky tiles that flank the lower half of the yellow moon. Yellow ants immediately follow behind them, eating into the lower curved edges of the moon. Keep an eye on your waiting slots during this push. Ensure that every block you move into a slot has an active target on the board so that no ants stand idle.
Step 4: Dismantle the Bat Body and Expose the Branch
With paths running up both flanks, turn your attention back to the center of the board to strip the bat body. Select the active dark blocks in your tray to direct ants into the torso. As the black body tiles vanish, the vibrant magenta outline around the bat wings and ears becomes fully exposed, along with the lower edge of the brown tree branch where the bat is hanging.
Bring in the magenta block to send purple ants after the wing outlines and ears. These magenta tiles clear away quickly because their total count is relatively small. Removing the bat head and ears directly uncovers the central section of the brown branch, giving you your first direct contact point with the wood tiles that divide the moon in half.
Step 5: Strip the Wings and Satisfy the Hungry Door
Now that the bat outline is dismantled, the board splits into two major clearing zones. The upper yellow moon sits above the branch, while the remaining sky tiles wrap around the top perimeter. Select the brown blocks from your tray to send brown ants directly into the tree branch.
As the brown ants eat through the thick wood structure, the counter on the Hungry Door in the upper right corner begins dropping rapidly. The door requires brown tiles to satisfy its appetite. Continue clearing the branch until the wood snaps in the middle, granting your ants full vertical access into the upper hemisphere of the yellow moon and unlocking the sealed tiles behind the Hungry Door.
Step 6: Clear the Branch and Sweep the Upper Sky
With the branch nearly gone and the Hungry Door satisfied, bring in your remaining yellow and dark blocks to clear the final sections of the puzzle. Yellow ants flood into the upper moon, rapidly consuming the large blocks of bright yellow food that previously sat out of reach behind the branch.
At the same time, send your dark ants into the upper sky corners to finish off the remaining background tiles. The Connected Boxes in your tray can now be cleared without fear, because paths to both yellow and dark tiles are completely open across the entire upper board. Watch your remaining blocks tick down to zero one by one as the last few moon pixels and sky stars disappear, leaving the board clean and completing the level.
Colony Flow Level 1097 Winning Strategy
The Most Important Moves
The defining turning point of Colony Flow Level 1097 is the transition from clearing the bat to attacking the branch. Many players fail because they try to reach the upper moon before the branch is fully dismantled. The branch acts as a physical wall across the entire center of the puzzle, and attempting to route ants around it prematurely causes serious traffic jams and wasted moves.
Clearing the small green patch inside the bat chest early is another essential move. Removing that green block unlocks access to the core of the bat body from the inside out, allowing your dark ants to clear inward rather than chipping away solely from the outer edges. Once the interior is hollowed out, the wing outlines and branch become accessible much sooner, keeping your board flow smooth and predictable.
Keeping the Ants Moving
To prevent your five waiting slots from jamming, you must obey the rule of line of sight. Never tap a block simply because it is in the front row of your tray unless you can clearly see matching tiles connected to an existing path. On this level, large yellow blocks and brown branch blocks are especially dangerous if brought into the waiting slots too early.
Always ensure that at least three of your five waiting slots contain blocks that are actively counting down. If you notice a block stall because its path was cut off by another color, immediately prioritize opening a detour for that color before introducing any new blocks. By alternating between background sky tiles and central foreground figures, your ants will always have an open runway to their next meal.
Colony Flow Level 1097 Final Tips
Patience with the Connected Boxes is vital when executing this solution. When you see linked blocks in your tray, inspect the board to confirm that paths exist for both colors before pulling the trigger. If one color can reach its food but the second color is blocked by the branch or outer sky, the second block will sit motionless in your waiting slots and severely limit your remaining space.
Pay close attention to the counter on the Hungry Door as you chew through the branch. Knowing that the door unlocks after clearing those specific brown tiles gives you confidence to commit your brown blocks without second guessing your slot usage. Once that door opens, the final cleanup of the top sky tiles becomes straightforward.
If any path opening or block transition feels hard to visualize while reading these instructions, take a moment to watch the video above the article. Seeing the exact ant routes and slot timing in action will help you master Colony Flow Level 1097 with ease.
Comments