
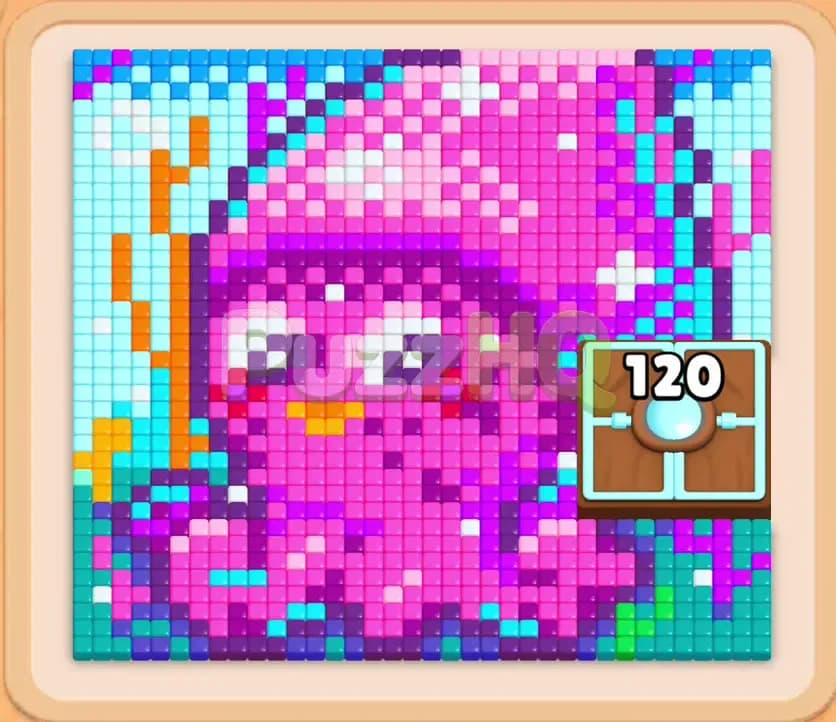
Colony Flow Level 1080 challenges you with a massive pixel art portrait of a pink octopus flanked by tricky obstacles. Your goal is to guide worker ants from the central nest along expanding paths to consume every last colored tile on the board. Success requires carefully selecting numbered blocks from the tray while keeping your five waiting slots open and feeding the massive Hungry Door blocking the right side.
Colony Flow Level 1080 Board Breakdown
Starting Colors and Blocks
The visual puzzle in this stage forms an adorable pink octopus surrounded by vibrant oceanic shades. Dominating the center of the mosaic is a solid mass of bright pink and magenta tiles representing the main body and tentacles of the creature. Dark purple outlines define the silhouette, deep shadow lines, and the expressive round eyes. Crisp white highlights give sparkle to the eyes and head, while light orange and yellow accents decorate the left side and facial features. A sky blue and cyan backdrop frames the creature, mixed with scattered teal border tiles along the bottom right edge.
Beneath the main board sits the block selection tray, stacked with multiple layers of numbered colored tiles. The accessible top layer offers a diverse assortment of values, featuring colors such as orange thirty four, dark purple thirty, deep blue thirteen, cyan twenty, teal fifteen, and bright green six. Below these initial options lie further reserves of light pink, yellow, white, and purple tiles, many of which are locked until you clear the blocks above them. In addition, several blocks in the lower rows are linked as connected boxes, requiring you to commit to both linked segments whenever you tap them into your waiting slots.
Paths, Obstacles, and Limited Space
The primary physical barrier on the board is the large Hungry Door stationed directly along the right flank. This reinforced barrier begins with a demand counter of one hundred twenty, meaning you must direct that exact number of matching tiles through connected pathways before the doorway dissolves. Until that counter drops to zero, the entire upper right section of the octopus and the adjacent cyan borders remain inaccessible to direct ant paths. Ants leaving the nest must initially wrap around the open outer edges or strike through narrow gaps at the top and left.
Your tray interface provides exactly five waiting slots to hold active numbered blocks. Every block you tap moves immediately into one of these five slots, where it remains until ants consume enough matching tiles to bring its counter down to zero. If all five waiting slots fill up with blocks that currently have no valid ant path to matching food, your colony stalls out and the attempt fails. Because connected boxes occupy two slots at the same time, reckless tapping will choke your queue before the Hungry Door even opens. Managing your available room while methodically shaving down the door counter is the central puzzle of this stage.
Colony Flow Level 1080 Complete Solution
Step 1: Open the upper lanes with orange, purple, and cyan blocks
Begin by tapping the orange block and the dark purple block from the top row of your tray. Ants emerge from the nest and march up the left corridor, chewing through the outer orange coral formations and the dark purple rim along the perimeter. Next, select the cyan twenty block to send blue ants into the top edge of the sky backdrop. As these border tiles disappear, clear paths open across the very top of the board, granting your ants access to the upper curves of the octopus head.
Step 2: Feed the Hungry Door down from one hundred twenty to sixty
With the crown of the octopus reachable from above, tap a pink block and a purple block to route ants into the right side of the head. As your worker ants digest these tiles, they channel directly into the Hungry Door. You will see the counter on the barrier drop rapidly from one hundred twenty down to sixty. Meanwhile, your active pink block in the waiting slots ticks down to single digits and clears out, leaving your queue with plenty of breathing room. Maintain this pressure by feeding exposed purple tiles along the upper border.
Step 3: Clear the upper background and lower the door to thirty
Select the white block and another light pink block to clear away the eye sparkles and the top layer of the head. Your ants peel away the upper layers of the creature, creating wide gaps that expose deeper purple shadow tiles. Continue funneling ants into the Hungry Door mechanism, which cuts its remaining count in half from sixty down to thirty. Your orange block reduces to a modest value of eight, and several waiting slots empty out just in time to expose fresh selections in your bottom tray.
Step 4: Dismantle the Hungry Door and unlock the right flank
Pick the next pink and purple blocks to satisfy the remaining thirty counts on the Hungry Door. Once the requirement hits zero, the door frame vanishes entirely from the board. This breakthrough opens a massive thoroughfare on the right side, connecting the nest directly to the cyan background tiles and the tangled right tentacles. With the barrier removed, your ants no longer need to take long detours around the perimeter, speeding up tile consumption across the entire right half of the board.
Step 5: Deploy connected boxes and hollow out the tentacles
Now that paths are wide and unobstructed, tap the connected blue and pink boxes resting near the front of your tray. Both linked blocks drop into your waiting slots simultaneously. The pink ants attack the wide base of the octopus body, while the blue ants sweep through the lower right waters. Pair this push with a dark purple block to shred the tentacle outlines. Watching the numbers decline across both linked blocks ensures you free up two waiting slots at the exact same moment, avoiding any gridlock.
Step 6: Carve through the face, cheeks, and eyes
With the tentacles largely dismantled, turn your attention to the center of the creature. Select the yellow and orange blocks to eliminate the blush marks and mouth details beneath the gaze of the octopus. Follow up with deep purple to clear the large round pupils. The ants swarm inward from both flanks, collapsing the remaining facial structure into small, isolated clusters of pixels. As these central blocks expire, your waiting slots stay comfortably under half capacity.
Step 7: Clear the remaining scattered perimeter fragments
The final phase requires cleaning up stray cyan background tiles and a few leftover purple outline squares. Tap the small cyan block showing nine and the final purple block showing fourteen. Ants stream across the empty board, picking off the floating pixels one by one. Once the last cyan tile vanishes into the nest, the remaining counters hit zero, completing the stage cleanly.
Key Moments in Colony Flow Level 1080
The Move That Opens Up the Board
The decisive turning point occurs during the sequence that shaves the Hungry Door down from sixty to zero. Before this barrier falls, your ants are forced into narrow, winding routes along the left and top edges, severely limiting how many colors you can clear at once. Removing the door blows open the entire right corridor. It instantly turns the clustered right tentacles and outer cyan border into easy targets, allowing you to cycle through your tray without worrying about blocked routes.
Finishing the Remaining Food
The endgame succeeds because you hold onto your low value cyan and purple blocks until the main mass of the octopus is completely gone. When only loose specks remain scattered across the corners, selecting large blocks would leave your waiting slots clogged with unfinished counts. By introducing single digit numbers and small batches at the very end, every ant finds an immediate target, wiping the board clean in a matter of seconds.
How to Avoid Getting Stuck on Level 1080
The biggest danger in this level is tapping connected boxes before the board has opened up enough space. Connected boxes claim two waiting slots at once. If you select them while the Hungry Door is still standing, you reduce your workable tray space to just three slots. If those remaining slots get occupied by colors that have no open path, you will trigger an instant game over. Keep connected boxes parked in the tray until the Hungry Door is gone and multiple lanes lead directly to matching food.
Another frequent pitfall is ignoring the Hungry Door counter in favor of clearing comfortable tiles on the far left. Spending too many moves chewing on the left border leaves the right half stagnant, forcing high count blocks to sit idle in your waiting slots. Every early move should serve a dual purpose by clearing immediate perimeter tiles while actively feeding the required tiles into the door.
Finally, keep a close eye on your block colors before tapping. Deep blue, teal, and cyan look somewhat similar at a glance, as do light pink and magenta. Tapping a blue block when only cyan tiles are reachable will cause that block to sit completely motionless in your queue. Verify that the exact shade you pick has an unobstructed route from the nest before you commit it to an open slot.
Final Thoughts
Patience and careful route planning are the true keys to conquering Colony Flow Level 1080. Focus on chipping away at the Hungry Door early, keep your five waiting slots uncluttered, and save your connected boxes for the wide open midgame. If you ever find yourself uncertain about which block to select next, take a moment to watch the video above the article to see the winning path in action.
Comments