
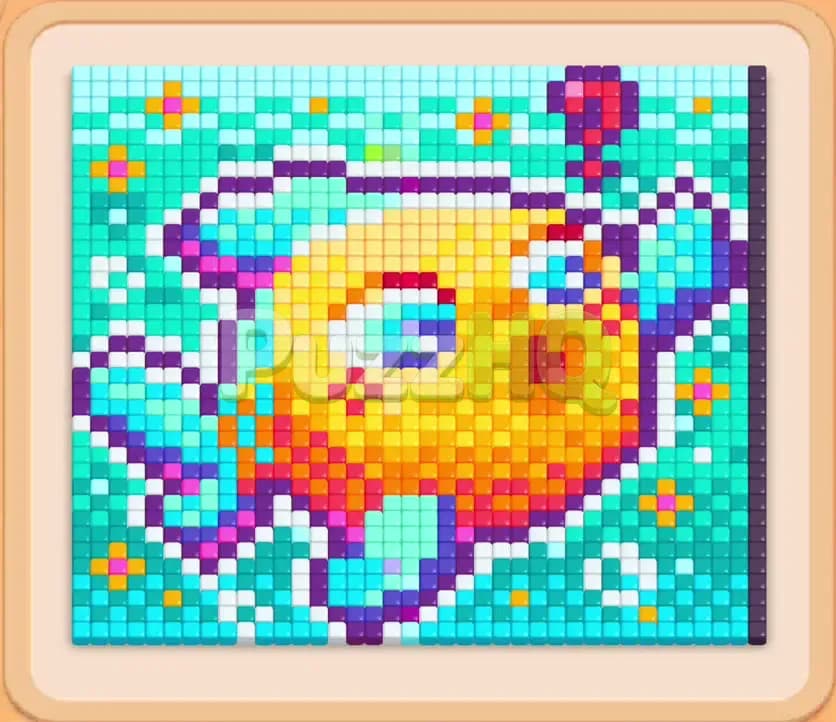
Colony Flow Level 1180 presents a dense underwater scene featuring a bright pufferfish surrounded by a thick wall of ocean tiles. Your main objective is to establish open paths from the nest into the outer background before tackling the multi layered fish in the center. Carefully balancing your tray choices ensures that your five waiting slots never fill up while the ants work through the massive field of tiles.
Colony Flow Level 1180 Walkthrough
Understanding the Starting Board
The puzzle opens with an elaborate pixel art illustration of a round yellow fish equipped with goggles and a snorkel, floating in deep water. A massive perimeter of cyan and teal tiles envelops the entire fish, blocking direct access to the interior shapes. Scattered through this aquatic border are white bubble clusters and purple accent pixels that frame the lower edges. The fish itself contains a complex stack of yellow flesh, orange shading, red contour lines, purple outlines, and cyan goggle lenses.
Ants emerge from a single nest hole situated along the bottom border of the wooden frame. At the start, the only tiles they can touch are the cyan, purple, and white pixels resting along the bottom boundary. Your bottom tray displays colored number blocks with values ranging from moderate counts up to heavy requirements like purple forty five and yellow fifty. Because every path to the inner fish is cut off by the outer sea, selecting colors that exist only in the middle of the fish will strand those blocks in your waiting slots indefinitely. The primary obstacle is breaking through the heavy cyan exterior without clogging your five holding spaces.
The Key to Clearing Level 1180
Success on this board depends entirely on prioritizing the outer layers before touching interior colors. You must feed the ants blocks matching the background cyan, border purple, and floating white bubbles right away. Clearing these perimeter tiles accomplishes two things simultaneously. It opens physical corridors upward into the belly and fins of the fish, and it empties out your waiting slots so new colors can rotate in.
Never pull yellow, orange, or red blocks until your ants have carved an unmistakable passage into the body of the fish. If you select a yellow block while the fish belly remains sealed behind blue and purple tiles, that yellow block will sit motionless in your tray. With five slots available, you only have room for a couple of slow clearing blocks before you run out of space. Once the boundary is compromised on the left and bottom, you can weave between exterior background colors and interior body colors, maintaining a steady turnover of active slots.
How to Beat Colony Flow Level 1180
Step 1: Open the lower perimeter with purple and cyan
Begin by tapping the purple forty five and the cyan twenty five from the top row of your tray. The purple ants march straight out of the nest hole to consume the dark accents along the lower left edge, while the cyan ants immediately attack the bottom water tiles. Because both colors are fully exposed along the floor of the board, neither block stalls in the waiting slots.
Watch as the purple number drops rapidly while the ants digest the base boundary. This initial bite creates your first true gap, exposing adjacent white bubble tiles and clearing room for ants to push upward along the left side. As these tiles vanish, select the white twenty three to send white ants into the freshly opened bubble cluster.
Step 2: Clear the left water column and expose the bubbles
With the lower left corner breached, tap another cyan block to keep the outer sea shrinking. The cyan ants expand their territory along the entire left flank, stripping away column after column of ocean tiles from the frame edge inward. At the same time, your white ants finish off the lower bubbles, freeing up that waiting slot completely.
Do not touch yellow or orange blocks yet. Even though you can see the fish tail and lower fins, their entry paths remain too narrow for high volume traffic. Keep your slots dedicated to cyan and purple until the left border of the board is completely hollowed out and the ants can walk around the tail unobstructed.
Step 3: Penetrate the lower belly with yellow and orange
Now that the lower left approach is wide open, select the orange twenty and the first yellow nineteen. The orange ants swarm the underside of the fish, chewing through the shadow layer along its belly. The yellow ants follow close behind, pouring into the bright core of the creature.
Introducing these warm colors at this exact moment works because the path from the nest hole through the cleared purple zone is completely clear. As the orange tiles disappear, deeper pockets of the fish interior become reachable. Keep an eye on your slots to make sure the cyan blocks continue counting down alongside the new yellow numbers.
Step 4: Expand through the upper left background and snorkel
Bring in the next white block and an additional cyan block to widen your corridors along the top of the board. The cyan ants travel past the cleared tail and push up into the top left corner, wiping out the water tiles above the fish. White ants move into the upper bubble chain, clearing the space right next to the green and purple snorkel tip.
By taking out the upper left corner, you prevent your ants from bunching up along the bottom. The board now has two distinct highways, one running along the bottom into the fish belly and one running around the left edge into the top fins. This division of labor keeps all five slots actively ticking down.
Step 5: Hollow out the central body and goggle frame
Select the yellow fifty and the purple thirty six. A massive swarm of yellow ants floods into the main body of the fish, eating away the bulk of the yellow pixels across the face and forehead. The purple ants target the dark outlines separating the fish head from the goggles and snorkel.
Because the yellow block requires fifty tiles, it will occupy a slot for a significant stretch of time. To prevent a bottleneck, fill your remaining slots with low count cyan and white blocks that can finish quickly. The white ants consume the goggle glare, opening direct access to the cyan lens tiles underneath.
Step 6: Chew down the dense right water wall
While the center of the board clears, shift your attention to the tall vertical strip of cyan tiles on the right edge of the board. Tap the cyan blocks waiting in your tray, including the cyan twenty and cyan twenty five. Cyan ants will march across the top and bottom corridors to chew inward on this stubborn wall.
Clear any blue or purple outline pieces that sit adjacent to this right column. As the cyan count decreases, the back curve of the fish and the right fin detach from the boundary wall. Maintaining active cyan consumption here is vital because this right column contains dozens of tiles that can stall your endgame if left unattended.
Step 7: Clear the remaining yellow face and inner cyan lens
Pick the remaining yellow blocks and the small cyan blocks to mop up the upper half of the creature. Yellow ants sweep through the remaining forehead tiles while cyan ants pick apart the eye lenses inside the goggles. With both sides of the board wide open, ants travel back and forth across the canvas with maximum speed.
Your waiting tray should now have two or three empty slots open at all times. Use this breathing room to bring in purple and white blocks that hold small counts, allowing your ants to polish off the snorkel stem and the few isolated bubble dots lingering near the top frame.
Step 8: Eradicate the red accents and dark contours to clear the board
With only the structural skeleton of the fish remaining, select the red sixteen, the dark purple twenty seven, and any lingering orange or yellow blocks. Red ants race along the mouth, the eye circle, and the fin ridges, consuming the vibrant outline tiles that gave the fish its shape.
Dark purple ants clean up the final border pixels around the snout and tail. Because every single barrier tile on the entire canvas has already been removed, the ants move without any pathing restrictions. The final numbers hit zero, the last pixel vanishes into the nest, and the board clears completely.
Why This Solution Works
The primary reason this sequence succeeds is that it respects the strict outside in geography of the puzzle. Mobile puzzle levels with dense borders require you to peel away the outer wrapper before attempting to touch the core art. If you pull blocks based on their presence on the board rather than their physical accessibility, you will instantly freeze your waiting slots. By dedicating the first several selections exclusively to cyan, purple, and white, every ant has an unobstructed target right outside the nest.
Managing the five waiting slots requires careful pacing between long commitment blocks and quick turnaround blocks. Blocks with values like forty five and fifty take extensive ant travel time to complete. If you load your tray with three massive blocks at once, your room for error shrinks to almost nothing. In this walkthrough, heavy colors like the yellow fifty are introduced only after broad entry points exist, and they are always supported by quick, low count background blocks that clear their slots promptly.
Another crucial factor is opening multiple travel corridors rather than tunneling through a single point. Carving out both the bottom route and the top left highway divides the swarm naturally. Ants working on the fish belly never collide with or wait behind ants working on the goggles and snorkel. This constant circulation keeps tile consumption rates high and prevents ant congestion near the nest entrance.
Final Thoughts
The defining decision on Colony Flow Level 1180 is resisting the temptation to tap warm colors early, allowing your cyan and purple ants to tear down the water border first. Once the outer boundary collapses, balancing heavy yellow blocks with rapid background cleanups will carry you safely to victory. If you want to double check the exact pathing routes or verify how the ants flow through the fish belly, watch the video above the article to guide your next move.
Comments