
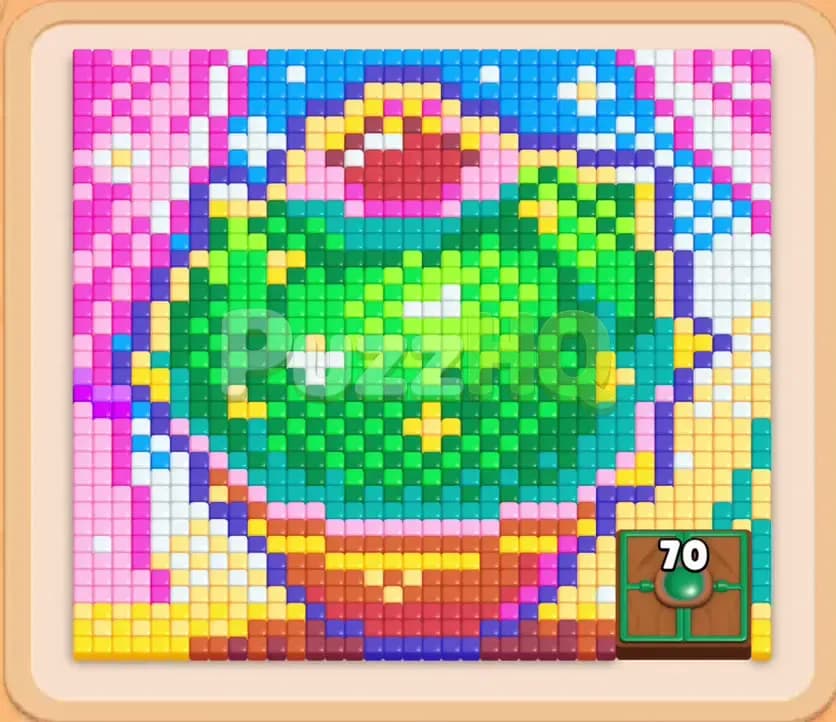
Colony Flow Level 1340 presents a dense and colorful board where careful ant routing makes all the difference. You are tasked with dismantling a massive decorative succulent resting inside an ornate bowl, surrounded by vivid background borders and tricky barrier mechanics. The puzzle stands out because of its strict space constraints, connected tray pieces, and a hungry door that guards a significant portion of the lower board.
Colony Flow Level 1340 Starting Setup
Reading the Board
When you open the level, the board displays an elaborate pixel art illustration of a round green plant or cactus set within an earthy reddish brown planter. At the very top, a cluster of bright magenta and yellow tiles forms an ornamental flower crown. Framing this centerpiece is a checkerboard of pale pink and white tiles on the upper left, while the upper right and far outer edges feature rich sky blue and deep blue sections. The lower corners contain bands of sunny yellow tiles, along with purple and brown accents establishing the base of the pot.
In the bottom right corner of the art grid, you will notice a large green Hungry Door stamped with the number seventy. This door completely seals off the food tiles behind it until your ants consume seventy qualifying pieces. Down in the selection tray, you have access to a variety of numbered color blocks, including thirty five white, twenty six pink, thirty teal, twenty dark green, thirty light pink, and forty yellow in the frontline. Crucially, several blocks deeper in the stack are linked together as Connected Boxes. Pulling a linked pair forces both items into your holding area at the same time, which immediately demands smart management of your available space.
What You Need to Watch Out For
Your primary challenge here is balancing the five waiting slots while satisfying the Hungry Door. Because the door requires seventy tiles before it swings open, any moves aimed at that sector must be sustained without stalling out your ant flow. If you send ants toward colors that have no open path from the nest, the chosen block simply sits idle in your five slots.
Connected Boxes amplify this danger. Whenever you select a block that is physically chained to a partner block, both immediately leap into your five waiting slots. If you already have three unfinished blocks occupying the holding area, grabbing a linked pair will instantly fill the remaining slots. If none of those active colors can clear enough food to vanish immediately, your run ends on the spot. You must prioritize perimeter clearing to widen access corridors before touching the linked pieces.
Colony Flow Level 1340 Step by Step Walkthrough
Step 1: Peeling the Outer Pink and White Perimeter
Your opening sequence must create space along the outer boundary where the ants can travel freely without getting bottlenecked. Begin by picking the twenty six pink block and the thirty five white block from the front of your tray. The nest immediately sends out streams of workers marching up the left edge, chewing through the pale pink and white checkerboard background.
Clearing these outer columns exposes the left flank of the central cactus and removes initial congestion around the nest entrance. As the pink block drains down toward zero, bring in the thirty light pink block to continue scouring the upper left corner. Keep an eye on the waiting slots, ensuring that each color you place has dozens of reachable tiles. By the time this first wave finishes, the entire upper left backdrop dissolves into empty space, giving your colony wide pathways around the top of the board.
Step 2: Opening the Top Blue Flank and Deploying Linked Blocks
With the left side cleared, turn your attention to the upper right corner where blue and cyan tiles form the opposing background frame. Pick the thirty teal block and follow it with the top blue block. Ants will march across the cleared upper crest to reach the blue clusters, carving away the outer edge and exposing the right side of the flower crest.
Now that open lanes exist, you can safely pull your first pair of Connected Boxes from the tray. This pair brings a white block and a deep blue block into your waiting slots simultaneously. Because the upper pathways are open, ants immediately latch onto the remaining white background bits and the deep blue highlights along the upper rim. Both blocks count down rapidly, leaving your waiting slots uncluttered and revealing fresh green and yellow blocks underneath in the tray stack.
Step 3: Feeding the Hungry Door
Shift your strategy downward to confront the Hungry Door sitting at the bottom right. The door requires seventy food tiles to vanish, and the surrounding lower area is packed with yellow tiles. Select the forty yellow block to send a dedicated swarm of yellow ants marching along the bottom rim directly toward the barrier.
As the ants chew through the yellow patches along the base of the planter and the right edge, the number on the Hungry Door ticks down from seventy to thirty six, and then rapidly to zero. Once the counter depletes, the wooden doors burst open, granting full access to the blocked yellow and teal tiles tucked in the corner. Select the secondary yellow and cyan blocks that appear in your tray to clean out the newly unlocked sector completely.
Step 4: Dismantling the Planter Base and Flower Crown
With the Hungry Door eliminated, the entire bottom perimeter is accessible. Pick the brown and purple blocks to break apart the base of the planter. Ants stream along the lower horizontal path, clearing out the supporting pedestal and loosening the lower edge of the green core.
At the same time, clear the top ornament by selecting the small magenta block and the adjacent pink reserves. The ants strip away the decorative crown at the top of the cactus, leaving only the massive spherical green body and its lighter green interior shading. Clearing both the extreme top and extreme bottom concentrates all remaining food into the central cluster, making path navigation much shorter and faster for your colony.
Step 5: Shaving the Massive Green Centerpiece
Now comes the bulk of the puzzle. The central cactus is composed of dark green, emerald green, and light green tiles layered in concentric rings. Select the thirty nine green block and the twenty dark green block to unleash a massive assault on the center.
Your ants attack the outer layers of the sphere from both sides. Watch the numbers decrease steadily as the broad silhouette shrinks inward. When these blocks clear out of your waiting slots, select the next available green block and the light green block beneath it. The spherical shape gradually turns into a narrow vertical stem as the outer walls disappear, exposing the inner core tiles.
Step 6: Clearing Remaining Accents and Freeing Late Connected Boxes
As the green center thins out, a few isolated accent tiles remain scattered around the edges, including stray cyan, magenta, and yellow spots. Pull the teal block linked to the seventeen cyan block. Since both colors are visible on the right shoulder of the shrinking plant, the ants quickly consume them, preventing these dual boxes from jamming your waiting area.
Follow up with the single digit magenta and blue blocks to vacuum up the stray pixels left behind from the earlier flower petals. Every time a block finishes, immediately check the board to ensure your next selection targets the outermost remaining tiles rather than buried interior pixels.
Step 7: Devouring the Final Green Core
Only a scattered spine of light green and medium green tiles remains floating in the center of the board. Pull the final twenty four green block, the seven dark green block, and the six light green block into your tray slots.
Swarns of green ants converge from all sides on the lingering vertical column. The remaining tiles vanish within seconds, draining all active blocks down to zero and leaving your waiting slots completely clear. With the last pixel eaten, the level is officially beaten.
Colony Flow Level 1340 Winning Strategy
The Most Important Moves
The defining turning point in the Colony Flow Level 1340 solution is how you handle the Hungry Door. Trying to chip away at the central cactus before opening the door is a trap because your paths become cramped, and you run out of viable blocks in the tray. Directing your yellow blocks toward the bottom right corner early ensures that seventy tiles are digested quickly, opening up the entire lower half of the board.
The other critical decision is managing when you draw Connected Boxes. In this level, linked boxes appear at several stages in the tray stack. You must resist touching any linked pair until you can see that both associated colors have large, exposed tile groups ready to be eaten. If you pull a linked pair while one of its colors is buried behind uncarved green layers, that block will sit frozen in your waiting slot, permanently reducing your margin for error.
Keeping the Ants Moving
To prevent your five waiting slots from overflowing, you should always maintain an alternating rhythm between exterior clearing and interior carving. Use the background colors like white, light pink, and sky blue to open wide highways around the board perimeter. Once the highways exist, your ants can reach multiple angles of the central subject simultaneously.
Never place more than two slow draining blocks into the waiting slots at once. If you have a large block of forty tiles actively being worked on, your other occupied slots should contain small blocks with counts under ten or fifteen. These smaller blocks clear out rapidly, cycling fresh options into your tray and keeping at least two holding slots open as an emergency buffer.
Colony Flow Level 1340 Final Tips
When executing your run, pay close attention to tile accessibility before tapping any block in the tray. Just because a color appears abundant on the board does not mean your ants can actually walk to it. If a cluster of light green is trapped behind three layers of dark green, selecting a light green block too early will only waste a valuable waiting slot. Always peel the onion from the outside inward.
Keep a close eye on the numbers displayed on your tray blocks compared to the visible tile count on the board. Overestimating how many tiles of a certain color are reachable can cause an ant route to stall midway through, leaving you stuck with an unfinished block. Taking an extra second to inspect the board before tapping will save you from catastrophic slot jams.
If you find yourself stuck or want to see the exact marching rhythm of the ants in action, take a moment to review the gameplay video located above this guide to master the timing.
Comments