
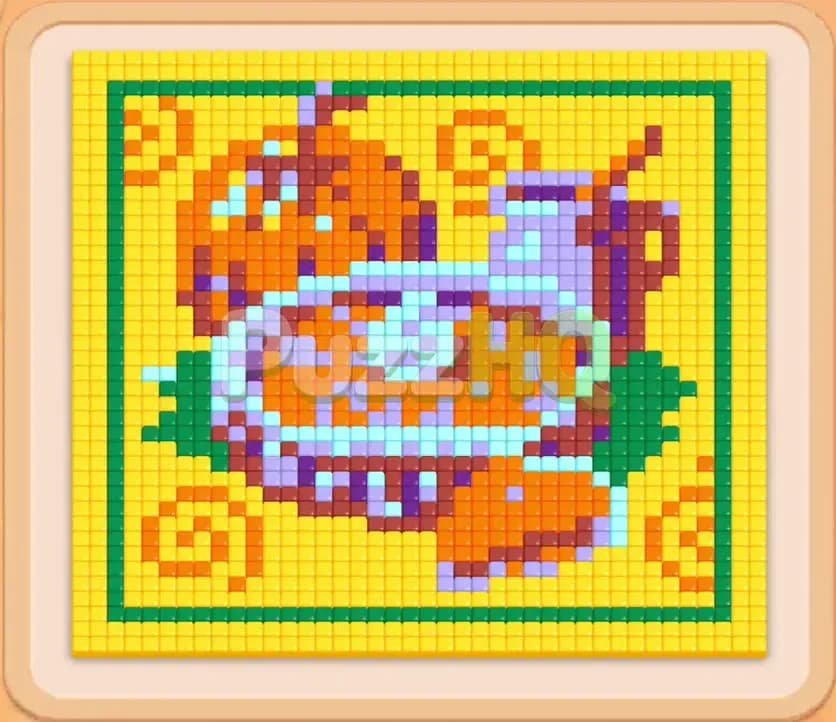
Colony Flow Level 1297 brings a massive harvest feast puzzle that demands sharp queue awareness from your very first move. The pixel art board features heavy layers of pumpkins, a drink pitcher, a baked pie, and a thick surrounding frame that blocks access to the juicy interior tiles. You must coordinate your ant swarms carefully because pulling the wrong color block without an active pathway will clog your waiting slots and end your run immediately. If you balance your tray selections and systematically strip away the outer shell, you will conquer this tricky stage without breaking a sweat.
Colony Flow Level 1297 Overview
What You Are Working With
When you load into this stage, the upper board displays a rich harvest feast scene packed with hundreds of colorful food tiles. A bright yellow square frame surrounds the entire scene, lined along the inner rim by an arch of dark green tiles. Inside this border sits an intricate still life composed of two round pumpkins in orange and deep maroon, a tall pitcher jug rendered in lavender and royal purple, and a decorative serving plate filled with pie slices highlighted in light blue, dark blue, and cream white. Small green leaves accent the bottom corners and the base of the pitcher.
Beneath the board sits the ant nest hole where your worker ants emerge, directly above five open waiting slots. Your inventory tray holds several stacks of numbered color blocks. In this level, you have single numbered blocks in yellow, green, orange, brown, purple, and light blue. You also have Connected Boxes, which are two distinct color blocks linked together by a rigid bridge. Connected Boxes move into the waiting slots as a single unit, taking up two adjacent waiting slots at the same time. You cannot separate them, so you must ensure that both linked colors have valid targets on the board before you drag them out of your tray.
What It Takes to Clear Level 1297 Board
Clearing this board requires you to hollow out the picture from the bottom center upward. Ants cannot eat food tiles that are completely buried behind other colors. They can only latch onto exposed edges and open paths. If you pull a color block whose matching tiles are buried deep inside an unbroken wall of yellow or green border blocks, those ants have nowhere to walk. The pulled block will sit completely idle in your waiting slots, counting down zero points and taking up precious real estate.
If all five waiting slots fill up with blocks that have no valid eating paths, the ant colony stops moving and you lose the game on the spot. To prevent this deadlock, your strategy must focus on carving a wide entrance through the bottom yellow and green borders first. Once you pierce the perimeter, you unleash a direct highway into the central pie and the lower pumpkin base. From there, you will burn through the tray numbers by constantly matching active food faces, rotating colors so that at least one or two waiting slots stay open or clear out rapidly.
Colony Flow Level 1297 Step by Step Solution
Step 1: Breach the bottom yellow and green border to open the central highway
Begin by pulling the single yellow and green blocks from the top layer of your tray to attack the bottom edge of the frame. The yellow perimeter tiles sit directly across from the ant nest hole, making them immediately accessible to your initial swarm. As the ants chew through the lower horizontal yellow line, pull the green block with the count of thirty two to dismantle the lower green arches and corner foliage. Watch the numbers on both blocks tick down rapidly as the worker ants strip away the baseline. This move carves a wide opening in the bottom boundary, creating the physical path your colony needs to touch the inner picture tiles without jamming your queue.
Step 2: Target the light blue pie plate and lower maroon pumpkin base
With the bottom boundary broken open, pull the light blue block and the dark maroon block into your waiting slots. The ants now have a clear straight run into the bottom edge of the decorative serving plate and the lower pumpkin crust. Your light blue ants will chew into the lattice crust and plate rim, while the maroon ants take bites out of the shaded pumpkin sections directly beside it. Because both colors now feature wide exposed faces, their counters drop steadily toward zero. Keeping these blocks running simultaneously guarantees that your waiting slots cycle clean rather than stagnating.
Step 3: Deploy purple and orange blocks to consume the pitcher and pumpkin core
As soon as the light blue block expires and vacates its waiting slot, bring up the purple block and an orange block from your lower tray rows. The purple ants stream upward through the central cavern to eat the lower body of the tall drink pitcher. At the same time, the orange ants begin clearing the main bulk of the foreground pumpkin slices. You will notice the numbers on these blocks dropping in large chunks because the ants have dozens of adjacent target tiles to devour simultaneously. Do not pull any secondary yellow blocks during this phase, because the outer yellow columns are not yet linked to the main inner chamber.
Step 4: Dismantle the inner pie completely to expose the deep background
Continue feeding the central swarm by pulling a fresh light blue block and another brown block to wipe out the remaining pie lattice. The ants quickly digest the white and blue plate centers, completely removing the dish from the table. This clears out the entire lower middle portion of the board, leaving a massive empty space where ants can freely maneuver. The purple pitcher loses its lower base, leaving only the upper handle and spout hanging near the top border. Check your waiting slots closely here and make sure you keep at least two empty slots ready for the upcoming multi block pairs.
Step 5: Activate the first pair of connected boxes to strip the upper arches
Now that the board is wide open, pull the connected yellow and green pair from the tray into your waiting slots. This linked piece occupies two slots side by side, which is why having ample queue space was critical. The green counter sits at four while the yellow counter carries a larger sum. Because the top green arch and the surrounding yellow frame are both exposed along their inner edges, both colors activate instantly. The green half vanishes almost immediately after eating just four tiles, which instantly frees up one of the two occupied waiting slots and eliminates any danger of a board lock.
Step 6: Clear the pitcher handle and upper pumpkin dome
With the green arch gone, pull a purple block and an orange block to tackle the upper half of the harvest still life. The purple ants march straight to the top right to finish off the pitcher handle and rim, wiping purple completely off the board. Meanwhile, the orange ants devour the rounded upper dome of the background pumpkin, peeling it away from the top boundary line. As these blocks count down to single digits, monitor your tray to prepare for the final cleaning sequence. You have plenty of open board space now, so the ants move with maximum speed and zero pathing resistance.
Step 7: Clear the remaining outer yellow frame columns
Bring in your remaining yellow blocks to dismantle the tall left and right vertical borders. The worker ants swarm along the inner edges of both columns, chewing them down from the inside out. Because the outer frame contains dozens of uniform tiles, your yellow counter burns down without delay. Stripping the side pillars leaves only the final pumpkin remnants and the top horizontal border hanging at the very ceiling of the play area. Your waiting slots will have plenty of room to spare as each yellow unit completes its task and leaves the queue.
Step 8: Deploy the final connected pair and sweep the remaining harvest tiles
Pull the final connected pair of cyan and orange into your slots, accompanied by your last brown and orange reserve blocks. The cyan block registers its single remaining tile and disappears in an instant, leaving the orange block to finish the last orange pumpkin wedges at the upper left. Your brown ants clean up the final stem and shadow tiles at the top center. The ant colony swarms over every last lingering pixel until the entire board is spotless and clear.
Final Thought
Patience and strict queue control are the keys to mastering this level, especially when managing the linked boxes toward the middle of the run. Always confirm that an opening exists before pulling a block out of your tray, and you will never find yourself trapped with a full waiting rack. If any part of the pathing or block order feels confusing to visualize in text, take a moment to watch the complete gameplay video above this article to see every ant path and tile clear in real time.
Comments