
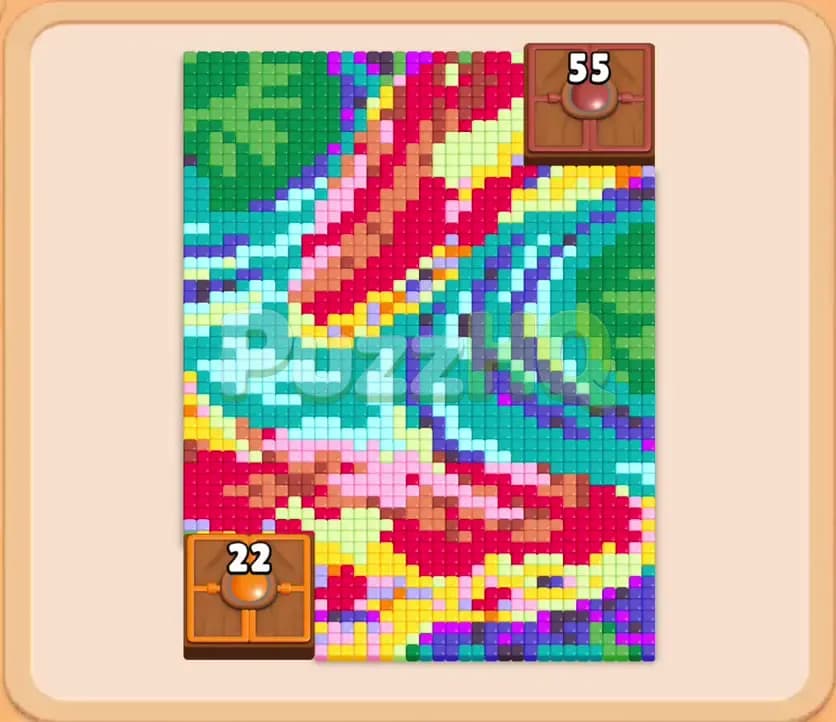
Colony Flow Level 1350 presents a complex swirling mosaic of food tiles bordered by two tough Hungry Doors that block key sections of the board. You need to carve clear routes through the outer edges while steadily feeding these obstacles so your ants can reach the tiles trapped beneath them. Maintaining free space in your five waiting slots is critical because picking the wrong color too early will leave your tray completely paralyzed.
Colony Flow Level 1350 Walkthrough
Understanding the Starting Board
The board in Colony Flow Level 1350 features an elaborate swirl of vibrant pixel art tiles. A broad curved ribbon of red and magenta arcs through the upper half, wrapped inside rolling waves of turquoise, teal, and deep blue. Along the lower right perimeter, clusters of bright yellow tiles sit ready for harvesting, while softer pink tiles line the bottom edge. In the upper left corner, a dense block of solid green food awaits.
Two Hungry Doors stand as major roadblocks on this board. In the top right corner, a Hungry Door bearing the number 55 guards an entire quadrant of tiles behind it. Near the bottom left, a second Hungry Door marked with the number 22 seals off another hidden pocket of food. These doors will not budge until you direct enough matching ants to feed and break them down.
Below the board, you have five empty waiting slots and five columns of stacked numbered blocks. The visible top blocks at the start include Green 30, Orange 12, Pink 28, Pink 30, and Cyan 45. Buried underneath are blocks of Purple 20, Light Green 55, Red 45, Teal 45, and Brown 25, along with several others. Because the ants emerge from the central nest opening at the bottom, your initial movement is restricted to the exposed edges of the mosaic. The interior swirls cannot be reached until the outer tiles and doors are systematically cleared away.
The Key to Clearing Level 1350
Success on Colony Flow Level 1350 hinges on peeling the puzzle like an onion while dedicating specific blocks to the Hungry Doors. You cannot rush the center of the board. The ants require physical space to navigate, and any block selected without an open path to matching food will simply sit motionless in your waiting slots.
Your first major priority is clearing the lower pink tiles and the bottom right yellow cluster. This immediately frees up navigational lanes along the right and left flanks. As soon as brown and orange blocks become accessible in your tray, you must channel them toward the Hungry Doors. The top door requires 55 total units of feeding, which means it will take multiple blocks over several phases to break open.
Always maintain at least one or two empty waiting slots throughout the run. If you fill your slots with colors buried deep inside the swirling patterns, your entire colony will stall. By timing your block selections so that each color finishes its meal quickly, you ensure a continuous flow of ants and keep your options flexible.
How to Beat Colony Flow Level 1350
Step 1: Clear the bottom pink edge and right yellow corner
Begin by selecting the pink blocks and the yellow block from your tray. Pink ants immediately march out from the nest to devour the thin border of pink tiles along the bottom edge, while yellow ants stream into the lower right corner to consume the bright yellow patch. Clearing these two outer sections right away creates vital breathing room directly outside the nest opening. As the yellow tiles vanish, your ants gain an unobstructed route along the right perimeter of the board, setting the stage for your assault on the upper quadrant.
Step 2: Feed the top Hungry Door and thin the teal swirl
With the right flank open, pull the brown block from the tray along with the active teal block. Brown ants immediately rush up the right perimeter track straight into the top right Hungry Door, reducing its counter from 55 down toward 30. At the same time, teal ants begin eating away at the bottom edge of the sweeping turquoise wave in the center. Thinning this teal layer exposes deeper bands of magenta and blue while your brown ants make a substantial dent in the heavy obstacle guarding the upper corner.
Step 3: Advance through the upper left green and central magenta
Select the light green block followed by the magenta block. Light green ants travel along the cleared left wall, curling into the upper left pocket to chew through the solid green square. Meanwhile, magenta ants attack the bold red and pink curved stripe that runs through the middle of the board. Clearing chunks of this central ribbon breaks the mosaic into smaller islands of food, allowing ants to slip between sections that were previously joined together.
Step 4: Destroy the top Hungry Door to reveal hidden tiles
Tap the next brown block to deliver the remaining nourishment required by the top right Hungry Door. The counter drops rapidly from 14 down to zero, causing the door to break apart and disappear from the board. This momentous clearance exposes a rich cache of dark blue, purple, and orange food tiles tucked in the upper right corner. With the door gone, your ants now possess a complete outer ring of movement around the top portion of the stage.
Step 5: Dismantle the central teal and upper dark blue swirls
Bring the dark blue and remaining teal blocks into play. Dark blue ants charge directly into the newly opened upper right section, eating through the swirl of navy tiles that were previously shielded by the door. At the same time, your teal ants finish consuming the central turquoise arcs, clearing out the entire middle section of the puzzle. Removing these large swaths of food eliminates the dense clutter and leaves only a few isolated shapes on the board.
Step 6: Feed and eliminate the bottom left Hungry Door
Now turn your attention to the remaining obstacle by choosing the orange block. Orange ants run directly toward the bottom left Hungry Door, driving its counter from 22 down to zero. The door vanishes, uncovering a previously inaccessible pocket containing bright green, light blue, and yellow tiles. Unlocking this final corner at this stage ensures your waiting slots stay clean, as you can now immediately target every color that was trapped inside.
Step 7: Clear the newly uncovered bottom left pocket
Select the yellow and light green blocks to send your colony into the freshly opened lower left area. The ants quickly consume the small clusters of yellow and light green food tiles that were hidden beneath the door. Clearing this corner tidies up the lower half of the board completely, leaving the bottom area entirely barren and allowing any future ants to route directly to the top half without any obstacles in their way.
Step 8: Sweep the final tiles across the top perimeter
Wrap up the puzzle by selecting the final dark green, red, light blue, and purple blocks. Ants stream along both outer boundaries to clean up the last few tiles lingering in the upper corners. Dark green ants finish off the remaining fragments in the top left, while light blue and purple ants sweep through the final patches in the upper right. Once the last tile is consumed, your tray empties and the level is successfully completed.
Why This Solution Works
The primary reason this sequence succeeds is that it strictly respects the geometry of the board. Colony Flow puzzles penalize players who try to solve interior sections before opening the perimeter. In this level, the central swirl is completely surrounded by outer layers of yellow, pink, and teal. Tapping a color like dark blue or purple at the start would strand that block in your waiting slots because the ants would have no path to reach the center. By clearing the edges first, you guarantee that every block you select goes to work immediately.
Handling the Hungry Doors in two distinct phases is equally essential. The top door demands 55 points, which represents a massive investment of ants. Attacking it early with your first brown blocks prevents your tray from becoming clogged with unusable door clearing blocks later. Conversely, the bottom door holds only 22 points and guards a completely self contained corner. Leaving that door for the middle of the run lets you focus your attention and waiting slots on dismantling the complex center first.
Finally, this method maintains slot discipline. By continuously picking blocks whose matching tiles are already accessible, your waiting slots cycle naturally rather than filling up. An empty slot is your best safety buffer in Colony Flow, and this walkthrough ensures you never have more than three slots occupied at any given moment.
Final Thoughts
Beating Colony Flow Level 1350 comes down to opening your perimeter lanes early and methodically chipping away at the top Hungry Door before attempting to solve the center. If you ever find your slots getting crowded or your ants walking in circles, take a moment to look at the pathing video at the top of this guide to see exactly how each route opens up. Keep your moves methodical, feed the doors on schedule, and you will clear the board with room to spare.
Comments