
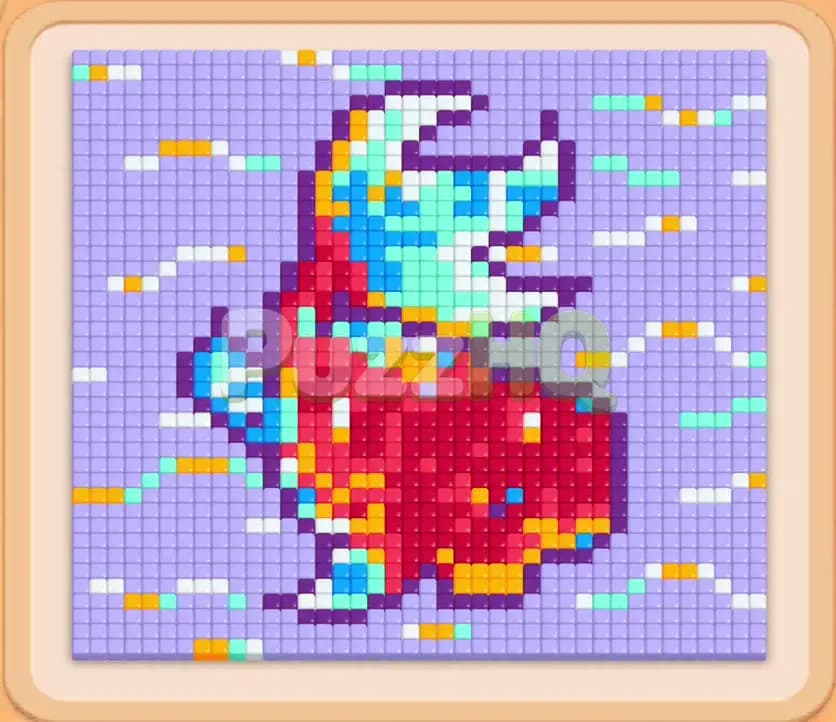
Colony Flow Level 1214 presents a dense pixel art layout enclosed by a thick wall of light purple tiles. Your primary challenge is navigating a massive outer background while managing the linked pairs of connected boxes waiting in the bottom tray. Success requires peeling back the outer layer in steady stages so your ants can reach the colorful creature trapped in the center.
Colony Flow Level 1214 Walkthrough
Understanding the Starting Board
When you open the level, the board displays a striking winged creature constructed from red, dark purple, cyan, blue, yellow, and white tiles. Surrounding this entire figure is a deep perimeter of light purple food tiles that wall off nearly all internal paths. The ants emerge from the underground nest at the bottom center of the board, meaning their first available targets must be the light purple tiles along the lower edge.
The bottom tray organizes your selection across five columns. At the start, the top visible row is heavily dominated by light purple thirty count blocks, alongside a yellow thirty count block. Beneath these starting blocks rest multiple layers of upcoming colors, including teal, dark purple, and red. The critical mechanic you must account for on this board is the Connected Boxes. Two dark purple boxes in the tray are joined together by a purple tether band, meaning they are linked boxes that are cleared together. Selecting into these columns without an accessible route for dark purple tiles will instantly clog your queue.
Your primary obstacle is the sheer volume of the light purple background. It prevents the ants from touching any of the vibrant colors that comprise the creature body. If you tap blocks for red, cyan, or dark purple before the light purple border is cleared away, those blocks will sit idle in your five waiting slots. Because you only have five slots, letting two or three inactive blocks linger while waiting for a path to open will quickly cause a game over.
The Key to Clearing Level 1214
The winning approach for this level hinges on systematic perimeter reduction. You must treat the light purple background as an outer shell that has to be stripped away from the bottom upward. Because the ant nest is positioned at the lower edge of the floor, the ants can only reach the underside of the pixel art initially. You should use the initial light purple blocks to excavate the lower rim, which creates the physical space needed to expose the creature feet and belly.
Managing your five waiting slots requires strict discipline regarding when you activate the Connected Boxes. Since the linked dark purple boxes are tied to each other, you must ensure that dark purple food tiles on the creature feet and outline are directly accessible before bringing those linked blocks into play. Once the ants consume the lower light purple border, the dark purple outline becomes reachable. That specific opening provides the green light to engage dark purple and red blocks safely. Always keep at least two waiting slots completely clear during the middle phase of the board so you have the flexibility to cycle through unavoidable blocking tiles in the tray.
How to Beat Colony Flow Level 1214
Step 1: Peel away the lower light purple border
Start by selecting the light purple blocks visible at the front of the tray columns. Your ants will rush from the nest hole and immediately begin eating the lowest row of light purple tiles directly above them. As the light purple counts tick down from thirty toward single digits, a wide horizontal trench opens beneath the creature. This initial clearing reveals the bottom tips of the yellow accents and the lower dark purple boundary of the figure. Do not touch any colored blocks that lack an open path yet. Focus entirely on exhausting the light purple blocks so that the ants push the clearing line upward into the main structure.
Step 2: Deploy yellow and red blocks to expose the creature body
With the lower boundary hollowed out, the ants can now reach several yellow highlight tiles and the bottom edge of the red body. Tap the yellow block and select the first red blocks from the tray. You will see yellow ants peel away the accents near the bottom while red ants swarm into the center of the creature torso. In your waiting tray, keep track of the remaining counts on your yellow and red blocks. The red blocks begin at thirty and thirty one, quickly dropping as the central mass of the red body shrinks. This step is essential because clearing the red belly widens the corridor toward the interior cyan wings and creates room around the dark purple leg structures.
Step 3: Unleash dark purple ants on the exposed feet
Now that the lower red tiles and yellow spots are cleared, the dark purple feet and lower outline stand fully exposed to ant traffic. Select the dark purple blocks that have become available in your tray. Your dark purple ants will surge upward from the nest and lock onto the creature lower claws and outlines, rapidly reducing their counts from five and three down toward completion. Clearing these dark purple foundation tiles is necessary to connect the left and right pathways, giving your ants access to both sides of the upper torso. Keep your waiting slots balanced by allowing the red and yellow blocks to finish emptying before you pull fresh colors from the tray.
Step 4: Handle the connected boxes and clear lower red clusters
As you progress through the tray, the column housing the Connected Boxes becomes accessible. These two dark purple boxes are tethered together by a band and must be cleared together. Because you already exposed the dark purple frame of the creature, selecting these linked boxes will not strand your slots. The dark purple ants will immediately find active targets along the mid section and leg joints. Simultaneously, pick the available red blocks with counts around twenty nine and twenty four to continue digesting the main chest of the figure. As these red clusters vanish, you create an open central chamber that exposes the lower boundary of the cyan and blue wing feathers.
Step 5: Hollow out the upper light purple background
Turn your attention back to the light purple background that still wraps around the upper wings and horns of the creature. Tap the next wave of light purple blocks, including the thirty count blocks that have rolled to the front of the tray. The light purple ants will climb along the left and right outer corridors, carving out massive chunks of the background. As the light purple tiles disappear, the shape of the background turns into a high V shape above the creature head. This step removes the side walls that were boxing in the cyan, blue, and white tiles of the wings, preparing the entire upper half of the board for final consumption.
Step 6: Dispatch cyan and white ants to dismantle the wings
With the lateral background tiles gone, the bright cyan and white sections of the creature crest and wings are entirely accessible. Select the teal and cyan blocks along with the white five count block from the tray. Cyan ants will march across the top shoulders of the creature, devouring the vibrant blue and teal feathers. White ants target the sharp horn tips and high contrast accents along the wing edges. Because these colors have relatively low total tile counts compared to the background, these blocks will clear out of your waiting slots very rapidly, keeping your workspace open and preventing any slot congestion.
Step 7: Clear the remaining blue and dark purple framework
At this stage, the outer light purple background is completely wiped out, leaving only the internal skeleton of the pixel art. Select the remaining dark purple blocks, including counts of nine and zero, alongside the blue blocks showing counts of three and four. Dark purple ants will eliminate the last structural outlines around the head, while blue ants consume the deep wing shading. Watch your five waiting slots carefully during this sequence. Because the blocks clear in rapid succession, you will see slots constantly emptying and refilling as the final tray layers roll forward.
Step 8: Clean up the final yellow and red food tiles
Only a tiny cluster of scattered red body tiles and isolated yellow flecks remain on the board floor. Tap the final yellow twenty four block and the red single count block from the bottom tray. Yellow ants will stream across the open board to gather the final few yellow crumbs, while the red ants snatch the last red tile from the creature center. With every single food tile eaten and all blocks in the tray resolved, the board clears completely, rewarding you with the level complete screen and celebratory golden stars.
Why This Solution Works
The primary reason this solution succeeds is that it respects the strict physical geography of the board. Because the ants enter exclusively from the bottom opening, any block selected must have an unobstructed line of travel from that lower entry point to the matching food color. The massive light purple background initially functions as a barrier that seals off ninety percent of the colorful tiles. By committing your first moves entirely to eroding the lower light purple shelf, you create a wide landing zone that transforms a narrow bottleneck into an expansive staging area.
Another critical factor is the careful handling of the Connected Boxes. In Colony Flow, linked boxes can easily end a run if they are drawn into the waiting slots while their target color remains trapped behind other tiles. By waiting until the creature dark purple feet were fully cleared of obstructing light purple and red tiles, the dark purple ants could immediately go to work the second those linked boxes entered the active slots. This prevented the linked boxes from sitting idle and taking up two valuable waiting slots at a time when tray flexibility was most crucial.
Finally, the order of color clearing prevents slot exhaustion during the late stages. Stripping the central red core before tackling the upper light purple background opened an internal channel through the middle of the art. This gave the ants two distinct avenues of approach, allowing subsequent colors like cyan, white, and blue to be eaten from both the inside out and the outside in. By keeping the flow of ants continuous and matching block selection directly to exposed surface area, your five waiting slots never become overwhelmed.
Final Thoughts
Patience and board awareness are your greatest assets when conquering Colony Flow Level 1214. As long as you dismantle the light purple background from the base upward and delay the connected dark purple boxes until their target paths are clear, the puzzle unfolds smoothly. If you ever feel uncertain about an ant path or want to verify the exact timing of a block pick, take a moment to watch the video above the article to see every move executed in real time.
Comments