
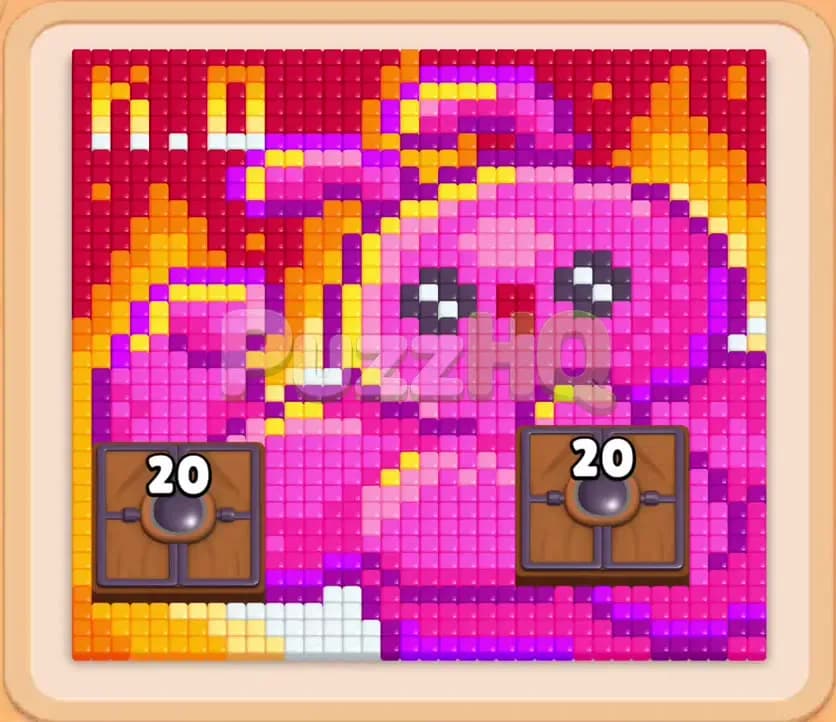
Colony Flow Level 2057 presents a dense pixel art layout packed with tightly layered colors and bulky obstacles that can quickly trap your marching workers. Your main challenge centers on navigating through outer borders to reach the central character while preventing your limited queue from filling with unusable selections. By focusing on exterior colors first and freeing up access to locked elements, you can guide your swarm smoothly across the board.
Colony Flow Level 2057 Walkthrough
Understanding the Starting Board
At the start of the puzzle, the board displays a colorful scene featuring a pink character surrounded by fiery orange and red edges, yellow accents, and white text blocks reading out a bold message across the upper left. Guarding the lower half of the creature are two sturdy wooden chests, each marked with a counter of twenty. These chests act as major physical barriers, denying your ants access to the lower portions of the character until you interact with keys and clear the surrounding area.
Below the board, your tray presents several rows of colored numbered blocks alongside special puzzle mechanics. You will see connected boxes linked by a sturdy bridge, requiring both segments to find available targets or wait together in your tray. You will also notice mystery hidden boxes marked with question marks that keep their colors secret until surrounding blocks are picked. Near the bottom row rests a grey key block displaying a value of two, which ties directly into opening up those heavy chests. Because you only have five waiting slots, tapping blocks whose colors lack open paths will quickly paralyze your colony. The primary obstacle is the thick layer of perimeter food that shields the interior pink body, combined with the rigid presence of the locked chests.
The Key to Clearing Level 2057
Success on this board relies entirely on peeling away the outer shell before you attempt to clear the central subject. The bright red wall along the top and sides, together with the fiery orange and yellow accents, must disappear first so your ants can reach deeper layers without bottlenecking. If you bring pink or dark purple blocks into your waiting slots too early, the ants will find no legal route to those interior pixels, leaving dead blocks sitting uselessly in your queue.
Managing the five waiting slots demands extreme discipline. You must prioritize blocks that immediately activate worker streams, ensuring numbers count down to zero and vanish from the tray. Connected boxes require special caution because they consume multiple slots simultaneously if their paired color cannot clear at the same speed. Your goal is to systematically carve open paths around the wooden chests, deploy the key block when the pathway is cleared, and finally flood the central pink character with massive groups of pink ants once the obstacles disappear.
How to Beat Colony Flow Level 2057
Step 1: Strip the lower perimeter with orange and yellow blocks
Begin your run by selecting the light yellow block with eighteen charges and the orange block showing eleven charges from the front of the tray. These colors have direct, open paths along the bottom left corner and the lower rim of the playfield. Your yellow and orange worker ants immediately march out of the underground nest and begin chewing through the exposed boundary tiles. As these blocks deplete their counts, select the white block with eleven charges to consume the small patch of white food sitting along the lower corner. Clearing these bottom tiles creates your first breathing room and reveals the next row of tray options, keeping all five waiting slots completely clear.
Step 2: Unleash red ants against the background wall
With the lower perimeter softened, turn your attention to the blazing red backdrop and the upper message tiles. Pick the dark red block carrying twenty three charges. Red ants will surge upward along the exposed right and upper edges, eating through the outer frame that confines the scene. Because this red section covers a huge continuous area, the red ants rapidly exhaust their block, clearing out the entire upper right corner and exposing deeper layers of the character. This large scale removal prevents the red block from lingering in your waiting slots and unlocks access to the top portion of the creature.
Step 3: Deploy connected boxes and clear the yellow trim
Now that the upper perimeter is fractured, you can safely select the connected box pair from your tray. This linked unit includes an orange segment alongside a yellow block, demanding that both colors have clear feeding lines. Because your earlier moves exposed orange flames on the left and bright yellow headband accents across the character, both groups of ants immediately rush into action. Follow this up by bringing in the magenta block with twelve charges and the purple block with seven charges. Watching both connected segments tick down together keeps your queue fluid and opens adjacent hidden mystery boxes in the tray.
Step 4: Dismantle the purple details and upper headwear
The removal of the outer flames exposes the detailed purple lines running through the character accessories and upper borders. Tap the purple block with seven charges and the accompanying magenta block. Workers quickly strip away the dark purple outline near the top left, which systematically uncovers the white blocks behind the old text lettering. At this stage, your waiting slots may hold three or four active colors at once, so allow the ants a moment to finish consuming their designated paths before touching any new blocks. Once the counts reach zero, the slots clear out automatically, giving you the capacity needed for the deeper layers.
Step 5: Target the main pink body of the character
With the shielding layers stripped away, the massive pink bulk of the central figure is completely exposed. Tap the pink blocks from your tray, including the block with twenty charges and the smaller pink segments that have surfaced from the hidden boxes. A gigantic wave of bright pink ants bursts from the nest and floods the center of the board. They rapidly swarm across the face, cheeks, and body, chewing through dozens of food tiles in seconds. This heavy clearing action reveals the full outlines of the wooden chests and unlocks access to the lower key block resting in your tray reserve.
Step 6: Collect the keys to unlock and dismantle the chests
Now that the pathways leading directly to the wooden chests are wide open, select the grey key block showing two charges. Your ants run straight to the chests, delivering the keys and reducing the counter on each chest from twenty down to ten. Continue by clearing any nearby lingering yellow and orange blocks that wrap around the chest borders. As the remaining boundary tiles crumble under your worker ants, the final charges on the chests vanish completely. Both wooden chests break apart and disappear from the board, exposing the hidden food tiles that were trapped underneath their bulky frames.
Step 7: Clean up the eyes and remaining white tiles
With the massive chests eliminated and the creature body mostly eaten, only small clusters of scattered food remain on the board. You will see dark purple tiles marking the pupils of the eyes, along with a few white highlights and stray pink pixels across the base. Pick the dark purple block showing nine charges, followed by the remaining white block with six charges and the final large magenta block. The ants make quick work of the remaining facial features and cleanup tiles. Every remaining block counts down to zero, emptying your waiting slots and clearing the board for a complete victory.
Why This Solution Works
This walkthrough succeeds because it honors the natural physical access points of the layout. In Colony Flow, ants cannot burrow through walls of unrelated food colors to reach their target tiles. If you pick a pink block while the pink character remains encased behind red, orange, and purple borders, those pink ants will wander helplessly or refuse to leave the nest. That selected block would sit permanently in one of your five waiting slots. By methodically peeling away the red background, orange flames, and yellow trim first, you guarantee that every color block you select has an open, valid path ready for consumption.
Furthermore, this order directly addresses the threat of the two heavy wooden chests. These obstacles possess substantial hit counts and effectively block off the entire bottom quadrant of the creature. Rushing to interact with the chests before clearing the surrounding tiles would only result in dead ends. By waiting until the upper and central body is substantially reduced, you provide your ants with clean delivery routes for the keys. When the key block is selected, the path is already clear, allowing the chests to take damage immediately and break down without stalling your progress.
Queue management is the second pillar of this strategy. Linked connected boxes and mystery hidden boxes can easily sabotage a run if handled carelessly. Activating the connected boxes only when both the orange and yellow tiles were exposed ensured that neither half of the linked pair became an idle burden in your waiting slots. Similarly, uncovering mystery boxes gradually prevented unwanted color surprises from jamming your limited tray space. Every move directly funded the next, maintaining open waiting slots from the first tap to the final cleanup.
Final Thoughts
Patience and perimeter management are the real secrets to conquering this level without getting stuck. By stripping away the outer red and orange borders before diving into the central pink figure, you maintain constant ant momentum and keep your five waiting slots wide open. If you want to see the exact ant marching routes and timing in real time, take a look at the video above the article to guide your winning run.
Comments