
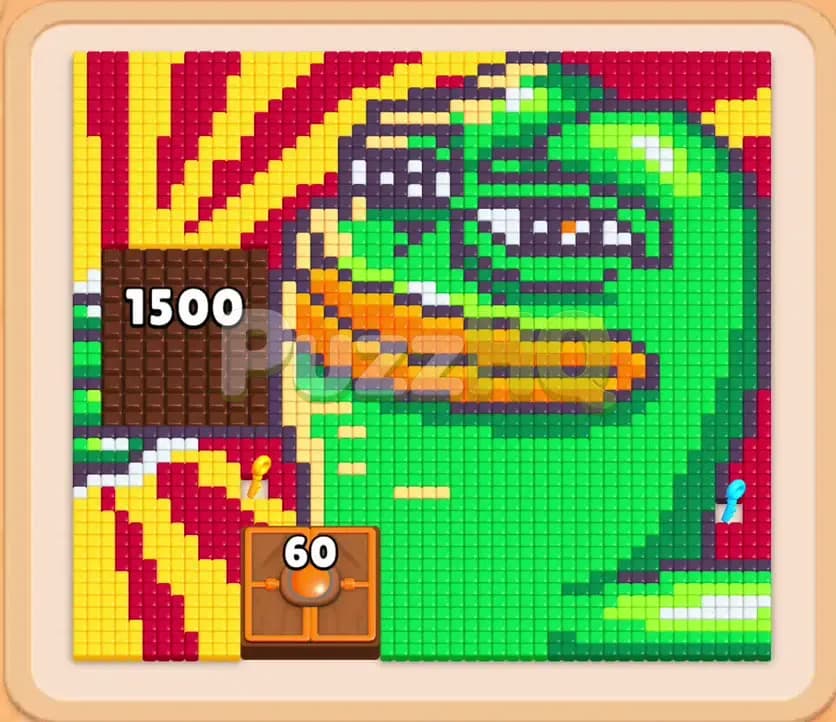
Colony Flow Level 927 presents a dense pixel art puzzle featuring a large green character wearing sunglasses against a vibrant background. Your main challenge is clearing through heavy outer layers while managing special board hazards that threaten to clog your five waiting slots. Success depends on opening paths in the correct order so your ants never run out of reachable food tiles.
Colony Flow Level 927 Walkthrough
Understanding the Starting Board
The puzzle board displays a recognizable green face with broad yellow and orange lips, framed by black sunglasses with white glare accents. Bright red and yellow rays decorate the upper left background, but a massive brown chocolate block with fifteen hundred durability points sits directly on top of them. At the bottom center, a sturdy lock box with a counter of sixty blocks access to a cluster of tiles sitting right above the ant nest. In the selection tray below, you will find multiple rows of colored number blocks, including connected boxes bound together by colored bands. The central obstacle is the sheer volume of green food tiles that wall off the rest of the board. You cannot send ants into the red background rays or the bottom center cluster until you resolve the chocolate barrier and collect enough keys for the lock.
The Key to Clearing Level 927
The secret to conquering this stage is exercising patience with background colors while methodically chewing through the green face. You must avoid selecting red or yellow sunburst blocks early because those tiles remain sealed behind the chocolate wall. Filling your waiting slots with colors that have no open path will instantly cause a defeat. Instead, focus on using green, black, and white blocks to shave away the character face and sunglasses. As your ants travel across the board, their continuous movement gradually grinds down the fifteen hundred points on the chocolate block. Simultaneously, exposing the mouth area lets ants reach tiles that release floating keys to satisfy the bottom lock. Keep at least two waiting slots free whenever possible so you can draw through the connected tray blocks without jamming your queue.
How to Beat Colony Flow Level 927
Step 1: Open paths through the outer green layers
Begin by picking the two green blocks showing forty five points each from the front row of your tray. Green ants immediately rush out of the nest and begin devouring the lower chin and cheeks of the character. This broad green area offers plenty of open targets, allowing your first two blocks to count down rapidly. As the ants consume these tiles, they carve wide lanes upward into the face and begin brushing against the right side of the brown chocolate block. This early pressure immediately starts weakening the chocolate defense while clearing room around the central sunglasses.
Step 2: Carve into the black sunglasses and white glare
Select the black block with fifty points and the white block with forty points from the available options. Black ants target the dark frames of the sunglasses across the upper middle section, while white ants tackle the shiny reflection pixels embedded inside the lenses. Consuming these central details creates a deep trench across the middle of the head. This trench is vital because it splits the upper forehead from the lower jaw, granting your ants access to inner green tiles and further degrading the adjacent chocolate block down toward eight hundred points.
Step 3: Handle the connected tray blocks and expand the central opening
Turn your attention to the tray where you will find linked boxes tied together by flexible bands. Select the black and green options that form part of this connected group to pull them into your waiting queue together. Your black ants continue stripping away the outer edges of the sunglasses while fresh green ants clear the upper forehead and temple. Watch your five waiting slots carefully during this phase. Let the active white and green numbers fully expire before bringing in any extra blocks from deeper rows. By the time this step wraps up, the chocolate durability drops past six hundred points and the character mouth is fully exposed.
Step 4: Target the yellow and orange mouth to release the keys
Tap the yellow and orange blocks from your tray to send workers directly into the thick lips of the character. The bright orange tiles form the inner lip line while the yellow tiles build the surrounding structure. Clearing this zone opens up the lower right corridor where key tiles are located. As your ants eat through these sections, small yellow keys lift from the board and fly directly toward the lock box at the bottom. The lock counter begins tumbling rapidly from sixty down toward single digits, while your constant ant traffic along the left flank drops the chocolate durability below three hundred points.
Step 5: Unlock the bottom chest and break the final chocolate layer
Continue feeding yellow, black, and white ants into the remaining facial details until the lock counter hits zero. Once unlocked, the bottom wooden box disappears, uncovering a tightly packed cluster of red, green, and yellow food tiles right next to the ant nest. At almost the exact same moment, your workers chip away the final sixty seven points on the chocolate block, completely destroying it. The massive barrier vanishes from the upper left corner, exposing the underlying red and yellow sunburst rays that have been trapped since the start of the match.
Step 6: Flood the background rays with red and yellow ants
Now that the upper left corner is completely open, select the red forty five block along with available yellow blocks from your tray. Red ants charge up the left corridor where the chocolate previously stood and begin devouring the red background stripes. Yellow ants assist by clearing the alternating rays and finishing off any leftover mouth pixels. Because these food tiles are completely unobstructed, your blocks drain with incredible speed, keeping your waiting slots clean and preventing any risk of a late round stall.
Step 7: Clear the remaining black and green stray tiles for the win
Finish the level by selecting the remaining green seventeen, black forty, and green thirty four blocks from the bottom tray. Small teams of ants quickly gather to sweep up the few remaining stray pixels scattered around the upper right brow and along the border walls. With all hazards removed and every path wide open, the ants clear the final bits of food from the board, successfully completing the puzzle.
Why This Solution Works
This winning sequence succeeds because it respects the natural physical flow of the board. The green character acts as a massive shield that protects the rest of the board. Attempting to clear background colors while that shield remains intact would quickly fill all five waiting slots with useless blocks. By committing your initial selections strictly to green and black, you ensure that every ant leaving the nest has an immediate and reachable destination.
The chocolate barrier on the left requires fifteen hundred hits, which sounds overwhelming at first glance. However, the game allows your ants to erode chocolate naturally as they navigate nearby paths and clear adjacent tiles. Working through the center of the face directs heavy ant traffic directly past the chocolate border, breaking down the barrier organically without requiring you to hunt for a specific brown block.
The same logic applies to the lock and key mechanic guarding the bottom cluster. Trying to access that bottom area prematurely is impossible because the lock requires sixty keys. The keys themselves only emerge once you clear the mouth and right side paths. By pacing your moves and delaying the red background blocks until the chocolate and lock both disintegrate, you maintain complete control over your five waiting slots from start to finish.
Final Thoughts
Managing your tray space and ignoring the tempting red background blocks early on is the definitive decision that makes Colony Flow Level 927 smooth and repeatable. Once you prioritize the green face and allow the chocolate and lock to crack open naturally, the board transitions from an intimidating maze into a straightforward cleanup. If you find yourself unsure about a specific movement or want to double check the timing of a block pick, take a moment to watch the video walkthrough above the article for real time visual guidance.
Comments