
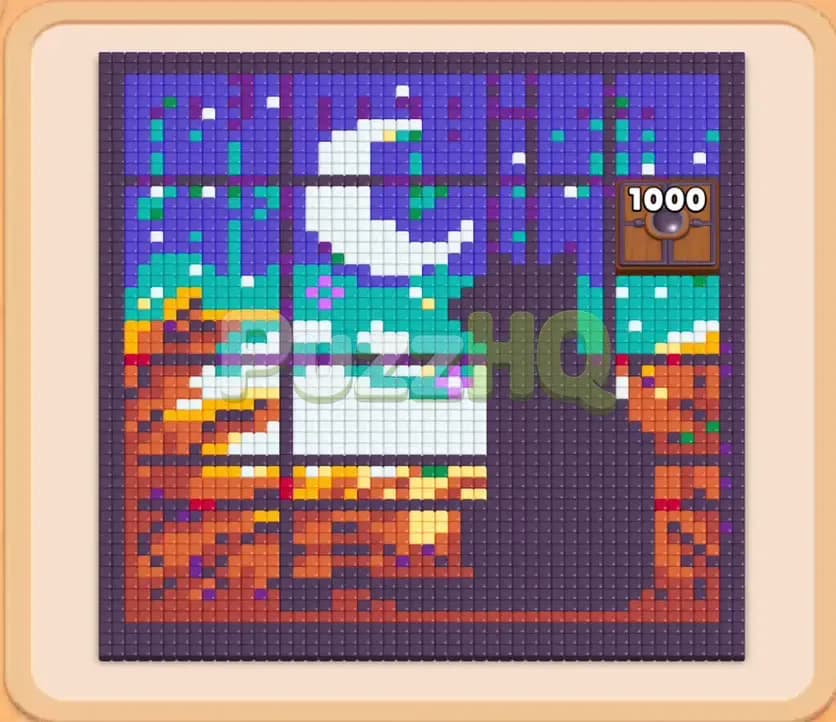
Colony Flow Level 947 presents a complex visual puzzle where you must clear a detailed night window scene while managing a tight waiting tray. The central challenge revolves around a massive Hungry Door guarding the upper right corner that requires one thousand food tiles cleared before it opens. Finding the winning path demands strict control over your five waiting slots so your ants never stall out before the barrier collapses.
Colony Flow Level 947 Starting Setup
Reading the Board
The puzzle board displays a scenic window overlooking a desert night landscape under a glowing crescent moon. Deep blue and purple tiles form the starry night sky across the top half, accented with cyan and white highlights. Below the sky, warm layers of orange, brown, dark red, and yellow depict rocky terrain framed by dark grey window mullions. A dense, dark purple silhouette dominates the lower right quadrant, creating a heavy barrier between your ant nest and the rest of the canvas. In the upper right corner, a wooden Hungry Door displays a counter of one thousand, completely blocking off the tiles sitting behind it.
Below the board rests your ant nest opening, positioned directly beneath the image canvas. Further down, you have five empty waiting slots that hold active blocks chosen from the lower staging rows. The reserve rows present a dense assortment of numbered blocks including dark red, blue, dark grey, brown, dark blue, purple, pink, yellow, teal, and white. Because the Hungry Door demands a high volume of cleared tiles before granting access to its sector, you must systematically peel away the open portions of the landscape and sky first.
What You Need to Watch Out For
Your biggest threat throughout this stage is slot saturation. With only five waiting slots available, picking blocks whose matching colors are locked behind other structures will quickly freeze your board. If all five slots fill with stalled blocks, your run ends immediately. The right side of the board is practically untouchable at the start because the Hungry Door seals the upper right and the heavy purple silhouette seals the lower right.
This means your early ant paths must travel exclusively through the lower left corner and up the left border. Selecting colors found only in the center or right half of the image will trap those blocks in your waiting area with zero progress. Every single pick in the opening minutes must directly target the exposed orange, brown, and teal tiles on the left side to establish wide corridors toward the central moon and window frame.
Colony Flow Level 947 Step by Step Walkthrough
Step 1: Carving Into the Lower Landscape with Brown and Teal
Begin by targeting the accessible terrain in the lower left corner. Select the brown block with fifty five points to deploy brown ants directly toward the base of the mountains. The ants immediately start chewing through the earthy orange and brown slopes, rapidly reducing the block counter down to four. While the brown ants finish clearing the slope, bring the teal forty five block into your waiting slots.
This teal block targets the cyan accents along the left horizon and begins opening pathways toward the upper window pane. By chewing away this lower corner, your ants uncover the underlying borders and expose adjacent purple and yellow tiles. These early clearances immediately begin chipping away at the Hungry Door counter, dropping it from one thousand down to eight hundred ninety six.
Step 2: Attacking the Night Sky with Purple and Deep Blue
With the lower left corner cracked open, your ants now have room to climb upward along the left edge of the frame. Draw the purple block and the blue block into your active slots, along with a yellow block to finish off the horizon lines. Purple ants march into the upper left quadrant, devouring the dark starry sky tiles and tunneling around the upper window frame.
The purple block counter drops swiftly toward thirty one while the blue block works down to forty two. Yellow ants finish scrubbing the bright desert highlights, reducing that block to twenty one. Cleansing this upper corner removes the top left boundary of the window, creating multiple entry points into the center of the sky where the white moon rests. The Hungry Door counter holds steady at eight hundred ninety six as your ants concentrate on the western half of the board.
Step 3: Opening the Left Border and Clearing Window Panes
Continue your assault along the western corridors by maintaining continuous pressure with yellow, purple, blue, brown, and dark blue. At this point, your waiting slots hold yellow at twenty, purple at nine, blue at thirty seven, brown at twenty three, and dark blue at twenty two. Although all five slots are occupied, every single color is actively being consumed on the board, which keeps the ants moving without delay.
The purple block drops into single digits and vanishes first, freeing up a critical waiting slot. As the blue and dark blue ants tear through the remaining sky tiles and window framing on the left, the Hungry Door counter takes another major hit, plummeting down to seven hundred ninety two. The left third of the board is now entirely clear of food tiles.
Step 4: Releasing White Ants to Consume the Crescent Moon
Now that the left corridors connect directly to the center of the night sky, you can safely bring in the white block with twenty seven points and a dark grey block with forty eight points. White ants surge upward from the nest, following the cleared western path and pouring into the center of the canvas to devour the bright white crescent moon and adjacent cloud highlights.
At the same time, dark grey ants begin dismantling the thick window grid bars that divide the landscape. Yellow drops down to eleven while your blue block works through its remaining points. With four slots engaged and one slot open for flexibility, the moon vanishes from the board. These continuous clears drive the Hungry Door requirement down to six hundred forty three.
Step 5: Dismantling the Dark Silhouette and Window Grid
With the moon and upper center clear, your paths can now pivot toward the right half of the board. Bring in dark grey thirty three, dark red two, blue forty two, and black twenty seven, alongside the lingering yellow four. Ants swarm into the massive dark purple and black silhouette that previously walled off the right side.
The dark red and yellow blocks clear almost instantly, vacating their slots and allowing you to queue fresh colors from the tray. Black ants slice deep into the silhouette, carving wide avenues straight toward the Hungry Door from below. The central window panes disappear completely, leaving wide expanses of empty canvas behind. The Hungry Door counter collapses down to three hundred sixty.
Step 6: Pushing the Upper Perimeter Down to Unlock the Hungry Door
Load your waiting area with dark grey forty five, pink four, white six, yellow seventeen, and green three. Black and dark grey ants strip away the dark purple border surrounding the top edge of the frame and begin eating the tiles immediately adjacent to the Hungry Door.
Pink and green ants clean up stray accent tiles left scattered across the central clearing. Because every color chosen has exposed tiles ready for consumption, the blocks empty out in rapid succession. The Hungry Door counter tumbles through the final stretch, dropping past one hundred seventy nine until the counter hits zero. With its requirement fulfilled, the wooden door vanishes entirely from the board.
Step 7: Clearing the Final Tiles Across the Canvas
With the Hungry Door gone, the secluded pocket of tiles in the top right corner is finally exposed. Select your final reserve blocks, including dark grey five, blue sixteen, purple six, teal thirty seven, and green one.
Ants flood the newly opened upper right corner and trace the remaining perimeter lines. Teal and purple ants eat the last fragments of sky, while green and dark grey ants wipe out the final border tiles. As the last green tile disappears into the nest, the entire board clears and the level is complete.
Colony Flow Level 947 Winning Strategy
The Most Important Moves
The defining decision in this level is choosing to ignore the right side entirely during the opening phase. It is tempting to pick colors that look plentiful across the whole board, but the silhouette and the Hungry Door make the right side a complete dead end early on. Committing your first two moves to brown and teal on the lower left is what unlocks the entire puzzle.
Once that bottom left wedge is clear, your ants gain vertical mobility. Routing purple and blue up the left edge allows you to flank the window frame from above. This top down approach lets you attack the moon and the silhouette from their exposed sides rather than trying to hammer through their armored bases.
Keeping the Ants Moving
Managing the five waiting slots on this stage requires paying close attention to block countdown speeds. During the middle phase of the level, you have all five slots filled with active colors. This is only safe because you timed your picks so that small count blocks, like purple nine and dark red two, finish quickly to cycle new space.
Never draft a high number block unless you can clearly see that its matching tiles are already accessible along an active ant highway. If you pull a block whose tiles are buried behind two layers of uncleared food, that block will sit completely dead in your tray. Keeping at least one slot cycling rapidly ensures you always have room to react as new tile clusters open up.
Colony Flow Level 947 Final Tips
When you play through this stage, keep your eyes on the Hungry Door counter between every block selection. Watching the counter drop tells you that your clearing pace is healthy and confirms that you are making meaningful progress toward unlocking the top right quadrant. Do not rush to draft colors that appear behind the door until the wooden barrier has visibly vanished.
Pay close attention to the structural window bars running through the middle of the artwork. These dark grey and black lines act as natural walls that divide your ant columns. Clearing out segments of the window frame early gives your ants multiple shortcuts across the canvas, drastically reducing the travel time between the nest and the remaining food tiles.
If any path transitions or block selections seem tricky while you are working through the sequence, take a moment to review the gameplay video located above this guide. Watching the ant traffic move in real time will help you master the timing and clear the board with confidence.
Comments