
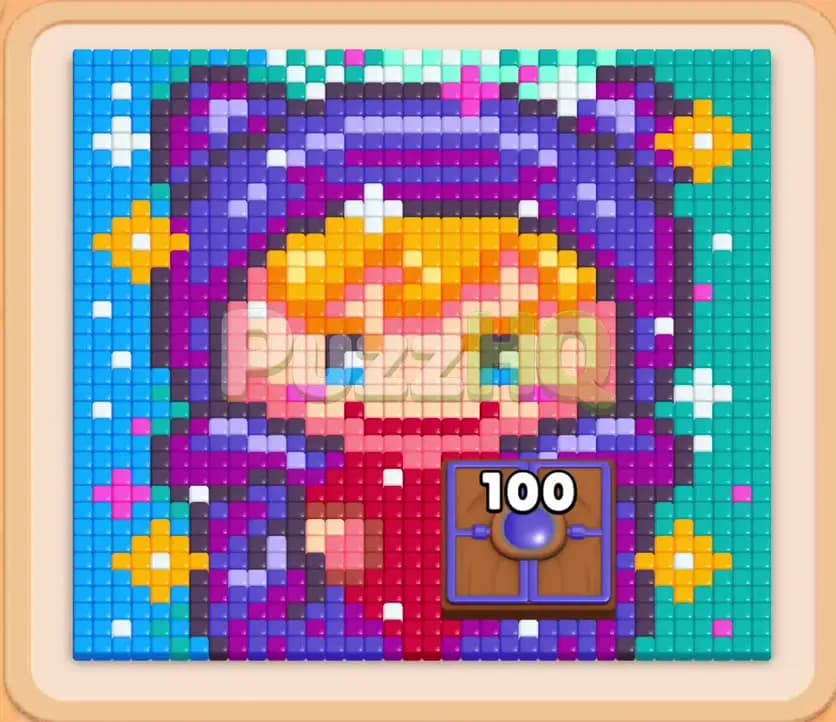
Colony Flow Level 1140 presents an intricate board centered on a large pixel art portrait of a girl wearing a purple cat hood. Your primary challenge is navigating through a tight lower perimeter while dealing with a heavy wooden obstacle that blocks the right side of the character. Success on this stage requires careful management of your five waiting slots, ensuring you clear outer layers methodically so that your worker ants always have a direct route to their food.
Colony Flow Level 1140 Walkthrough
Understanding the Starting Board
When you start Colony Flow Level 1140, you are greeted by an elaborate pixel art figure dressed in a crimson cloak and a deep purple cat ear hood. Golden yellow hair frames a peach face with expressive eyes, and bright yellow sparkle shapes decorate the surrounding sky. A wide teal border with white accents surrounds the upper and side edges of the canvas. The ant nest sits at the bottom center of the floor, directly underneath the hem of the red cloak.
Two distinct special mechanics are present on this stage. The most glaring obstacle is the Hungry Door positioned on the bottom right corner of the character cloak. This sturdy wooden door features a counter of one hundred, blocking all access to the right flank of the board until your ants consume enough matching red tiles adjacent to its perimeter. Down in the block tray, you will also notice Connected Boxes linked by a bright orange connector line. These paired orange blocks share a bond, meaning both linked blocks must be factored into your tray strategy when releasing ants toward the yellow and orange hair sections.
Paths into the board are strictly limited at the beginning. The central nest points directly into the bottom edge of the red cloak, leaving the upper facial features, the thick purple hood, and the outer teal borders completely isolated. Because the Hungry Door seals off the right side, your initial progress must push straight up through the red cloak and expand toward the left purple trim.
The Key to Clearing Level 1140
The winning strategy for this puzzle revolves around feeding the Hungry Door as early as possible without clogging your waiting slots. Because the door requires one hundred tiles to open, your red blocks are your absolute priority in the opening phase. However, you cannot simply dump red blocks into your slots carelessly. You must alternate between red blocks and small perimeter colors like white, black, or pink to keep ants moving continuously.
Managing the five waiting slots is vital because of the dense layering of the art. If you pull a color whose tiles are trapped behind uncleared layers, that block will sit idle in your waiting area. With only five slots available, two dead blocks can easily cause a cascade failure. You must peel the artwork from the bottom upward, opening lateral paths into the purple hood and blonde hair before touching the high count blocks that govern the background frame.
How to Beat Colony Flow Level 1140
Step 1: Clear the accessible lower tiles to begin opening paths
Your first move must target the food tiles closest to the nest opening at the bottom of the board. Select the initial light blue and red blocks that have direct line of sight from the nest. Worker ants will immediately stream out and chew away the base of the cloak and the lowest corner tiles. Clearing these entry tiles carves out an initial foothold, exposing adjacent red pixels and chipping away at the bottom border. Keep your waiting slots mostly clear during this opening salvo by only picking blocks with immediately visible targets.
Step 2: Target the lower red cloak to feed the Hungry Door
With the entrance widened, focus your attention on the crimson cloak that makes up the lower body of the character. Pick the visible red blocks from the tray to direct a steady march of red ants into the lower garment. As these red ants devour the cloak, watch the counter on the Hungry Door drop rapidly from one hundred down to fifty six. This reduction is critical because it begins weakening the barrier that walls off the right half of the board. Take care to select only the red counts that match the exposed surface area so your ants finish their jobs completely and vacate the waiting slots.
Step 3: Clear the lower hood edges and exposed detail colors
As the lower red garment recedes, dark purple tiles on the bottom left and several accent pixels become exposed. Bring in a purple block and small utility colors like black and white to clear away the stray background pixels and the lower folds of the hood. Ants marching along the left side will strip away these darker tiles, broadening your pathway upward toward the face. By clearing these side pixels now, you prevent small leftover tiles from becoming isolated bottlenecks later in the run.
Step 4: Break down the remaining red cloak to unlock the Hungry Door
Continue selecting red blocks to chew through the rest of the chest and torso. As the red ants finish off the remaining required tiles, the Hungry Door counter hits zero and the massive wooden barrier vanishes from the board. This is the major turning point of the level. Removing the door opens a massive corridor along the right side, giving your colony direct access to the teal tiles, the right purple hood trim, and the lower edge of the hair. Your ants can now travel along both flanks freely.
Step 5: Deploy the connected boxes to devour the blonde hair
With the right corridor open, you can safely resolve the Connected Boxes resting in the bottom tray. Tap the linked orange pair to send worker ants surging into the golden hair tiles beneath the hood. Because these boxes are tethered together, they activate in tandem and direct a massive swarm into the yellow and orange strands across the forehead. The ants quickly tear through the bangs, breaking the barrier that separates the peach face from the upper hood.
Step 6: Consume the facial tiles and inner details
Now that the hair is largely cleared, the peach skin tiles, blue eyes, and pink cheek pixels are completely exposed. Select the peach block along with blue and pink blocks to send ants into the central portrait. The workers will systematically dismantle the facial features, leaving only the outer hood and the high background frame intact. Because the face consists of relatively modest tile counts, these blocks clear out of your waiting slots quickly, leaving plenty of breathing room for the endgame.
Step 7: Clear the massive purple hood across the top
With the center of the board completely hollowed out, turn your full attention to the large purple hood and cat ears. Select the heavy purple blocks from your tray. Large swarms of purple ants will march up through the hollow face cavity and attack the hood from the inside out, as well as along the outer left and right edges. Watch the block numbers tick down as the thick headpiece disappears. Ensure that you clear both ears evenly so your paths to the top border remain balanced.
Step 8: Clean up the outer teal frame and final stars
The final phase involves clearing the expansive teal background and the scattered yellow stars in the corners. Select the remaining teal blocks to deploy your ants along the outer perimeter walls. As the teal borders vanish, release your yellow and white blocks to pick off the remaining sparkle shapes. The worker ants will sweep across the empty canvas, consuming every last stray tile until the board is completely cleared and victory is achieved.
Why This Solution Works
The primary reason this solution succeeds is the strict prioritization of the Hungry Door. Leaving the door intact for too long chokes your colony by restricting all movement to the left side of the canvas. By dumping early red blocks into the cloak, you rapidly satisfy the door requirement of one hundred tiles. Once that obstacle is dismantled, the board transitions from a narrow bottleneck into an expansive double corridor layout where ants can enter from multiple angles.
Another crucial factor is holding back on the Connected Boxes until their matching food is actually reachable. Triggering linked boxes while their target tiles are buried behind other colors would instantly occupy two of your five waiting slots with zero ant movement. Waiting until the red cloak and lower borders are stripped away ensures that the moment those orange boxes enter the slots, the ants find open pathways directly to the blonde hair.
Finally, clearing from the center outward protects you from late game slot jams. By hollowing out the face and hair before tackling the thick upper hood and the wide teal border, you create a massive highway right through the middle of the board. Ants tasked with clearing the top cat ears and background stars never get caught behind lingering foreground pixels, allowing your final blocks to resolve smoothly without filling your tray.
Final Thoughts
Patience and path awareness are the two qualities that make Colony Flow Level 1140 manageable. As long as you focus on clearing the red cloak to banish the Hungry Door and resist the urge to tap the connected orange boxes prematurely, your waiting slots will remain open and functional throughout the puzzle. If you run into trouble timing a specific move or want to double check how the ants navigate through the opened corridors, be sure to watch the walkthrough video above for an exact visual demonstration.
Comments