
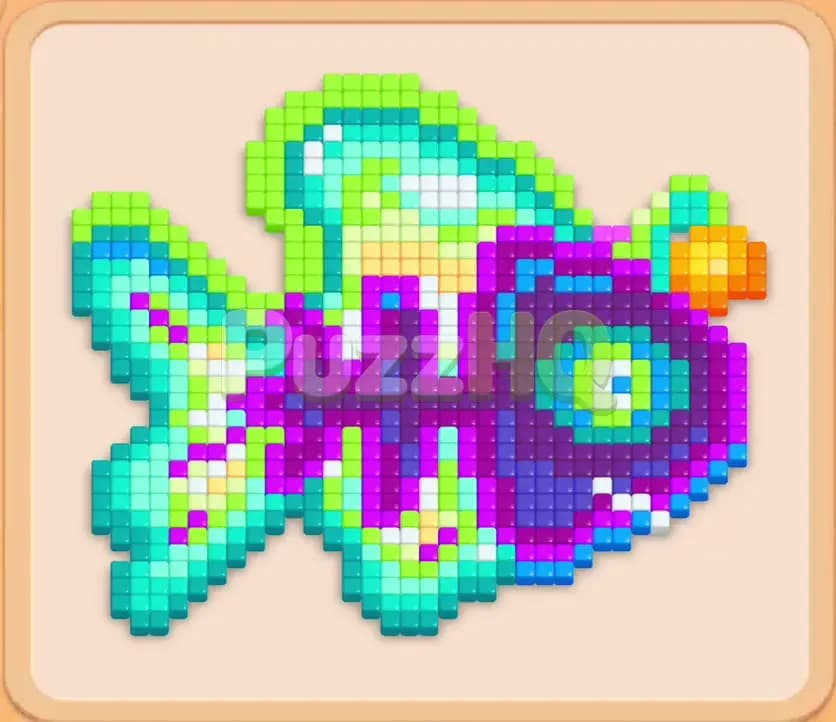
Colony Flow Level 1420 presents a vibrant pixel art challenge shaped like a glowing deep sea anglerfish skeleton. You face intricate layers of purple bone tiles, cyan fins, lime green accents, and a distinct orange lure dangling in front of the head. Success requires navigating tight waiting slots while managing connected blocks and coordinating your ant paths from the outside in.
Colony Flow Level 1420 Starting Setup
Reading the Board
The food board displays an elaborate anglerfish skeleton built from multiple bright colors. An orange lure floats just ahead of the mouth, acting as an isolated island of food that immediately catches your eye. Surrounding the creature is a framework of cyan and teal tiles outlining the tail, fins, and jaw. Inside that frame sits a dense structure of dark purple ribs, a thick spine, lime green highlights along the dorsal crest, and a prominent round eye socket made of cyan, blue, and white tiles.
Below the main play area sits the ant nest hole where your worker ants emerge. Beneath the nest you have five empty waiting slots, and further down is your selection tray packed with colored numbered blocks. The top layer of your tray shows white, purple, light green, and dark green blocks. Underneath these initial choices lie deeper layers containing cyan, blue, yellow, and special connected boxes that join two colored blocks together. Because ants must walk along clear corridors to reach matching food, the tightly packed skeleton blocks direct ant traffic around the exterior before inner routes become accessible.
What You Need to Watch Out For
Your biggest threat in this puzzle is slot congestion caused by premature color picks. You only have five waiting slots available at any time. When all five slots hold blocks that cannot send ants to active food tiles, your run ends immediately. The internal purple spine and ribs take up the bulk of the fish, but your ants cannot reach the center until you peel away the perimeter tiles.
Another major hurdle comes from the connected boxes resting in the lower tiers of the tray. Connected boxes force you to commit to linked colors simultaneously, which can suddenly take up two waiting slots in one move. If the board does not have open pathways to both colors of that linked pair, one of those slots becomes dead weight. You must carefully time when you uncover and grab these linked units so you never paralyze your ant workforce.
Colony Flow Level 1420 Step by Step Walkthrough
Step 1: Clearing the Angler Lure
Begin your run by addressing the forward tip of the fish where the orange lure hangs above the mouth. Select the top purple block and pull the orange connected block into play to dispatch orange ants directly toward the lure. The orange workers stream out from the nest, climb the right side perimeter, and swiftly chew through the orange bait tiles. Because this cluster contains relatively few tiles, the orange block depletes rapidly and disappears from your waiting slots, keeping your staging area open for the next phase.
While the orange ants finish their task, your purple ants begin chipping at the exposed jaw and frontal skull bones. This dual action gives you early momentum without cluttering your slots. Clearing the orange cluster clears the air space above the snout, creating an open junction where ants can turn inward toward the forehead and dorsal fin.
Step 2: Opening the Dorsal Fin
With the snout area cleared, focus on the upper crest of the fish. Select the white blocks and the lime green blocks visible on your tray to target the top dorsal fin. White and green ants march along the upper curve of the fish body, eating through the outer crest tiles. Watch the counters on your white and green blocks drop as the dorsal fin begins to hollow out.
As your workers consume the white highlights and green trim along the top, you expose the underlying cyan struts of the skeleton. Opening this top channel is crucial because it gives future ants a highway across the entire upper half of the board. Keep an eye on your waiting slots here, as you will likely have purple, white, and green blocks active at the same time. Ensure that every block in your tray has reachable food before you commit it to an empty slot.
Step 3: Digging into the Purple Spine
Once the dorsal fin has lost its outer coating, tap into the heavy purple blocks from your tray to send a massive swarm into the main skeleton. Purple ants flood through the snout and down into the central spine. They break apart the thick purple vertebrae and begin severing the vertical ribs that divide the body.
During this stage, your purple block counters will tick down steadily from thirty five toward zero. Clearing these central purple bones is what truly opens the board. Each rib that vanishes creates a cross bridge between the top fin and the lower belly. When the purple blocks run down their counts and vanish from your waiting slots, you gain vital breathing room to organize your next selections.
Step 4: Activating Connected Boxes
Now that central pathways are open across the fish, you can safely pull the connected boxes that sit in your middle tray layers. You will encounter linked pairs including yellow and cyan combinations as well as cyan and purple vertical units. Because the body cavity is now hollowed out, ants of both colors can find immediate routes to their targets.
Send your yellow ants after the small golden patches scattered along the spine base and tail, while your cyan workers attack the rib joints and jaw outlines. Watch the connected blocks sit side by side in your waiting slots as their numbers decrease together. Having clear lines of travel ensures that neither half of a connected box gets stuck waiting for an opening.
Step 5: Stripping the Ribs and Eye
With the connected blocks winding down, shift your attention to the large ocular socket and the remaining ventral ribs. Bring in your light green, blue, and remaining purple blocks from the tray. Workers swarm the circular eye, consuming the bright white pupil and the blue iris ring before devouring the surrounding cyan socket.
At the same time, ants travel down into the lower rib cage, clearing away the final purple fragments and freeing the lower belly outline. By the time this phase concludes, the anglerfish skeleton has been reduced to a clean, empty framework. Your waiting slots should clear out nicely as these moderate count blocks expire, leaving you with plenty of empty room for the endgame.
Step 6: Cleaning up the Outer Cyan Frame
The final phase leaves only the long curving arches of the outer cyan frame and the tail fin. Draw your remaining cyan blocks and any leftover blue blocks from the bottom tray. A massive wave of cyan ants pours out of the nest hole, splitting into two primary columns that travel up the left tail and along the outer spine perimeter.
Because no other colors remain on the board, every ant moves with complete efficiency along the cleared corridors. Watch the cyan numbers count down to zero as the last pixel tiles on the tail and dorsal arches disappear. Once the final tile is eaten, the board clears completely and you earn your victory on Colony Flow Level 1420.
Colony Flow Level 1420 Winning Strategy
The Most Important Moves
The defining decision in this level is clearing the upper dorsal fin and orange lure before attempting to hollow out the center. Many players make the mistake of pulling heavy purple and cyan blocks too early, hoping to blast through the thickest part of the skeleton right away. That approach backfires because the outer frame blocks ant entry into the deep ribs, leaving high count blocks sitting uselessly in your waiting slots.
Another critical factor is your timing on the connected boxes. You must resist touching linked pairs until the adjacent purple and green sections are gone. A connected box takes up two slots instantly. If even one color lacks an unobstructed path, you operate with only three usable slots for the rest of the midgame. Waiting until the spine breaks open guarantees that both colors can work simultaneously.
Keeping the Ants Moving
To maintain an uninterrupted flow, always check that you have at least one slot emptying out before you introduce a new color. In Colony Flow Level 1420, colors like white, orange, and yellow have relatively low total tile counts compared to purple and cyan. Use these low count colors as quick cycling blocks. They enter a slot, consume their small clusters, and exit within seconds.
Pairing one long term block such as purple with two rapid cycling blocks like white or green keeps your slots fluid. This rhythmic rotation prevents the dreaded five slot gridlock. Whenever you see three or four slots filled with slow draining numbers, stop drawing from the tray until at least one block finishes its run and clears a space.
Colony Flow Level 1420 Final Tips
Patience during the first minute makes all the difference when tackling this board. Take a moment before your first tap to trace where the ants will walk once they emerge from the nest. Since the nest sits low in the center, your workers naturally travel along the bottom edges first. Make sure your color picks align with paths that are physically reachable rather than food tiles trapped behind solid bone walls.
Keep a close eye on your tray depth as well. Uncovering a needed block often requires clearing the block directly above it. Plan two moves ahead so you know which color will be revealed next, and avoid leaving high number blocks stranded without active paths.
If any pathing angle or connected box timing feels difficult to visualize as you play, you can watch the complete walkthrough video above this article to see every move executed in real time.
Comments