
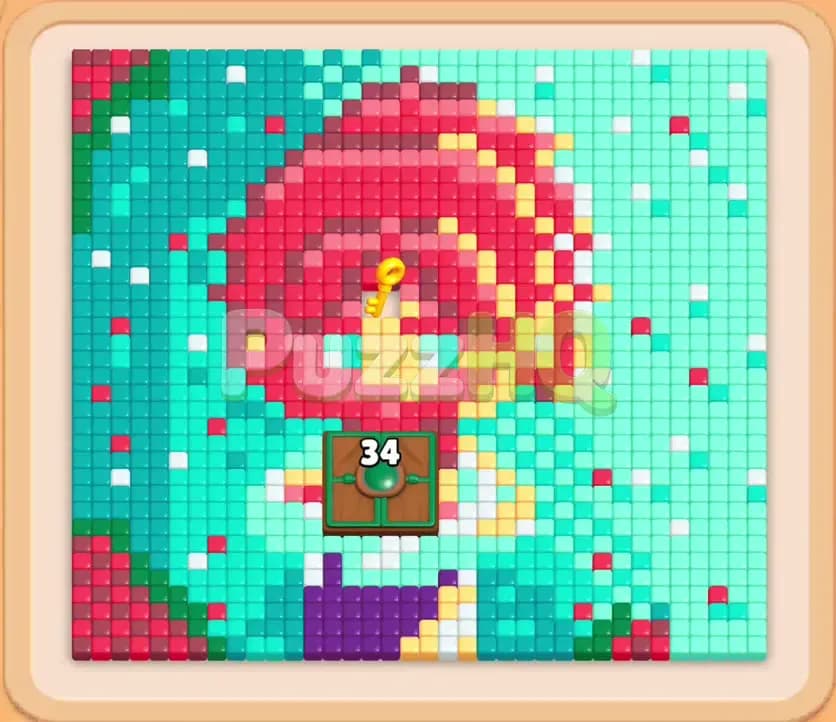
Colony Flow Level 1430 presents a dense portrait puzzle featuring a girl with vibrant crimson hair against a dual teal and forest green backdrop. The challenge revolves around managing high value color blocks while coordinating around multiple obstacles including a stubborn Hungry Door right in the center and a locked block that requires retrieving a golden key from the character forehead. What makes this solution so satisfying is the delicate balance between carving wide paths along the outer perimeter and saving just enough space in your waiting slots to deploy double wide Connected Boxes without hitting a game ending jam.
Colony Flow Level 1430 Starting Setup
Reading the Board
When you first look at the board on Colony Flow Level 1430, you are faced with a detailed pixel art portrait composed of several distinct color zones. The exterior of the image is dominated by light teal tiles along the right flank and dark forest green tiles along the left flank. In the upper portion of the frame, rich crimson and pink hair frames the face, highlighted by golden yellow locks that sweep across the top. Right at the center of the forehead rests a bright golden key icon embedded directly into the yellow food tiles. Below the face sits a green Hungry Door stamped with the number thirty four, guarding the royal purple shirt tiles clustered at the base of the image.
Down in your block selection tray, you start with five active columns holding numbered tiles. The visible top row features a white twenty five, dark red sixteen, pink nineteen, a teal twenty five linked to another teal twenty five directly beneath it as Connected Boxes, and a yellow nineteen. Just beneath the surface, you can spot additional reds, teals, whites, and browns, along with a locked yellow block in the fourth column marked with a prominent padlock. Above the tray sit your five empty waiting slots, ready to accept tiles as you order your colony forward.
What You Need to Watch Out For
The primary threat on this stage is slot congestion caused by premature picks. Because the Connected Boxes occupy two waiting slots at the same time and require both connected teal blocks to deplete together, picking them when the teal tiles on the board are blocked will instantly choke your capacity. Furthermore, the yellow locked block in your tray cannot be tapped until your ants physically path to the golden key embedded in the girl hair and collect it.
If you rush to clear colors that only expose minor slivers of the board, your waiting slots will quickly fill up with stagnant blocks that have no reachable targets. You have to peel away the outer perimeter colors first, opening wide highways from the perimeter so ants can steadily chew through their targets without getting stuck behind walls of unselected food.
Colony Flow Level 1430 Step by Step Walkthrough
Step 1: Peeling Back the Exposed Edge Tiles
Begin your run by targeting the unobstructed colors along the borders. Tap the dark red sixteen and the pink nineteen from the front of your tray. Ants will stream out from the lower nest and march up along the left flank, nibbling at the loose red hair strands and the outer pink crown. While those ants begin chewing away, tap the white twenty five to target the stray white flecks scattered throughout the background field.
Selecting these initial blocks immediately frees up deeper slots in your tray, revealing a dark red twenty five and a purple thirty. Your waiting slots will temporarily hold the working red and pink blocks as their counters tick down. Watch the numbers drop steadily, sixteen falling to eleven, then eight, while the white block begins eating up loose pixels across the upper expanse. Because these tiles lie on open outer boundaries, the ants encounter zero obstructions, keeping your slot turnover smooth and predictable.
Step 2: Tunneling Through the Crown and Uncovering the Golden Key
With the outer edges softened, it is time to press into the main cluster of the girl hair. Select the dark red twenty five and the light red blocks that became accessible in the lower tray rows. As the red ants chew deeper into the thick crimson skullcap, they begin carving clear channels toward the yellow bangs.
Your waiting slots will now hold your active red and pink blocks, reducing down from five to four and then clearing out. As the crimson perimeter collapses inward, you expose the outer fringe of the yellow hair on the upper right side. Do not touch the yellow blocks in your tray just yet. Instead, pull the available pink nineteen to maintain forward momentum. The ants will hollow out the dome of the head, opening a direct visual route right down to the forehead where the golden key sits nestled between yellow tiles.
Step 3: Deploying the Connected Teal Blocks
Now that wide avenues exist across the right side of the board, shift your focus to the massive ocean of teal food tiles. Select the Connected Boxes from your tray, which features two linked teal blocks. These two blocks slide up into your waiting slots side by side, bound together by their physical connector bar.
Immediately, a massive swarm of cyan and teal ants rushes up the right border. They swarm the entire eastern coastline of the portrait, rapidly shaving down the block counters from twenty five down to eighteen, twelve, and eventually four. Taking this action at this specific moment is critical because the expansive teal field gives the connected ants plenty of room to eat without stalling. As these large teal numbers drop, you expose the edge of the central Hungry Door from the right, while also uncovering new yellow and white blocks in your tray.
Step 4: Collecting the Key and Releasing Yellow Ants
With the Connected Boxes steadily draining in your waiting slots, select the yellow nineteen from your tray. Yellow ants immediately travel through the newly excavated crown at the top of the portrait and converge on the blonde locks framing the character eyes. As the yellow workers strip away the food tiles surrounding the forehead, they make contact with the golden key icon.
Collecting the key instantly triggers an unlock animation down in your tray. The padlock over the yellow block shatters, granting you full access to tap it whenever you need. Bring that newly unlocked yellow block into play right away. The yellow swarm will finish vacuuming up the eye highlights and the remaining hair ribbon, entirely clearing the upper half of the head and ensuring your yellow counters hit zero without occupying precious waiting space for long.
Step 5: Breaking Down the Central Hungry Door
By this stage, your Connected Boxes will have dwindled down to single digits before finally popping and leaving your waiting slots wide open. Now you must direct your colony toward the green Hungry Door resting directly beneath the character chin. The door starts with a high requirement of thirty four food tiles cleared.
Select the accessible teal twenty four and the purple blocks from your tray. As your ants clear surrounding food tiles across the lower neck and cheek regions, the green counter on the Hungry Door rapidly descends from thirty four down to sixteen, and finally crumbles away completely. When the Hungry Door breaks, the barrier vanishes, exposing a dense cluster of deep purple shirt tiles that were previously locked away from all ant movement.
Step 6: Clearing the Remaining Purple and Green Clusters
With the Hungry Door completely destroyed, tap the purple thirty from your tray. Purple ants swarm directly into the base of the portrait, tearing through the collar and shirt tiles with zero resistance. Simultaneously, bring in the forest green and remaining teal blocks from your tray to mop up the dense green field on the far left.
Your waiting slots will comfortably hold the purple and remaining teal counters as they tick down from thirteen to two, and finally to zero. Ants will strip away the final stubborn pixels from the outer green crescent and the bottom edge of the frame. Once the last teal and purple flecks disappear down the ants path, the entire wooden board is left totally pristine, completing the level.
Colony Flow Level 1430 Winning Strategy
The Most Important Moves
The defining turning point of this level is the exact moment you activate the Connected Boxes. Beginners often tap linked blocks the second they see them in the tray, but doing that early on this stage would force two bulky teal blocks into your waiting slots while the teal field is still cramped. By waiting until the outer crimson hair and edge teal pixels were opened up, you ensure that the linked blocks have an endless buffet of tiles to consume without pausing.
The second vital sequence is using the crown of the head to reach the golden key. You cannot unlock the restricted yellow block in your tray through normal tile clearing. You must clear the dark red hair tiles directly above the forehead to build a safe runway for the ants to grab the key. Reaching that key on schedule prevents you from getting stuck with an unusable tray column when yellow is desperately needed.
Keeping the Ants Moving
To prevent the dreaded five slot gridlock on Colony Flow Level 1430, you must practice strict color discipline. Never tap a block from your tray if the corresponding color tiles on the board are walled off by another shade. For example, picking purple while the Hungry Door is still sealed will leave a dead purple block sitting uselessly in your waiting tray for multiple minutes, cutting your functional slot limit down from five to four.
Always prioritize picks that immediately generate high traffic ant flow. Watching the numbers on your blocks drop rapidly is your indicator that you made the right call. If you notice a block counter stalling for more than a couple of seconds, stop picking new colors and let your existing ants carve out the blockage before introducing another tile to the waiting bench.
Colony Flow Level 1430 Final Tips
When you tackle this puzzle on your own device, keep a close eye on the countdown display on the green Hungry Door. It requires thirty four tiles to vanish from adjacent zones before it unlocks the purple shirt below. Planning your moves so that your teal and red ants naturally chip away at this counter will save you from having to make desperate, wasteful picks near the endgame.
Pay extra attention to the physical layout of your bottom tray. You can preview upcoming colors by looking at the stacked blocks beneath the top row. Always plan two moves in advance so that clearing a low number block exposes a high value color that already has an open path waiting on the board.
If any pathing choice or block selection in this guide feels tricky to visualize during your own attempt, take a moment to watch the complete video walkthrough above the article to see the exact ant routes in action.
Comments