
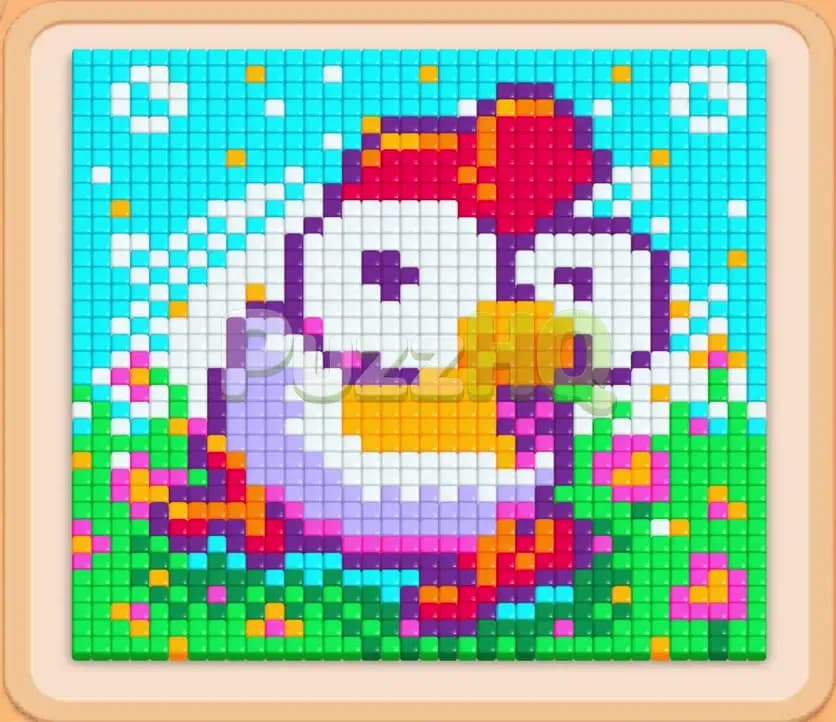
Colony Flow Level 1640 presents a vibrant pixel art puzzle featuring a colorful rooster perched atop a flowering nest. The challenge lies in managing a dense cluster of exterior cyan sky tiles and intricate multicolored details across the chicken figure. Clearing this layout requires careful coordination of your waiting slots and smart management of linked blocks to keep your ant colony moving without interruption.
Colony Flow Level 1640 Starting Setup
Reading the Board
The puzzle board displays an elaborate pixel art image of a rooster resting in a grassy flower patch. The outer border consists of bright cyan sky tiles that envelope the top and sides of the canvas. The rooster itself features a large red comb on top of its head, a bright orange beak, white feathers across its face and belly, purple accents defining its wings and body shadows, and a green patch filled with pink and yellow floral accents along the base.
Beneath the board sits the ant nest, along with five open waiting slots and the block tray. The top row of your tray holds multiple numbered cyan blocks alongside white and green options. Deep in the lower rows, you will find Connected Boxes linked by solid bridge bars. These linked boxes must be handled together, meaning they claim multiple waiting slots at the exact same moment.
What You Need to Watch Out For
The primary hazard in this level is slot congestion caused by early color mixing. Because the outer cyan sky tiles completely surround the upper rooster, you cannot reach the inner red, purple, and orange tiles until substantial perimeter space is eaten away. If you draw colorful blocks from the lower rows before their matching food tiles are exposed, those blocks will sit idle in your waiting slots.
Having five waiting slots gives you reasonable flexibility, but Connected Boxes can consume two slots in a single tap. If your slots fill up with colors that have no open food paths, your ant flow stops instantly and you fail the stage. Your priority must always be clearing the open exterior borders first, then steadily working into the rooster core as paths open up.
Colony Flow Level 1640 Step by Step Walkthrough
Step 1: Clear the Sky Border with Cyan and White Blocks
Begin by selecting the cyan blocks from the top row of your tray. A cyan block with a count of twenty sends a steady stream of cyan ants pouring from the nest toward the wide sky area. Follow this up by tapping additional cyan options to expand the clearing along the upper left and top edges.
As the sky tiles vanish, the outer contours of the rooster head and comb emerge. Now tap the white forty block to unleash white ants against the large cluster of white face tiles. By deploying cyan and white together, your ants chew through two major regions simultaneously. The numbers on your cyan blocks drop toward single digits while white ants carve deep into the rooster forehead. Keep an eye on your waiting slots and let the cyan blocks finish emptying completely before introducing new colors.
Step 2: Attack the Floral Base with Magenta and Red Blocks
With the upper borders receding and the top comb partially uncovered, your next target is the base of the image. Tap the magenta twenty seven block and the red thirty block from the newly exposed tray row. Magenta ants will rush toward the pink flowers nestled in the greenery, while red ants climb straight up to eat the exposed tips of the rooster comb.
Next, bring in an orange block to target the beak and lower nest accents. You will notice your waiting slots filling up during this phase, with red, magenta, orange, and purple blocks all active at once. Do not panic as long as every active block has ants actively moving on the board. The purple ants will begin eating the dark feather outlines, and the magenta ants will quickly finish their floral targets, freeing up critical slot space.
Step 3: Remove the Green Grass Lawn
Once the magenta flowers disappear and the comb shrinks, the bottom green grass becomes fully accessible. Tap the green eighteen block and the supporting green thirty blocks from the tray. Green ants swarm the bottom right and left corners, chewing away the dense lawn tiles that support the rooster.
At the same time, select any remaining cyan blocks to clean up lingering sky pixels along the side edges. The green blocks clear rapidly because the lawn is wide open with no obstacles blocking the path from the nest. As the green numbers drop to zero, those blocks vanish from your waiting slots, creating much needed room for the complex mid game transitions.
Step 4: Deploy Connected Orange Blocks for the Beak and Feet
Now that the perimeter lawn and sky are completely cleared, the board focus shifts entirely to the rooster body. The tray reveals Connected Boxes joined by a bridge bar. Tap the connected pair of orange blocks to place both into your waiting slots simultaneously.
Because the orange beak and lower foot pixels are completely unobstructed, orange ants deploy in heavy numbers. They swarm the central beak and the orange toes at the bottom of the bird. Watch the block counts count down in unison as both connected segments clear together. While the orange ants work, deploy a white block to keep chewing through the chicken breast and lower belly feathers.
Step 5: Dismantle the Red Comb and Chest
The rooster head is now stripped of its sky backdrop, leaving the tall red comb fully exposed. Tap the red forty block from the tray. A heavy wave of red ants marches straight up through the central clearing to consume the bright red crown atop the bird.
Pair this move with another white block to finish dissolving the white belly. The rooster now looks like a floating skeleton of purple outlines, orange accents, and fading red crest tiles. By concentrating your active slots on red and white, you prevent slot clutter and ensure that the ants make rapid progress across both zones without bumping into closed paths.
Step 6: Clear the Final Purple Outlines and Orange Remnants
Only the dark purple feathers, wing shadows, and a few scattered orange tiles remain on the board. Tap the final connected purple blocks from the bottom of the tray. Linked purple ants emerge from the nest and spread outward along the delicate wing outlines and eye details.
Select the final small orange block to send ants after the last two beak pixels and foot segments. With white, red, and green completely gone from the board, every single ant path is wide open. The purple ants quickly strip away the dark feather edges, while the orange ants collect the final scraps. When the last pixel tile disappears, the board clears and victory is yours.
Colony Flow Level 1640 Winning Strategy
The Most Important Moves
The defining turning point in Colony Flow Level 1640 is the transition from the outer cyan border to the interior floral base. Many players fail because they get excited by the high value purple and red blocks in the lower tray and pull them before the board has opened wide enough paths. If you pull purple or red while the sky is still full, those ants have to squeeze through narrow gaps, which slows down clearing rates and clogs your waiting slots.
Equally critical is how you handle the Connected Boxes. Because linked blocks occupy two waiting slots at the same time, you must only select them when you have at least three empty slots available and the target color is wide open. Deploying the connected orange blocks only after the green grass and lower borders were gone ensured that the orange ants had direct, immediate access to the feet and beak without stalling.
Keeping the Ants Moving
Maintaining smooth ant flow on this board requires balancing wide area colors against precise detail colors. Cyan, white, and green represent bulk colors that have dozens of connected tiles. Red, magenta, and orange represent detail colors clustered in smaller pockets.
Whenever you place a detail color into your waiting slots, always pair it with a bulk color that is actively draining. For instance, pairing the red comb block with the large white body block ensures that even if the red ants take a moment to climb to the top, the white ants are constantly emptying their block and keeping your slot turnover high. Never load your slots with five detail colors simultaneously, as that creates a high risk of total gridlock.
Colony Flow Level 1640 Final Tips
When you play through Colony Flow Level 1640, pay close attention to the order in which blocks drop down through your tray columns. As upper cyan and white blocks are picked, they reveal vital colors underneath. Always plan two moves ahead by glancing at the numbers sitting beneath your current options. If you see a connected pair approaching the surface, make sure you clear out simple single blocks first so you have plenty of slot room ready.
Keep an eye on the pathing of your ants as they exit the central nest hole. Ants take the shortest open line toward their matching color. By clearing the bottom lawn early, you create wide highways that let ants reach the upper comb and head much faster than if they had to crawl around stubborn obstacles.
If any transition in this walkthrough feels tricky or your ants seem to stall on a specific color group, take a moment to watch the gameplay video above this guide. Seeing the exact timing of the tray selections in motion will help you replicate this clean win with total confidence.
Comments