
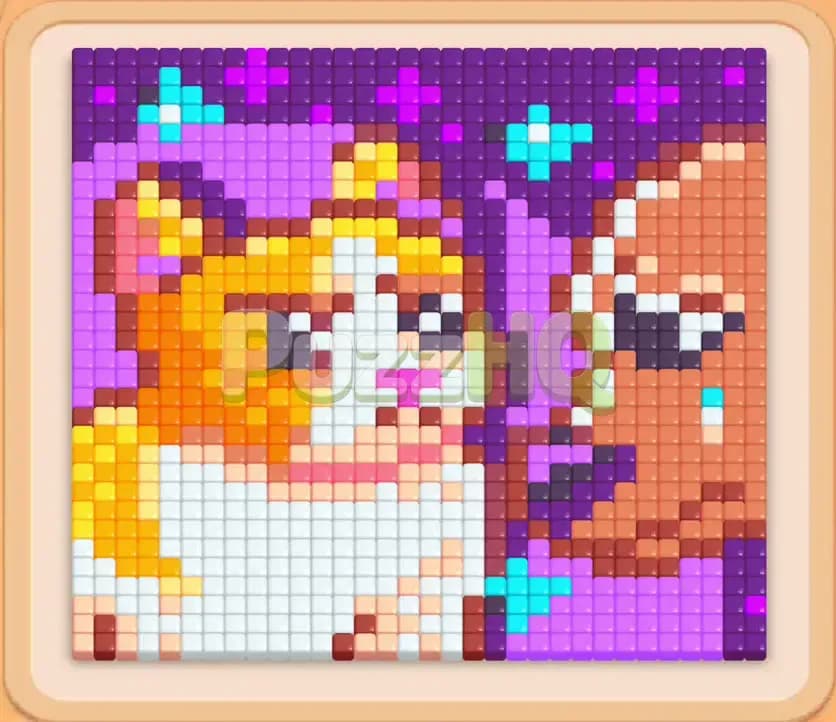
Colony Flow Level 1937 brings a vibrant challenge that will test your patience and your ability to manage crowded spaces. You are tasked with dismantling a massive pixel portrait of a charming cat in a purple witch hat sitting right beside a bald companion. With five waiting slots at your disposal and multiple twin blocks that take up two slots at once, one careless tap can lock your entire board and force a quick restart.
Colony Flow Level 1937 Overview
What You Are Working With
The upper half of your screen displays a large pixel canvas full of distinct colors. You will see a ginger and white cat wearing a pointed purple hat, complete with bright cyan sparkles shining around the brim. Beside the cat sits a companion rendered in warm tan and peach shades, wearing dark spectacles. A deep purple background fills the spaces between the characters.
Beneath the portrait sits the ant nest, from which your colony emerges to feed on matching tiles whenever you open a viable path. Below the nest are five empty waiting slots. These slots hold any block you pull from the lower tray until the ants finish consuming the corresponding color from the board.
The lower tray contains your supply of colored numbered blocks arranged in overlapping rows. This level introduces Connected Boxes, which link two colored blocks together with a solid bridge. In this layout, you will deal with pairs that combine orange and yellow blocks. Selecting a connected pair moves both blocks into your waiting slots simultaneously, instantly taking up two of your five available spots. You also have a Hidden Box buried in the lower tray marked with a question mark. This mystery box keeps its true color secret until you clear away the blocks resting on top of it.
What It Takes to Clear Level 1937 Board
Clearing the board on Colony Flow Level 1937 requires you to eliminate every single food tile from the pixel portrait until nothing remains. Your primary danger throughout the entire run is the five slot limit. When all five waiting slots fill with blocks and your ants have no reachable tiles of those colors to eat, the board jams and you lose the game immediately.
To prevent this sudden defeat, you must only pull blocks whose matching food tiles are currently exposed on the canvas. Connected Boxes demand extreme caution because they immediately consume two slots. If you pull a connected pair while three other slots are already occupied, you will instantly fill your holding area. If either color in that pair lacks open food tiles, your run ends right there. You must dismantle the portrait from the outer edges inward, clear away the protective dark outlines, reveal the hidden mystery box safely, and maintain at least one open slot as an escape route at every stage.
Colony Flow Level 1937 Step by Step Solution
Step 1: Feed the exposed orange fur and outer purple rim to open immediate paths
Begin by pulling the orange 14 block and the purple 15 block from the front row of your tray. Orange food tiles are directly open along the left cheek and side of the cat, allowing the ants to stream out of the nest hole without delay. At the same time, purple ants climb straight toward the upper left corner to nibble on the brim of the witch hat. Watching these two colors activate right away guarantees that your waiting slots start clearing immediately. The orange counter begins dropping rapidly, and the purple counter ticks downward, keeping your board alive while exposing deeper tile layers on the cat face.
Step 2: Deploy the connected yellow and orange pair while both fur colors remain exposed
Now that the outer fur is open, tap the connected pair containing yellow 15 and orange 11. This linked unit shifts directly into two waiting slots, but because both orange and yellow tiles are completely accessible on the cat body and forehead, two separate ant streams start feeding at once. The orange counter drops from 11 down toward 2, while the yellow counter steadily decreases as the ants consume the yellow fur patches. By committing this double block early while matching food is abundant, you prevent it from becoming an awkward burden later when canvas space shrinks.
Step 3: Remove the dark outlines using the black block to reveal the interior features
Select the black 11 block from your tray to direct ants toward the dark sunglasses, eye details, and character borders. Black tiles create a wall across the center of the artwork, shielding several interior sections of white and peach food. As the black counter winds down from 11 to 5 and then vanishes completely, the dark barrier dissolves. This opens up clear paths toward the white whiskers, the cat chest, and the peach skin tones of the companion. Clearing black also vacates a waiting slot, giving you breathing room for your next sequence.
Step 4: Clear the white chest fur and peach skin to expose the lower tray layers
Bring in the white 10 block and the peach 16 block into your open waiting slots. The ants immediately rush toward the lower half of the canvas, eating the large cluster of white tiles that make up the cat chest and paws, while another group attacks the peach face on the right side. The white block ticks down to 7, and the peach count steadily falls toward zero. As these large light patches disappear, the bottom half of the pixel portrait clears out, which allows you to access new rows in your block tray without jamming your waiting rack.
Step 5: Uncover the hidden box by clearing obstructing pink and purple tray blocks
Focus your attention on the tray to free the hidden box marked with a question mark. Pull the pink 4 block and the adjacent purple block that sit directly above it. The pink ants quickly clean up the small nose and ear accents on the cat, while the purple ants continue gnawing at the large witch hat. With the path completely clear in the tray, the mystery box reveals its hidden color and becomes available for selection. Make sure you keep at least one waiting slot completely empty during this transition so you never risk an accidental board lock.
Step 6: Bring in the second connected pair and collect the cyan sparkles
Tap the second connected yellow and orange unit, which enters the waiting area alongside a fresh white block. The yellow count starts at 11, working on the upper ears and hat trim, while the white ants finish off the remaining chin tiles. While these streams do their work, pull the cyan block to gather the bright magic sparkles floating around the witch hat. Because cyan tiles sit on the outer surface of the artwork, the ants reach them instantly, draining the cyan counter in seconds and freeing up that waiting slot before your connected pair finishes.
Step 7: Dismantle the purple witch hat and wizard cloak with high capacity blocks
With the lower character details mostly cleared away, the bulk of the remaining canvas consists of the dark purple hat and the companion cloak. Pull the purple 20 block from the tray into your free slot. A massive stream of purple ants marches up the sides of the board, chewing through the thick clusters of hat tiles. The purple counter drops steadily from 20 down into single digits. Continue feeding this stream by pulling secondary purple blocks as slots open up, gradually carving the massive hat down to just a few stray pixels along the top border.
Step 8: Clear the final peach highlights and sweep the remaining purple perimeter tiles
Finish the level by pulling the remaining light peach block and the final purple 3 block into your waiting slots. The peach ants swiftly take care of the last two cheek pixels floating in the center of the frame. Meanwhile, purple ants run along the outer perimeter edges, picking off the very last scattered purple blocks near the top of the canvas. As the final purple counter hits zero, the last pixel vanishes from the screen, your waiting slots clear completely, and the level completes successfully.
Final Thought
Colony Flow Level 1937 requires sharp awareness of how much space you have left, especially when connected pairs take up two valuable waiting slots in one move. Always verify that both colors of a linked block have open food tiles on the board before you tap them, and never let all five slots fill without an active ant path. If any transition in this guide feels tricky to picture in your head, watch the walkthrough video above to see every single move executed in real time.
Comments